Bathroom Safety Checklist for Seniors: Zone-by-Zone Hazard Assessment with Tiered Action Priorities
The bathroom is the most dangerous room in the home for older adults, and this zone-by-zone checklist — grounded in CDC STEADI and occupational therapy frameworks — gives family caregivers an immediately actionable reference with tiered priorities, condition-specific guidance, and funding information to reduce fall risk whether responding to a recent incident or planning ahead.

Why the Bathroom Is the Highest-Risk Room in the Home
Falls are the leading cause of injury death among older adults in the United States. In 2024, 43,020 people aged 65 and older died from preventable falls, and in 2023, more than 3.85 million were treated in emergency departments for fall-related injuries — a 38% increase over the previous decade. Roughly 1 in 4 adults aged 65 and older falls each year, and falling once doubles the risk of falling again.
Within the home, the bathroom concentrates more fall hazards per square foot than any other room: wet surfaces, abrupt level changes at the tub threshold, confined turning space, and the physical demands of transferring on and off the toilet. A 2014 study (PMC4700929), cited by occupational therapists at FOX Rehabilitation, found that bathroom falls are twice as likely to result in injury compared to falls in other areas of the home. Widely cited estimates — including one attributed to UCLA Health — suggest that up to 80% of in-home falls among older adults occur in or near the bathroom, though this figure should be understood as directional rather than a single-study finding.
These numbers make a strong case for treating the bathroom as its own dedicated safety project — not a single line on a whole-home checklist. The zone-by-zone structure below mirrors how an occupational therapist actually walks through a bathroom assessment, and the priority tiers translate the findings into decisions you can act on today, this month, or as part of a planned renovation.
How to Use This Checklist: Crisis Scan vs. Full Planned Assessment
This checklist is designed to serve two different situations. Choose the approach that matches where you are right now.
- Responding to a fall or near-miss: Go directly to the zone where the incident occurred. Complete every Tier 1 item in that zone the same day. Then work through the remaining zones at a pace you can sustain.
- Planning ahead for aging in place: Work through all six zones in order during a single walkthrough. Flag every item that needs attention, then schedule Tier 2 items within 30 days and Tier 3 items as part of a longer renovation plan.
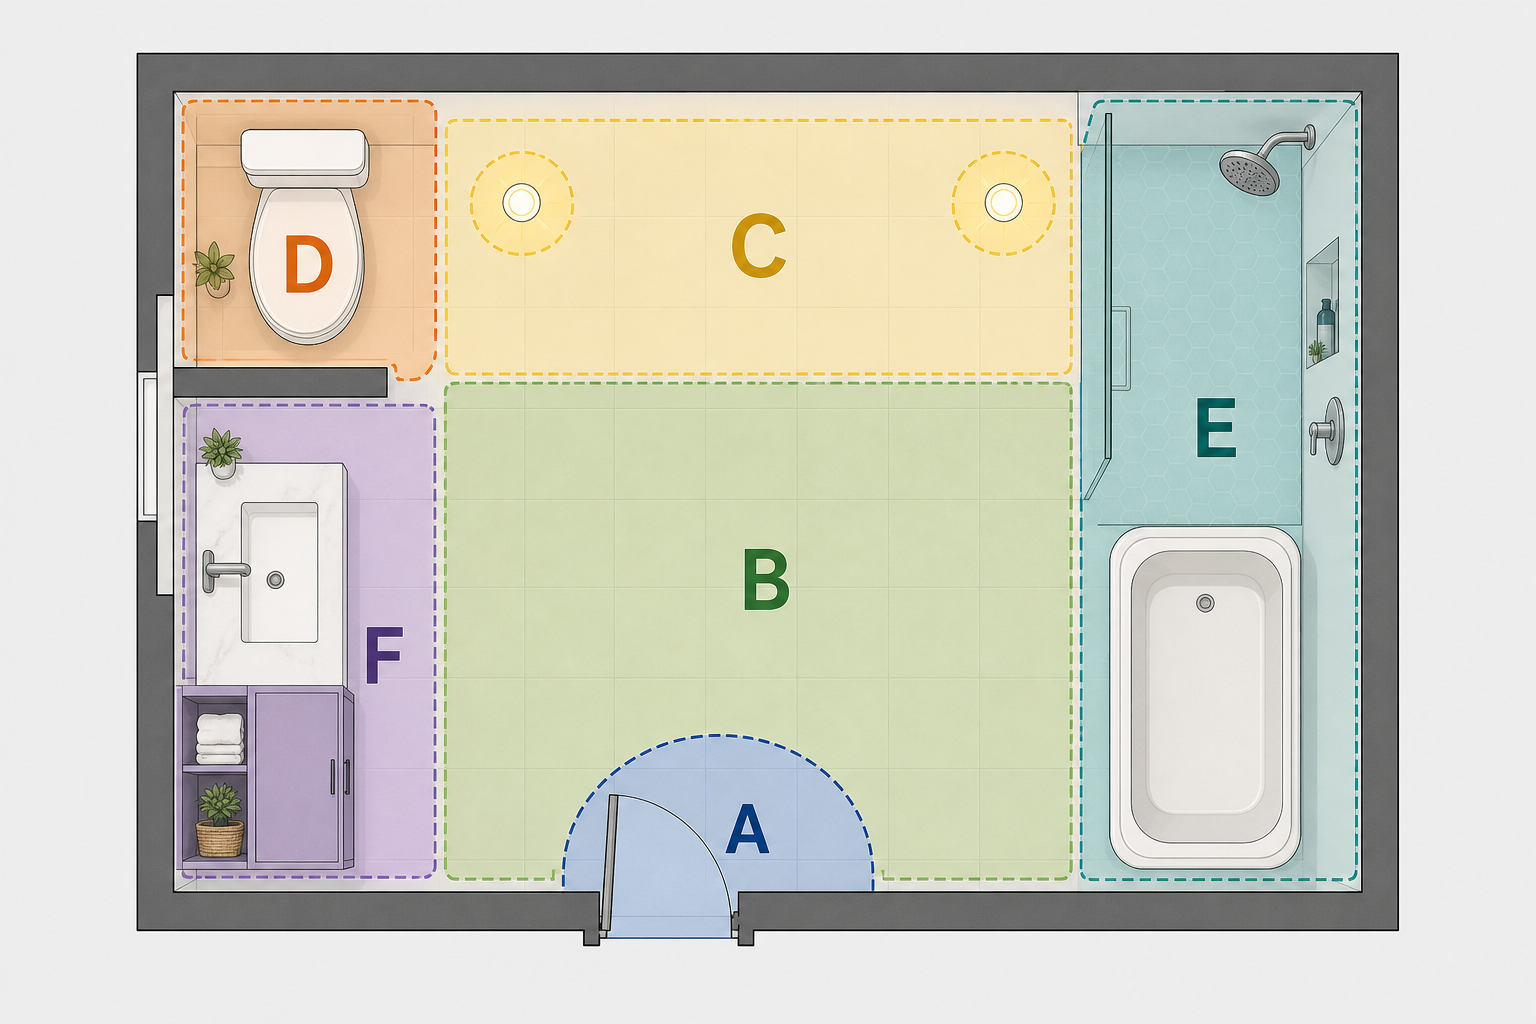
The six zones follow the physical path through the bathroom: Zone A (Entry and Door), Zone B (Flooring), Zone C (Lighting and Night Path), Zone D (Toilet Area), Zone E (Shower and Tub), and Zone F (Sinks and Storage). Each item in the checklist is assigned a priority tier — Tier 1 for same-day, low-cost actions; Tier 2 for modifications that require installation within 30 days; and Tier 3 for planned structural changes.
Zone-by-Zone Bathroom Safety Checklist
Zone A: Entry and Door
| Hazard | Recommended Fix | Priority Tier |
|---|---|---|
| Door swings inward — can trap a fallen person against the door | Rehang door to swing outward, or replace with a pocket door or barn-door design | Tier 2 |
| Doorway too narrow for walker or wheelchair | Measure doorway width against the mobility device; install offset ('swing-clear') hinges to gain approximately 2 inches of clearance without structural work | Tier 2 |
| Round knob requires grip and twist to operate | Replace with a lever-style door handle operable with a closed fist or wrist | Tier 1–2 |
| No clear turning radius inside the bathroom for mobility aid users | Evaluate whether door removal with a privacy curtain would provide adequate clearance; structural widening is a Tier 3 project | Tier 3 |
Zone B: Flooring
| Hazard | Recommended Fix | Priority Tier |
|---|---|---|
| Throw rugs or small area rugs on any bathroom surface | Remove all throw rugs immediately — they are among the most consistently cited fall hazards in CDC, NIA, and OT guidance | Tier 1 |
| Smooth tile with no wet-surface slip resistance | Apply adhesive non-slip strips in the tub, shower, and on tile floors adjacent to the tub or shower exit | Tier 1 |
| Tile flooring with a DCOF (Dynamic Coefficient of Friction) rating below 0.42 | When replacing tile, specify flooring with a DCOF rating above 0.42, which indicates adequate slip resistance when wet | Tier 3 |
| Loose or curling bath mat edges | Replace with a mat that has a full non-slip backing and no raised edges; recheck monthly for wear | Tier 1 |
Zone C: Lighting and Night Path
| Hazard | Recommended Fix | Priority Tier |
|---|---|---|
| Dim overhead lighting — a 60-year-old needs approximately three times more light than a 20-year-old to see clearly | Replace bulbs to achieve 800 or more lumens per fixture; choose cool white bulbs in the 3500K–4100K color temperature range for best contrast visibility | Tier 1 |
| No lighting on the path from bedroom to bathroom at night | Install motion-activated nightlights along the bedroom-to-bathroom path and at the bathroom entrance | Tier 1 |
| Bathroom completely dark when entering at night | Leave the bathroom light on at night, or install a motion-activated light inside the bathroom that activates automatically | Tier 1 |
| Light switches hard to locate in the dark | Add glow-in-the-dark switch plates or illuminated rocker switches at all bathroom entry points | Tier 1 |
Zone D: Toilet Area
| Hazard | Recommended Fix | Priority Tier |
|---|---|---|
| No support for sit-to-stand transfers from the toilet | Install a horizontal grab bar on the wall beside the toilet at 33–36 inches above the floor — the ADA standard range that accommodates most adults | Tier 2 |
| Toilet seat height too low, requiring significant knee and hip flexion to stand | Add a raised toilet seat (available in 2-inch, 4-inch, and 6-inch height increments) to reduce the effort of standing; choose a model with arms for additional transfer support | Tier 1–2 |
| Toilet inaccessible due to illness or recovery, or senior is confined to bedroom | A 3-in-1 commode — which functions as a raised seat with arms over the toilet, a bedside commode, or a free-standing toilet — qualifies as Medicare-covered durable medical equipment when medically necessary and prescribed by a physician | Tier 2 |
| Towel bar used as a grab bar | Remove reliance on towel bars for support — they are not load-rated for body weight and will pull from the wall; replace with a properly mounted grab bar | Tier 1 (remove reliance); Tier 2 (install bar) |
Zone E: Shower and Tub
| Hazard | Recommended Fix | Priority Tier |
|---|---|---|
| No support when stepping over the tub threshold — the most common single fall cause in the bathroom | Install a vertical grab bar at the tub or shower entry point for stepping in and out; a tub transfer bench eliminates the need to step over the threshold entirely | Tier 2 |
| No stability support while standing in the shower or tub | Install a horizontal grab bar on the long wall of the shower or tub at 33–36 inches above the floor | Tier 2 |
| No seating option in the shower or tub | Select seating based on the user's transfer ability: a tub transfer bench for users who cannot safely step over the threshold; a shower chair with arms for users who need seated stability; a shower stool for smaller spaces; a rolling shower wheelchair for non-ambulatory users | Tier 2 |
| Fixed showerhead requires standing and reaching | Replace with a handheld showerhead on a 6-foot flexible hose — allows seated bathing and full-body rinsing without repositioning | Tier 2 |
| Grab bar diameter outside ADA range | Choose grab bars with a diameter of 1.25 to 1.5 inches, which meets ADA standards and provides a secure grip | Tier 2 |
Zone F: Sinks and Storage
| Hazard | Recommended Fix | Priority Tier |
|---|---|---|
| Round faucet handles require grip and twist — difficult with arthritis or reduced hand strength | Replace with lever-style faucets operable with a wrist or forearm | Tier 2 |
| Water temperature not regulated — scalding risk for seniors with reduced temperature sensation | Install an anti-scald tempering valve (look for ASSE 1070 certified devices) set to a maximum of 120°F; verify temperature at the tap with a thermometer | Tier 2 |
| Frequently used items stored at floor level or above shoulder height — requires bending or reaching | Relocate daily items (soap, toothbrush, medication) to hip-to-shoulder height; use over-toilet shelving to keep surfaces clear and reduce floor clutter | Tier 1 |
| Floor clutter near sink creates trip hazard | Clear all items from the floor; use wall-mounted or over-toilet storage to keep the floor path unobstructed | Tier 1 |
Priority Tiers: What to Do Today, This Month, and Over Time
After a fall or near-miss, the number of items on a checklist can feel paralyzing. The three-tier framework below converts the zone checklist into a decision sequence — so you know exactly what to do first, what to schedule, and what to plan.
| Tier | Timeframe | Actions | Estimated Cost | Notes |
|---|---|---|---|---|
| Tier 1 | Same day | Remove all throw rugs; add adhesive non-slip strips in tub and shower; install motion-activated nightlight on bedroom-to-bathroom path; verify water temperature does not exceed 120°F; relocate daily items to accessible height; clear floor clutter | $0–$50 | No installation required; all items are removable or plug-in; complete before the next bathroom use after a fall |
| Tier 2 | Within 30 days | Install grab bar beside toilet (stud-mounted); install grab bar at tub/shower entry; add handheld showerhead; install raised toilet seat with arms; replace round faucet handles with lever style; install anti-scald valve | $50–$500 depending on number of bars and whether professional installation is used | Grab bar installation into studs is the most critical step; if stud location is uncertain, hire a handyperson or CAPS-certified contractor |
| Tier 3 | Planned renovation | Replace flooring with DCOF >0.42 rated tile; widen doorway for mobility aid clearance; convert standard tub to walk-in shower; install comfort-height toilet; upgrade to full-room lighting system | $500–$10,000+ depending on scope | These projects benefit from a CAPS-certified contractor and may qualify for Medicaid HCBS waiver funding or VA grants — see the Funding Pathways section below |
Condition-Specific Additions
Certain conditions shift which modifications are most urgent. Review the relevant additions below alongside the zone checklist.
- Arthritis: Prioritize lever-style faucets and lever door handles, which can be operated with a wrist or forearm when grip strength is limited. For grab bars, choose a textured or peened finish rather than smooth chrome — the surface texture maintains grip when hands are wet, which is when grip strength is most reduced.
- Peripheral neuropathy and diabetes: The anti-scald valve becomes the highest-priority Zone F modification. Reduced temperature sensation in the feet and hands means a senior may not detect dangerously hot water until a scald burn has already occurred. Set the tempering valve to a maximum of 120°F and verify the temperature at the tap with a thermometer.
- Cognitive decline: Simplify the bathroom environment to reduce confusion and disorientation. Label storage bins and light switches with large-print text or pictograms. Reduce the number of products visible on counters and shelves. A consistent, uncluttered layout supports independent function longer than a complex or frequently rearranged space.
- Walker and wheelchair users: Measure the doorway width with a tape measure and compare it directly to the width of the mobility device. Standard interior doorways are typically 28–30 inches; most walkers and wheelchairs require 32–36 inches of clear passage. Offset hinges can add approximately 2 inches without structural work. If the doorway is still too narrow, door removal with a privacy curtain is a lower-cost alternative to full doorway widening.
When to Request an Occupational Therapy Home Assessment
This checklist is designed to be used independently, but there are specific situations where a professional occupational therapy (OT) home assessment is warranted — and where a DIY walkthrough is not sufficient.
- The senior uses a walker or wheelchair and the bathroom has not been evaluated for device clearance.
- The senior has fallen more than once in the past 12 months.
- The senior has cognitive impairment that affects judgment, sequencing, or safety awareness during bathroom routines.
- There is uncertainty about which type of shower seating is appropriate for the senior's current transfer ability.
- Grab bar placement needs to account for the individual's specific height, reach, and strength — not just the ADA default range.
An OT assessment adds precision that a general checklist cannot provide: exact doorway width measurement against the user's specific device, individualized grab bar height recommendations based on the person's body and transfer mechanics, and selection of appropriate shower seating based on a direct transfer ability assessment. These are clinical judgments, not general guidelines.
Funding Pathways for Bathroom Modifications
The cost of bathroom modifications ranges from a few dollars for non-slip strips to several thousand dollars for structural work. Several funding pathways can offset these costs — but each has meaningful limitations that are worth understanding before you apply.
| Funding Source | What It May Cover | Key Limitations |
|---|---|---|
| Original Medicare (Part B) | OT evaluation when physician-prescribed; durable medical equipment such as a 3-in-1 commode when medically necessary (Part B covers 80% of the Medicare-approved amount after the deductible) | Does not cover preventive grab bar installation; does not cover structural modifications; DME requires a prescription and medical necessity determination |
| Medicare Advantage (Part C) | Some plans offer supplemental in-home modification benefits that may include grab bars, handheld showers, and related equipment | Significant plan-level variation; many plans require documented fall history or a medically diagnosed instability condition; verify directly with your specific plan before assuming coverage |
| Medicaid Home and Community-Based Services (HCBS) Waivers | Can cover grab bars, handheld showers, shower modifications, lever-style handles, lighting adaptations, and doorway widening in many states | State-administered with varying eligibility criteria; waiting lists exist in many states; functional need must be demonstrated at the time of application — you generally cannot apply in advance of need |
| Area Agency on Aging and local programs | State and local programs vary widely; some offer direct modification grants, low-interest loans, or volunteer installation programs | Availability depends on location and current program funding; the fastest way to find what is available locally is to contact the Eldercare Locator |
Ongoing Maintenance: Keeping Safety Features Effective
Installing safety modifications is not a one-time task. Grab bars loosen over time, non-slip strips peel at the edges, nightlights burn out, and a senior's functional needs change as they age. A brief monthly and annual maintenance routine keeps the modifications working as intended.
- Monthly checks: Test each grab bar by applying firm pressure — there should be no wobble or movement. Inspect non-slip mats and adhesive strips for peeling edges or worn surfaces. Test nightlight function. Run hot water and verify the temperature at the tap does not exceed 120°F.
- Annual reassessment: Reassess lighting adequacy — light needs increase with age, and a fixture that was adequate two years ago may no longer be sufficient. Re-evaluate doorway clearance if the senior has changed mobility aids or begun using one for the first time. Review the full zone checklist if there has been a new fall, a new diagnosis, or a noticeable change in balance, strength, or cognitive function.
Related reading
Noticed something outdated or inaccurate on this page? Flag a correction. We review every report against CDC, NIA, and AARP HomeFit guidance before updating a page.
Part of the Fall Prevention section.