
Grab Bars for Bathroom Safety: A Complete Installation Guide for Family Caregivers
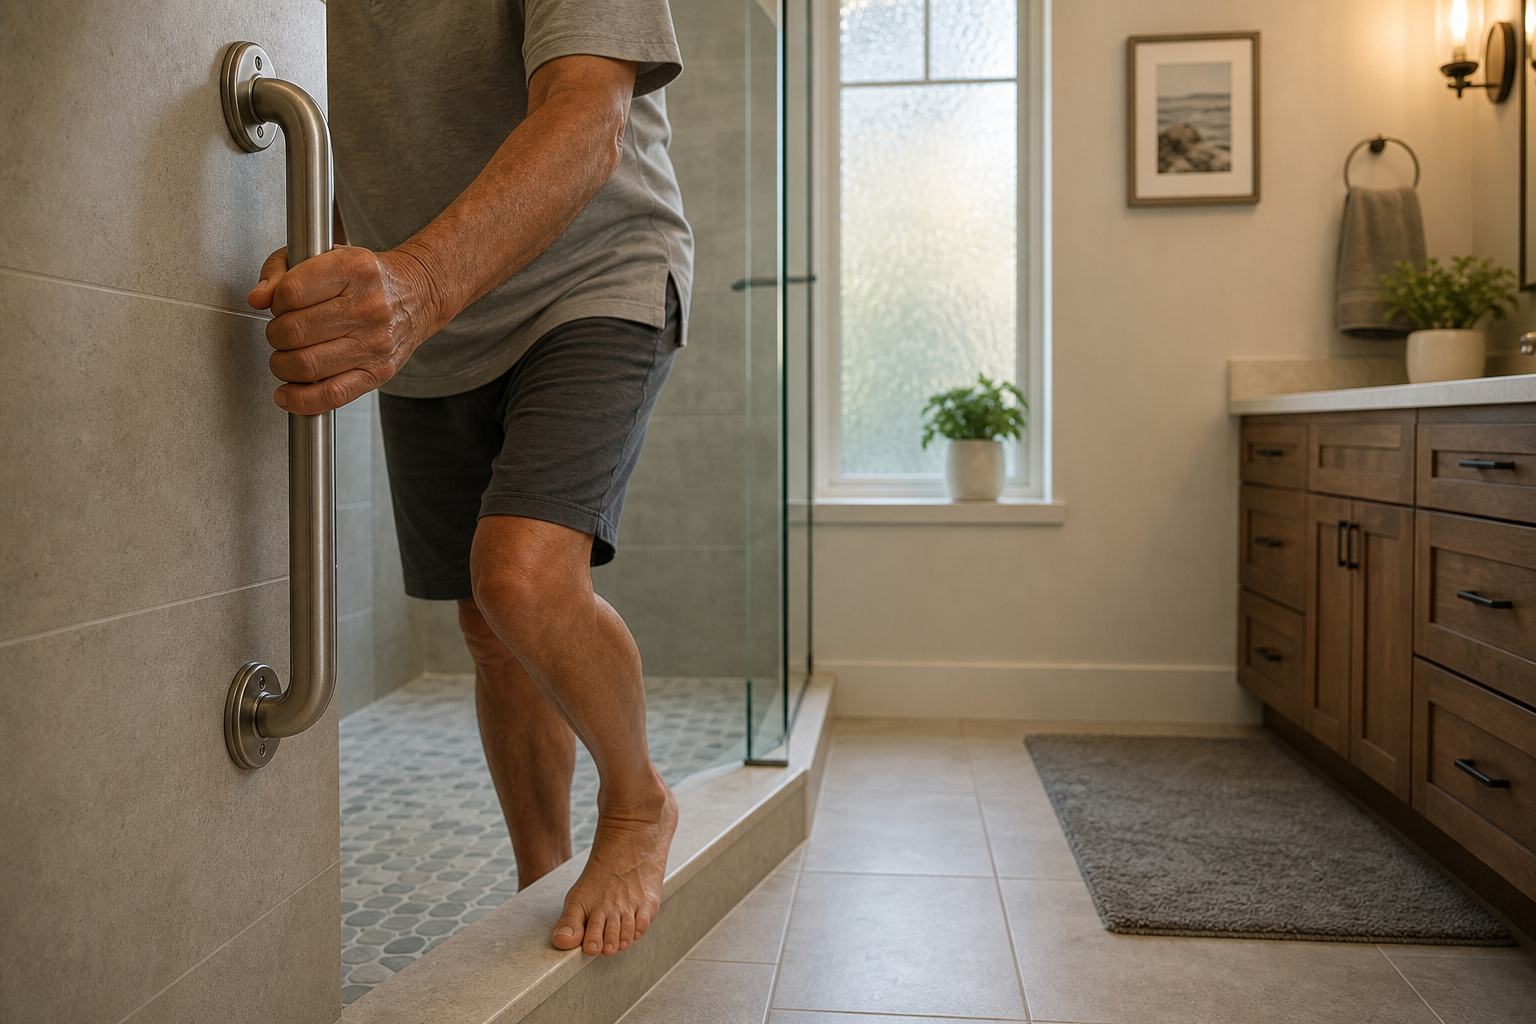
A correctly placed and properly mounted grab bar is one of the highest-impact, lowest-cost steps a caregiver can take to reduce bathroom fall risk — but common installation errors can nullify the benefit or create new hazards. This guide walks family caregivers through bar selection, ADA-aligned placement by bathroom zone, wall-surface anchoring methods, load testing, when to hire a certified professional, and concrete funding options including Medicare Advantage and VA grants.
Why Bathroom Grab Bars Matter: The Fall Risk Case
In 2021, falls among adults 65 and older caused over 38,000 deaths and sent nearly 3 million people to emergency departments — making falls the leading cause of injury death for that age group, according to CDC fall prevention data. Bathtubs and showers are among the most hazardous locations in any home, associated with an estimated $20 billion in annual injury costs in the United States.
Peer-reviewed research from the KITE-Toronto Rehabilitation Institute confirms that grab bars reduce fall hazard during bathtub transfers — even in younger adults — and improve bathing independence. Despite this evidence, only about one-third of households with an older adult currently have a grab bar installed. The two most commonly cited barriers are cost and uncertainty about installation on certain wall materials.
The cost-to-impact ratio is exceptional. A correctly installed grab bar costs $50–$350 depending on materials and labor. A single hip fracture resulting from a bathroom fall can cost $30,000 or more in acute care alone, with months of rehabilitation and lasting functional consequences. The math is not close.
Choosing the Right Grab Bar: Types, Diameter, and Weight Capacity
Not all grab bars serve the same function. Selecting the wrong bar type for a given bathroom zone is one of the most common caregiver mistakes — and it can make a bar feel awkward to use, reducing the likelihood that the person will actually rely on it.
| Bar Type | Best Bathroom Zone | Key Characteristic |
|---|---|---|
| Straight (horizontal) | Shower back wall, tub back wall | Provides lateral support during bathing; most common type |
| Angled (diagonal) | Shower entry, tub side wall | Supports both lowering and rising motions with a single grip |
| L-shaped | Toilet area, shower corner | Combines vertical and horizontal grip in one unit; versatile |
| Fold-down / flip-up | Toilet area with space constraints | Folds flat when not in use; useful where a fixed bar would block access |
Beyond bar type, two specifications matter most for safety:
- Diameter: ADA standards specify a circular cross-section of 1.25 to 2 inches, with 1.5 inches of clearance from the wall. Most residential grab bars fall in the 1.25–1.5 inch range, which fits the widest range of hand sizes and grip strengths.
- Weight capacity: ADA §607/608 structural strength requirements state that the bar, fasteners, mounting device, and supporting structure must each withstand 250 lbs of force. This is not just the bar's rated load — the entire assembly must meet this threshold.
Finish is a secondary consideration. Stainless steel and brushed nickel resist corrosion in humid bathroom environments. Chrome is common and durable. Textured or knurled surfaces improve grip when hands are wet. Avoid purely decorative bars sold as accessories — verify the 250-lb structural rating before purchase.
Placement by Bathroom Zone: Where Each Bar Goes and Why
Placement is where most DIY installations go wrong. A bar mounted at the wrong height or in the wrong location provides little functional benefit — and may actually encourage an unsafe grip posture. The following specifications draw from ADA §607/608 and ICC A117.1 as best-practice residential references, not federal residential mandates. Residential installation is not legally required to meet ADA specifications, and placement should always be individualized to the user's height, mobility pattern, and grip strength — ideally with input from an occupational therapist.
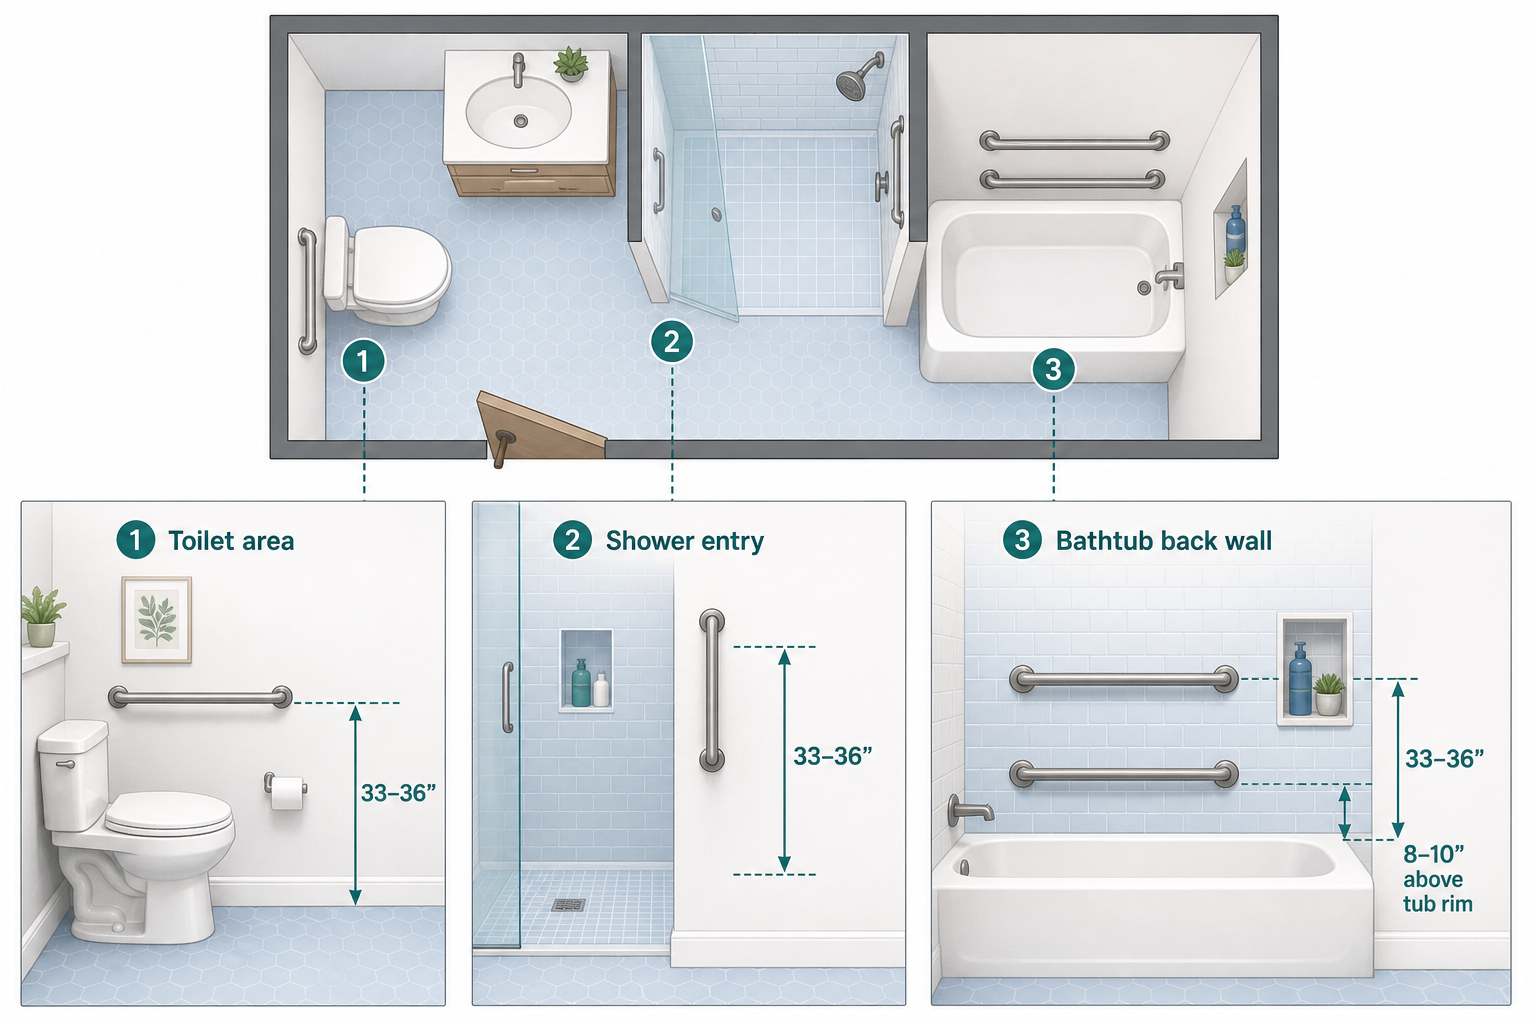
Toilet Area
Horizontal bars on both sides of the toilet, positioned 33–36 inches above the finished floor, support lowering and rising — the two highest-risk movements at the toilet. Bilateral placement is preferable to single-side installation because it accommodates the user's stronger side and provides a consistent grip regardless of approach direction.
If wall space allows only one bar, position it on the user's stronger side. An L-shaped or fold-down bar works well here when floor space is limited or a second person needs to assist with transfers.
Shower Entry
A vertical bar at the shower entry serves a biomechanically distinct purpose from horizontal bars. It supports stepping over the threshold — a movement that requires balance during a brief single-leg stance — rather than lateral movement or lowering. This vertical entry bar is specified in ICC A117.1 (18-inch minimum length) as a best-practice reference, not in the ADA Standards themselves.
Position the vertical bar so that its midpoint falls roughly at shoulder height for the user — typically 48–54 inches above the floor — allowing a natural, upright grip during entry and exit.
Shower and Tub Back Wall
The back wall of a shower or tub receives horizontal bars to support standing balance during bathing. ADA §607/608 specifies the top of the gripping surface at 33–36 inches above the finished floor for the primary horizontal bar.
For bathtubs, a three-wall configuration is the standard: bars on the back wall (horizontal, 33–36 inches), the control-end wall, and the head-end wall. On the back wall, a second lower bar positioned 8–10 inches above the tub rim provides a grip point for lowering into and rising from the tub — one of the most physically demanding bathroom transfers.
Wall Surface Decision Tree: Studs, Tile, Fiberglass, and No-Stud Solutions
The wall surface determines which anchoring method is safe and which is not. This is the section most caregivers skip — and where the most dangerous installation errors occur.
| Wall Surface | Preferred Method | Key Requirement | Professional Needed? |
|---|---|---|---|
| Drywall over studs | Screw directly into studs | Stud finder; 3-inch structural screws | No, if studs align with placement |
| Tile over studs | Screw through tile into studs | Diamond-tip drill bit; silicone sealant at flanges | No, if comfortable drilling tile |
| Tile — no stud alignment | Heavy-duty toggle bolt (SNAPTOGGLE-type) | Correct anchor rated for 250-lb pull; silicone sealant | Recommended for most caregivers |
| Fiberglass surround | Add blocking behind surround | Requires wall access; lumber blocking between studs | Yes — wall access required |
| Hollow drywall only | SNAPTOGGLE-type toggle bolt | Must be correctly matched to wall thickness and type | Recommended |
| Concrete or masonry | Masonry anchors and masonry bit | Specialty tools; correct anchor diameter | Recommended |
A few important clarifications on the options above:
- Stud mounting is the gold standard because screws bite directly into structural wood framing, providing the best pull-out resistance. When the needed placement location aligns with a stud, always use it.
- Heavy-duty toggle bolts (SNAPTOGGLE-type) can meet the 250-lb requirement on hollow drywall when correctly matched to wall thickness and material. Basic plastic wall plugs are not appropriate for safety equipment under any circumstances.
- Horizontal blocking — adding a horizontal length of lumber between studs inside the wall cavity — is the strongest no-stud solution and provides stud-like strength across a wide area. It is most practical during a bathroom remodel when the wall is already open.
- Fiberglass surrounds typically require opening the wall to add blocking behind the surround. This is consistently a case for professional installation — attempting to anchor through fiberglass without backing risks cracking the surround and producing an anchor that will fail under load.
- Adhesive-only grab bars are not suitable for daily fall prevention use, regardless of the adhesive strength claimed on packaging.
Step-by-Step Installation: Stud-Mount and Tile Toggle-Bolt Methods
Method 1: Stud-Mount (Drywall or Painted Walls)
This is the most straightforward installation scenario and is appropriate for most caregivers with basic tool experience.
- Gather tools: stud finder, level, pencil, power drill, 3-inch structural screws (minimum), drill bits sized for pilot holes.
- Use the stud finder to locate studs behind the wall surface. Mark stud centers with a pencil. Studs in residential construction are typically 16 inches on center.
- Hold the grab bar at the correct height (33–36 inches for horizontal bars) and confirm that the mounting holes align with marked stud locations. Adjust bar position slightly if needed — a bar shifted 1–2 inches horizontally is still functional; a bar anchored outside a stud is not safe.
- Use a level to confirm the bar is horizontal (or correctly angled for diagonal bars). Mark the mounting hole locations on the wall.
- Drill pilot holes at each marked location, slightly smaller in diameter than the screw shank.
- Position the bar's flange plates over the pilot holes and drive structural screws through the flanges and wall surface into the stud. Do not overtighten to the point of crushing the flange.
- Perform the load test (see the Load Testing section below) before allowing the care recipient to use the bar.
Method 2: Tile Wall with Toggle Bolts
Drilling through tile requires patience and the correct tools. Rushing this step cracks tile and produces a weak anchor point.
- Mark hole locations with painter's tape on the tile surface — this prevents the drill bit from skating across the glazed surface when starting the hole.
- Use a diamond-tip or carbide-tip drill bit designed for tile. Begin drilling at low speed with light pressure until the bit has penetrated through the glaze. Increase speed once through the surface layer.
- If studs are present behind the tile, switch to a standard wood bit after penetrating the tile and continue into the stud — this is the preferred outcome. If no stud is present, continue drilling through the tile and drywall layer to create a clean through-hole for the toggle bolt.
- Select a SNAPTOGGLE-type heavy-duty toggle anchor rated for the wall thickness and load requirement. Follow the anchor manufacturer's instructions for insertion and setting — the anchor must be fully set before attaching the bar.
- Apply a thin bead of silicone sealant around the underside of each flange plate before seating it against the tile. This prevents water intrusion behind the mounting surface, which can degrade the wall structure over time.
- Drive the mounting screws through the flange into the set anchors. Tighten until the flange seats firmly against the tile with no gap. Wipe away any sealant that squeezes out from the edge.
- Allow sealant to cure per manufacturer instructions before performing the load test and allowing use.
Load Testing: Verifying the Installation Before First Use
A load test is not optional. It is the only way to confirm that the installation will hold under actual use conditions before the person who depends on it applies their full weight.
After installation is complete and any sealant has cured, apply firm, sustained pressure to the bar in multiple directions: pull outward from the wall, push downward, and pull laterally in both directions. Use your full body weight if possible. The bar should not move, flex, creak, or show any separation between the flange and the wall surface.
Five Common Installation Mistakes — and How to Avoid Them
These are the errors that show up repeatedly in caregiver installations — and each one either eliminates the bar's protective function or introduces a new hazard.
- Wrong bar type for the zone. A horizontal bar at shower entry provides the wrong grip geometry for stepping over a threshold. A vertical bar on the tub back wall doesn't support lateral balance during bathing. Match bar type to zone function, not to what was on sale.
- Wrong placement height. A bar positioned too high forces the user to reach upward, shifting their center of gravity in the wrong direction. Too low, and the bar requires stooping to grip it. The 33–36 inch ADA reference range exists because it matches the functional reach zone for most adults during standing transfers.
- Anchoring without a stud or properly rated anchor. Basic drywall anchors and plastic wall plugs are not rated for the 250-lb load requirement. A bar anchored this way may hold initially but fail suddenly under stress — the worst possible outcome.
- Ignoring the weight capacity of the bar itself. The bar's own structural rating must meet the 250-lb threshold, not just the anchoring method. Verify the bar's rated load before purchase.
- Skipping the load test. The installation may look correct and feel solid during installation without actually meeting the 250-lb pull requirement. The load test is the only verification step that matters.
DIY vs. Hiring a Certified Professional: A Practical Decision Guide
DIY installation is appropriate for straightforward scenarios. Professional installation is warranted — and worth the cost — when the wall conditions or project complexity exceed what a careful non-specialist can safely handle.
| Scenario | DIY Appropriate? | Reason |
|---|---|---|
| Drywall wall, studs align with placement | Yes | Straightforward stud-mount; low risk of error with basic tools |
| Painted wall, stud locations confirmed | Yes | Same as above |
| Tile wall, studs align | Yes, with correct drill bit | Diamond-tip bit required; sealant at flanges |
| Tile wall, no stud alignment | Caution — professional recommended | Toggle-bolt selection and setting is critical; errors are common |
| Fiberglass surround | No | Requires wall access to add blocking; risk of cracking surround |
| Multi-bar project (3+ bars) | Professional recommended | Complexity increases error risk; pro installs are faster and warrantied |
| Uncertainty about wall structure | No — hire a professional | Unknown wall conditions are the highest-risk scenario |
When hiring a professional, look for CAPS-certified (Certified Aging in Place Specialist) or Age-Safe America certified installers. These credentials indicate specific training in grab bar placement and anchoring that general handymen and general contractors do not receive. A general contractor may be skilled at tile work or carpentry without having any training in the biomechanical placement requirements for aging-in-place safety modifications.
Before hiring, ask these questions:
- Can you show proof of CAPS or Age-Safe certification?
- Do you carry liability insurance of at least $1 million?
- Will you provide a written warranty on the installation?
- Will you perform a torque wrench test confirming 250-lb pull resistance on each bar before you leave?
Professional installation costs run approximately $170–$350 per bar depending on wall type: roughly $170 for standard drywall, $220 or more for tile, and significantly higher for fiberglass surrounds requiring wall access. For a multi-bar bathroom project, professional installation is often more cost-effective than multiple DIY attempts on difficult walls.
Funding Sources: How to Offset or Eliminate the Cost
Cost is the most commonly cited barrier to grab bar adoption. Several funding pathways exist — some of them covering the full cost of materials and installation — and most caregivers are unaware of more than one or two of them.
Original Medicare (Parts A and B)
Original Medicare does not cover grab bars. They are classified as a home modification, not Durable Medical Equipment (DME), and fall outside Part A and Part B coverage regardless of medical necessity.
Medicare Advantage SSBCI (Part C)
This is the most significant and least-known funding pathway for most caregivers. In 2025, over 42% of Medicare Advantage plans offered home modification benefits through the Special Supplemental Benefit for the Chronically Ill (SSBCI), with benefit caps typically ranging from $2,000 to $2,400.
Coverage is plan-specific and changes annually. Most plans that offer this benefit require:
- A home safety evaluation by an occupational therapist or physical therapist
- A functional mobility score meeting a threshold (such as a Timed Up and Go test over 12 seconds, or a Berg Balance Score under 45)
- A written plan of care from the evaluating therapist
- A quote from a licensed contractor
VA HISA Grant
Veterans may be eligible for the Home Improvements and Structural Alterations (HISA) grant, which provides up to $6,800 for bathroom safety modifications including grab bars. File VA Form 10-0103 through the VA healthcare system. This benefit is available to veterans with a service-connected or non-service-connected disability, though the grant amount varies by service connection status.
Medicaid Home and Community-Based Services (HCBS) Waivers
Medicaid HCBS waivers in most states include home modification benefits for eligible low-income older adults. Waiver availability, eligibility criteria, and covered modification types vary significantly by state. Contact your state's Medicaid office or Area Agency on Aging for current program details.
Additional Funding Sources
| Program | Who It Serves | How to Access |
|---|---|---|
| Area Agency on Aging | Low-income older adults; varies by region | Call 2-1-1 or visit eldercare.acl.gov to find your local agency |
| Rebuilding Together | Low-income homeowners, especially older adults | rebuildingtogether.org — local affiliate programs vary |
| Habitat for Humanity Aging in Place | Low-income older homeowners | Contact local Habitat affiliate; program availability varies |
| CDBG Grants (HUD) | Low-to-moderate income homeowners | Apply through local city or county housing office |
The same funding programs that cover grab bars frequently apply to other home modifications. If you are planning a broader bathroom or home safety project, see the Stair Lift Cost and Funding Options for Aging in Place guide — the VA HISA grant and Medicare Advantage SSBCI benefit can often be applied to multiple modifications within the same plan year.
Next Steps: Turning This Guide Into Action
A grab bar that remains unpurchased or improperly installed does not prevent falls. The following sequence moves from decision to installation to funding in a practical order:
- Complete a full home safety audit using the Home Fall Prevention Checklist for Older Adults to identify all bathroom hazards, not just grab bar gaps.
- Identify the bathroom zones that need bars — toilet area, shower entry, tub back wall — and note which are currently unaddressed.
- Assess wall surfaces in each zone: drywall, tile, or fiberglass. This determines your anchoring method and whether DIY is appropriate.
- Decide DIY or professional using the decision table above. When in doubt, a CAPS or Age-Safe certified installer is the lower-risk choice.
- Check Medicare Advantage plan benefits by calling the plan's member services line and asking specifically about SSBCI home modification benefits for the current plan year.
- Contact your Area Agency on Aging by dialing 2-1-1 to ask about local home modification assistance programs, contractor referrals, and any grant funding available in your county.
- Request an occupational therapist home visit for individualized placement recommendations, particularly if the care recipient has significant strength asymmetry, a recent fall with injury, or complex mobility needs. This step also activates Medicare Advantage SSBCI eligibility if the plan requires an OT evaluation.
Related reading
Noticed something outdated or inaccurate on this page? Flag a correction. We review every report against CDC, NIA, and AARP HomeFit guidance before updating a page.
Part of the Fall Prevention section.