Aging in Place Home Modifications: A Room-by-Room Prioritization Guide for Families
Overwhelmed by where to start with home modifications? This practical guide helps adult children prioritize the most critical safety upgrades first — from bathroom grab bars to entryway ramps — using a clear tiered framework that prevents both missed hazards and decision paralysis.
Estimated cost range: $25–$12,000+
Potential funding: VA grant, Medicaid waiver, USDA Section 504, HUD FHA loans, Rebuilding Together
Cost ranges are estimates. Verify eligibility directly with each program.
By Editorial Team
A tiered approach to home modifications starts with the highest-risk areas and works outward.
Why Prioritization Matters: The Fire Hose Problem
When you first realize your parent’s home needs modifications, the list of possible changes can feel endless. Grab bars, ramps, stair lifts, lighting, flooring, faucets, doorways — the options multiply quickly, and the stakes are high. Occupational therapist Matt Haase describes this experience as “like drinking out of a fire hydrant,” and his advice is direct: start slowly. Doing everything at once is a recipe for both financial strain and decision paralysis.
The problem is that not all modifications carry the same weight. A $200 grab bar installation in the bathroom can prevent a fall that leads to a $50,000 nursing home bill, while a kitchen remodel might improve daily convenience but won’t address the most urgent safety threats. Without a clear sequence, families often spend time and money on lower-priority upgrades while leaving the most dangerous hazards unaddressed.
This guide provides a tiered framework that separates modifications into three priority levels: immediate safety, daily function, and comfort and convenience. The goal is to give you a clear “what to do first” sequence so you can act without overwhelm and avoid missing the changes that matter most.
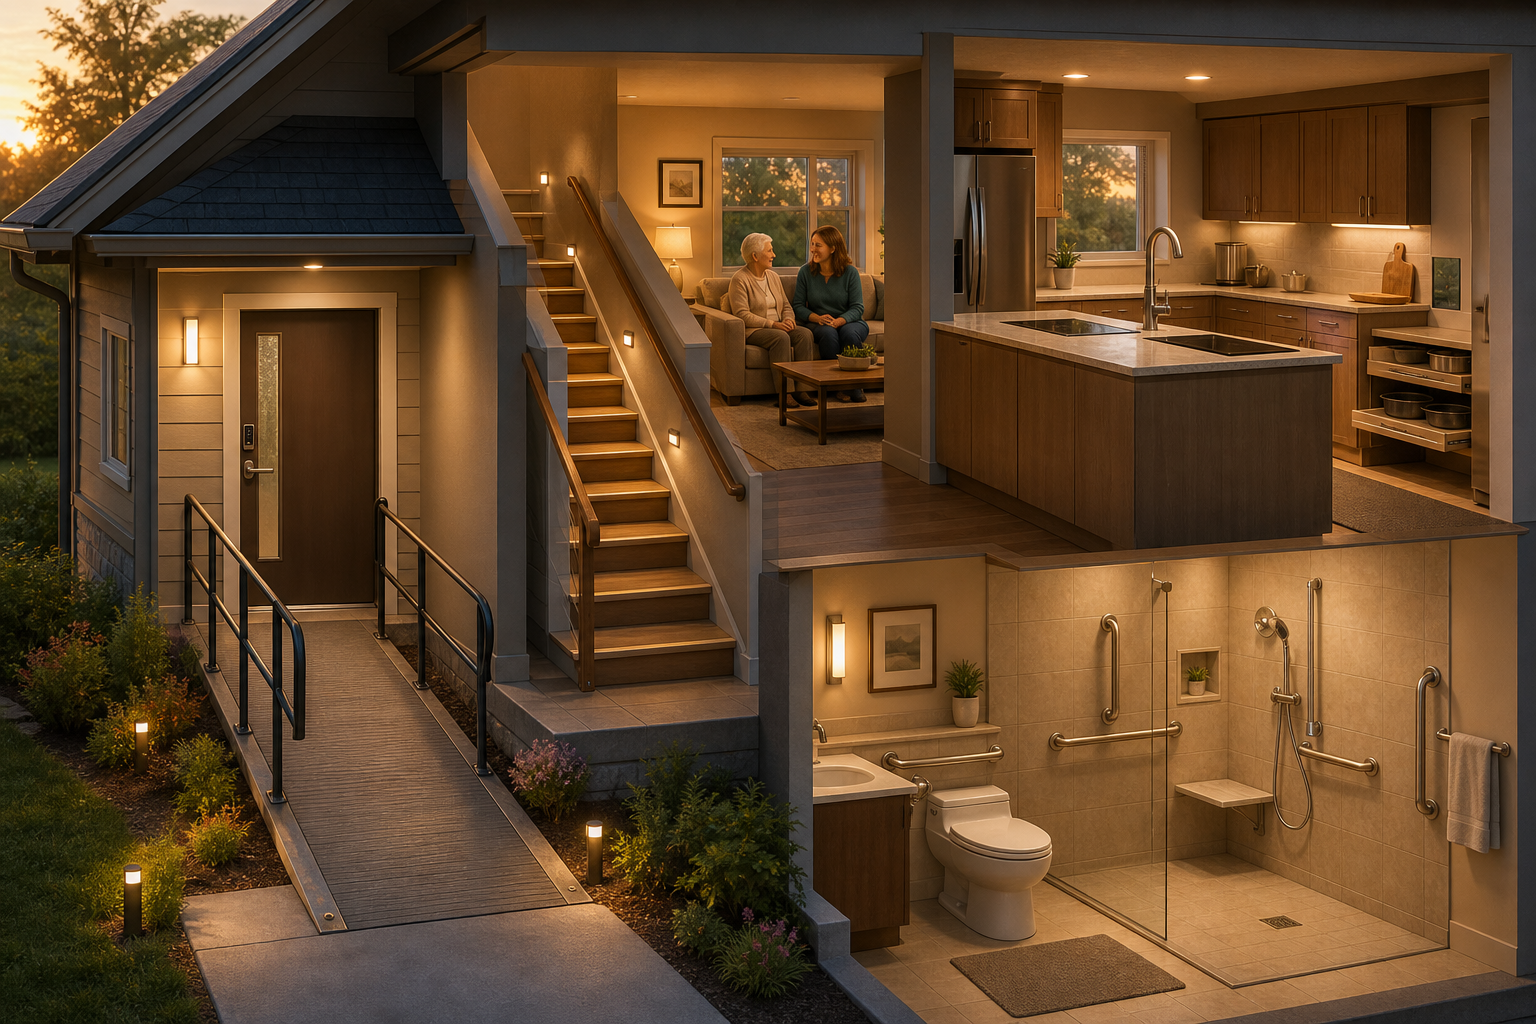
Priority 1: Immediate Safety — Bathroom, Entry, and Stairs
These three areas account for the majority of serious falls and injuries in the home. If you do nothing else, address these first.
The Bathroom: Highest Risk, Highest Impact
Occupational therapist Cheryl Hall calls the bathroom “the most risky place you’re gonna have,” and the data backs her up. According to the CDC, nearly 28% of bathroom injuries in adults 65 and older are toilet-related. Wet surfaces, confined spaces, and the need to transfer from sitting to standing create a perfect storm for falls.
The single most effective intervention is installing grab bars near the toilet and in the shower or tub area. A study published in PubMed found that grab bars improve balance recovery probability by nearly 76%. This is not a minor improvement — it is the difference between a steady recovery and a fall that results in a hip fracture or head injury.
Install grab bars near the toilet and inside the shower or tub. Ensure they are anchored into wall studs or blocking and rated to support 250–300 lbs per NAHB CAPS standards.
Add a shower chair or fold-down shower seat so standing is not required during bathing.
Replace the existing showerhead with a handheld model that has a 6-foot hose for seated use.
Install a toilet seat riser or replace the toilet with an ADA-height model (17–19 inches from floor to seat).
Apply nonslip strips or use a nonslip bath mat inside the shower and on the bathroom floor.
Consider a curbless (barrier-free) shower for long-term accessibility. Cost ranges from $6,000 to $18,000 depending on existing plumbing and layout.
The bathroom is the highest-priority room for safety modifications. Grab bars, a shower seat, and a raised toilet address the most common fall scenarios.
Entry and Exit: Getting In and Out Safely
A single step at the front door can become an insurmountable barrier after a hip replacement or as mobility declines. The National Poll on Healthy Aging found that only 19% of older adults have entrances with ramps or no stairs. That means more than 80% of older adults face at least one step to enter their own home.
Install a ramp at the primary entrance. The maximum slope should be 1:12 (1 inch of rise per 12 inches of run), with a 5-foot landing at the top. Modular ramps range from $1,500 to $12,000.
Add a covered entryway to protect the ramp or landing from rain, snow, and ice.
Replace doorknobs with lever-style handles, which require less grip strength to operate.
Install a keypad or smart lock so keys are not required to enter.
Ensure exterior lighting is bright and motion-activated so the path is well-lit at night.
Stairs: The Vertical Hazard
Stairs combine height, narrow footing, and the need for balance — a dangerous combination for older adults. The NAHB CAPS checklist recommends handrails on both sides of every staircase, with a diameter of 1.25 inches for a secure grip. Contrast strips on the top and bottom steps improve visibility for people with reduced depth perception.
Install sturdy handrails on both sides of the staircase. Ensure they are securely anchored and extend the full length of the stairs.
Apply anti-slip treads or contrast strips to each step, especially at the top and bottom edges.
Ensure stair lighting is bright and has switches at both the top and bottom of the stairs.
For older adults who cannot safely navigate stairs, a stair lift is a practical solution. Straight-staircase lifts range from $2,500 to $8,000; curved models cost more.
Priority 2: Daily Function — Lighting, Flooring, and Living Spaces
Once the immediate safety threats are addressed, the next tier focuses on reducing daily fall risk and making the home easier to navigate. These modifications are less urgent than bathroom and stair safety, but they address the most common environmental hazards that contribute to the more than 1 in 4 older adults who fall each year, according to the National Institute on Aging.
Lighting: The Overlooked Safety Net
Dim lighting is a major contributor to falls, especially at night when older adults get up to use the bathroom. The solution is straightforward and relatively inexpensive.
Install motion-sensor night-lights in hallways, bathrooms, and bedrooms so paths are automatically illuminated at night.
Replace dim or outdated light fixtures with bright LED bulbs throughout the home.
Add easy-access light switches at room entrances and bed-side. Voice-activated smart lighting is an excellent option for people with limited mobility.
Ensure outdoor pathways, steps, and entryways are well-lit with motion-activated lights.
Flooring: The Single Easiest Change
Removing throw rugs is the single easiest and most impactful fall-prevention change you can make. Throw rugs are a tripping hazard — they slip, curl at the edges, and catch on walkers and canes. If you do nothing else in this tier, remove every throw rug in the home.
Remove all throw rugs and loose mats. If floor covering is needed for warmth or comfort, use low-pile carpet that is securely tacked down.
Replace slippery flooring (polished tile, hardwood, laminate) with nonslip surfaces such as slip-resistant vinyl, rubber, or cork. These materials provide better traction and cushion falls.
Ensure transitions between different flooring types are flush. Interior thresholds should be no higher than 1/4 inch per NAHB CAPS standards.
Living Spaces: Clear Pathways and Accessible Furniture
Cluttered pathways force older adults to navigate around furniture, cords, and objects — increasing the risk of tripping. The goal is to create wide, clear paths through every room.
Clear pathways to at least 36 inches wide to accommodate walkers and wheelchairs. The NAHB CAPS checklist recommends a minimum of 36 inches for hallways.
Remove or secure loose cords and cables. Use cord covers or tape them to baseboards.
Choose chairs with armrests to make sitting and standing easier. Lift recliner chairs are an excellent option for people with limited leg strength.
Ensure that frequently used items (remote controls, phones, glasses) are within easy reach without bending or stretching.
The “before” and “after” of a living room safety assessment. Removing throw rugs, improving lighting, and clearing pathways are among the most cost-effective changes you can make.
Priority 3: Comfort and Convenience — Kitchen and Bedroom
The third tier covers modifications that improve quality of life and make daily tasks easier. These are less urgent than safety modifications, but they can significantly reduce frustration and fatigue for older adults living at home.
Kitchen Adjustments
The kitchen presents challenges related to reach, grip, and standing endurance. Small changes can make a big difference.
Install pull-out shelves and roll-out drawers in lower cabinets so items are accessible without bending or reaching deep into cabinets.
Replace twist-style faucets with single-lever models that require less grip strength and can be operated with one hand.
Consider an induction cooktop, which stays cool to the touch and reduces the risk of burns. Induction cooktops also have automatic shutoff features.
Place an anti-fatigue mat in front of the sink and stove to reduce strain during meal preparation.
Store frequently used items (dishes, glasses, pots) at waist level to minimize reaching and bending.
Bedroom Comfort and Safety
The bedroom should be a safe and restful space. Key modifications focus on the bed and the path to the bathroom.
Consider an adjustable bed that allows the user to raise the head and feet independently, making it easier to get in and out of bed and reducing pressure points.
Install bed rails or a bed assist bar to provide support when sitting up or transferring.
Place a night-light or motion-sensor light between the bed and the bathroom so the path is illuminated at night.
If the bedroom is on the second floor and stairs are becoming difficult, consider moving the primary bedroom to the main floor. This is a major structural change but can be the most impactful long-term solution.
Optional Enhancements: Smart Home Technology
Smart home devices can add an extra layer of safety and convenience. Voice assistants (Amazon Alexa, Google Assistant, Apple Siri) can control lights, thermostats, and locks without requiring physical movement. Smart locks allow caregivers to grant entry remotely. Fall detection sensors and passive home monitoring systems can alert family members if something is wrong. These technologies are not replacements for structural modifications, but they complement them well.
How to Conduct a DIY Home Safety Assessment
Before hiring contractors or buying equipment, walk through the home room by room with a critical eye. The following checklist covers the most common hazards and the key specifications to look for. Print this list and take it with you on your walkthrough.
Room-by-room home safety assessment checklist with key questions and target specifications based on NAHB CAPS standards and expert recommendations.
Room or Area
Key Questions to Ask
Target Specification
Bathroom
Are there grab bars near the toilet and in the shower? Is the shower entry step-free or curbless? Is the toilet at a comfortable height? Is the floor nonslip?
Grab bars rated for 250–300 lbs; ADA-height toilet 17–19 inches; curbless shower min. 36" wide; handheld showerhead with 6-ft hose
Entry / Exterior
Is there a step at the entrance? Is the path well-lit? Are door handles lever-style? Is there a covered landing?
No-step entry or ramp with max 1:12 slope; 5-ft landing at top; lever handles; motion-activated lighting
Stairs
Are there handrails on both sides? Are the treads slip-resistant? Is the lighting adequate at both top and bottom?
Handrails on both sides, 1.25" diameter; contrast strips on top and bottom steps; bright lighting with switches at both ends
Hallways / Pathways
Are pathways at least 36 inches wide? Are there throw rugs or loose cords? Is the flooring slip-resistant?
Min. 36" clear width; no throw rugs; flush thresholds (max 1/4" interior); nonslip flooring
Living Room
Are chairs easy to get in and out of? Is there clear space to move around furniture? Are frequently used items within reach?
Chairs with armrests; clear pathways; lift recliner if needed; items at waist level
Kitchen
Are cabinets and shelves accessible without bending? Are faucets easy to operate? Is the cooktop safe?
Pull-out shelves; single-lever faucet; induction cooktop with auto shutoff; anti-fatigue mat
Bedroom
Is the bed easy to get in and out of? Is the path to the bathroom lit at night? Is the bedroom on the main floor?
Adjustable bed or bed rails; night-light on path to bathroom; consider main-floor bedroom
Lighting (All Rooms)
Are lights bright enough? Are switches easy to reach? Are there night-lights in hallways and bathrooms?
When to Call a CAPS-Certified Professional or Occupational Therapist
Many home modifications can be done by a handy homeowner or a general contractor. But for complex structural changes — widening doorways, installing curbless showers, adding ramps, or moving a bedroom to the main floor — it is wise to bring in a professional who specializes in aging-in-place design.
A CAPS (Certified Aging-in-Place Specialist) is a credential offered by the National Association of Home Builders (NAHB). CAPS-certified contractors have training in accessible design, building codes, and the specific needs of older adults. They can help you plan modifications that are both safe and cost-effective.
An occupational therapist (OT) can provide a clinical assessment of the older adult’s functional abilities and recommend specific modifications tailored to their needs. An OT’s assessment is especially valuable when the older adult has a progressive condition like Parkinson’s disease, arthritis, or dementia, where needs will change over time.
Putting It All Together: Your Action Plan
The tiered framework gives you a clear sequence. Start with Priority 1, move to Priority 2, and then address Priority 3 as time and budget allow. The following table summarizes the three tiers and the key actions for each.
Three-tier prioritization framework for aging-in-place home modifications. Start with Priority 1 and work through the tiers in order.
Priority Tier
Focus Areas
Key Actions
Estimated Cost Range
Priority 1: Immediate Safety
Bathroom, Entry/Exit, Stairs
Install grab bars, shower chair, handheld showerhead, toilet riser; add ramp or no-step entry; install handrails on both sides of stairs; add stair lift if needed
$150–$12,000+ depending on scope
Priority 2: Daily Function
Lighting, Flooring, Living Spaces
Install motion-sensor night-lights; remove throw rugs; replace slippery flooring; clear pathways to 36" wide; add lift recliner if needed
$25–$5,000+ depending on flooring and lighting scope
Priority 3: Comfort & Convenience
Kitchen, Bedroom, Smart Home
Install pull-out shelves, lever faucet, induction cooktop; consider adjustable bed and bed rails; add smart home devices as desired
$100–$10,000+ depending on kitchen and bedroom scope
If you feel overwhelmed, remember Haase’s advice: start slowly. Pick one room — the bathroom — and address the most critical changes there. Once that room is safer, move to the next. Small, consistent steps build momentum and prevent the decision paralysis that keeps families from acting at all.
Start with the bathroom: install grab bars, a shower chair, a handheld showerhead, and a toilet riser.
Address the entry: add a ramp or no-step entry, lever handles, and bright motion-activated lighting.
Make stairs safe: install handrails on both sides, anti-slip treads, and bright lighting at both ends.
Improve lighting throughout: add motion-sensor night-lights and bright LED bulbs in every room.
Remove throw rugs and clear pathways to at least 36 inches wide.
Address kitchen and bedroom modifications for comfort and convenience.
Consider smart home technology as an optional enhancement.


Comments
Join the discussion with an anonymous comment.