
Room checklist
Home Ramp Installation for Aging in Place: Types, Costs, and Safety Standards
A structured decision guide for family caregivers and older adults choosing, sizing, and funding a residential ramp — covering the five main ramp types, how to apply ADA-derived slope standards as a residential safety benchmark, realistic 2026 installed costs, and a step-by-step framework for pursuing VA grants, Medicaid waivers, and other funding programs before paying out of pocket.
Why a Ramp Is Often the First Home Modification After Mobility Decline
When a parent's mobility changes — whether after a fall, a hip replacement, or a gradual decline in balance — the front door is often the first barrier that becomes impossible to manage safely. Steps that were never a second thought can become an impassable obstacle for someone using a walker, wheelchair, or scooter. A residential ramp addresses that barrier directly, restoring independent entry and exit without requiring relocation or a major structural overhaul.
A ramp's specific job is exterior entry access — getting from grade level to a raised threshold at the front door, side entry, or garage. It is not the right solution for navigating interior stairs between floors; that problem calls for a stair lift or elevator. If your primary concern is indoor stair access, see our guide to stair lift costs and funding options for aging in place.
For very large elevation changes — generally 24 to 30 inches or more — a vertical platform lift may be more practical than a very long ramp, particularly on narrow lots or confined entryways where a 24-foot run of ramp simply will not fit. This guide focuses on ramp selection and installation for the elevation ranges where a ramp is the appropriate and cost-effective choice.
Five Ramp Types: Matching the Right Option to Your Situation
The five main residential ramp categories differ substantially in cost, permanence, installation complexity, and the elevation ranges they can safely handle. Choosing the wrong type — typically a portable ramp for a rise that demands a permanent structure — is one of the most common and consequential mistakes families make.
| Ramp Type | Best Elevation Range | Key Advantages | Key Limitations | Durability / Maintenance |
|---|---|---|---|---|
| Threshold / rubber ramp | Under 3 inches | No installation required; very low cost ($50–$300); portable | Not suitable for wheelchair users on rises above 3 inches; can shift underfoot | Minimal; inspect for cracking or displacement |
| Portable folding ramp | 3–6 inches (some models to 12 inches) | Folds for storage or travel; no installation; $100–$600 | Requires a helper to position; not ideal for daily independent use at higher rises | Low; check hinge integrity and surface grip annually |
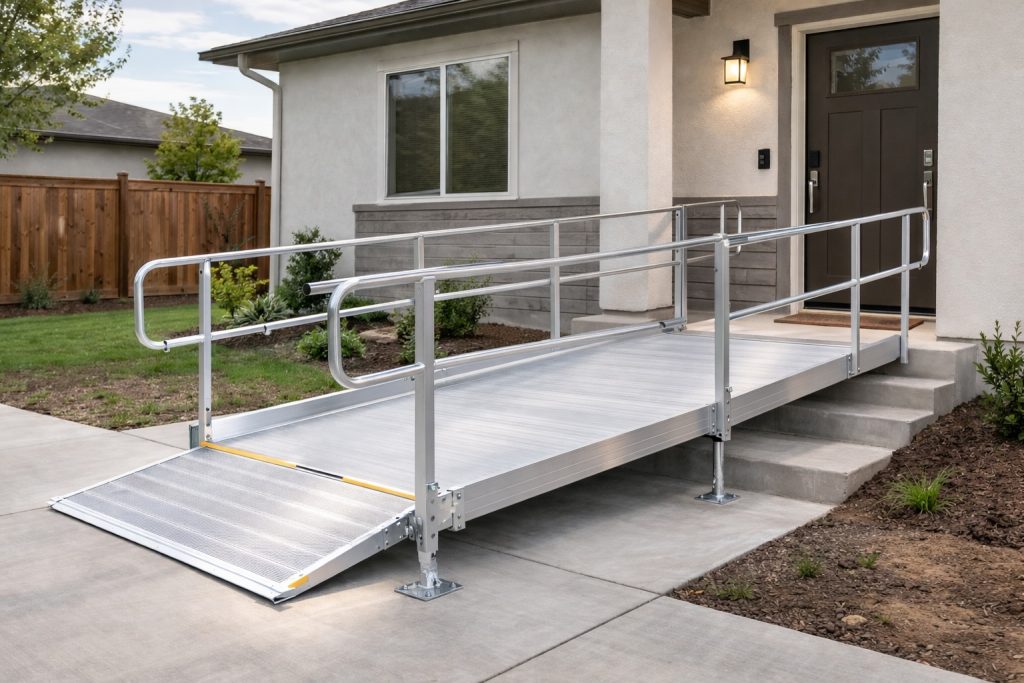
| Modular aluminum ramp | 6–24+ inches | No permits typically required; fast installation (often within 48 hours); relocatable; weather-resistant; $2,000–$8,000 installed | Higher upfront cost than portable options; requires professional assembly for safety | Very low; aluminum does not rust or rot; 20+ year lifespan with minimal upkeep |
| Wood ramp | 6–24+ inches | Traditional appearance; can be built to fit unusual entry configurations; $1,500–$6,000+ installed | Requires permits in most jurisdictions; susceptible to warping, rot, and slippery surfaces if not maintained | High; requires periodic sealing or painting; inspect annually for rot and structural integrity |
| Concrete ramp | 6–24+ inches (best for permanent, high-traffic use) | Extremely durable; permanent; integrates with existing hardscape; $3,000–$12,000+ installed | Highest cost; requires permits; not relocatable; long installation timeline | Very low once installed; inspect for cracking and surface deterioration every few years |
For rises under 3 inches — a common situation at sliding door thresholds or interior doorways — a rubber threshold ramp is a practical, low-cost solution that requires no installation at all. These are a subcategory of the threshold ramp type.
Modular aluminum ramps are the most widely chosen option for residential aging-in-place installations. They can be installed without permanently altering the property, often without a permit, and can be reconfigured or removed if needs change. In cold climates, aluminum's built-in traction surface and rust resistance make it more reliable year-round than wood.
ADA-Derived Safety Standards as the Residential Benchmark
The U.S. Access Board's ADA ramp standards define the dimensions that make a ramp safely usable for wheelchair users, scooter users, and people with balance impairments. Applying these standards to a residential installation significantly reduces fall risk and caregiver exertion.
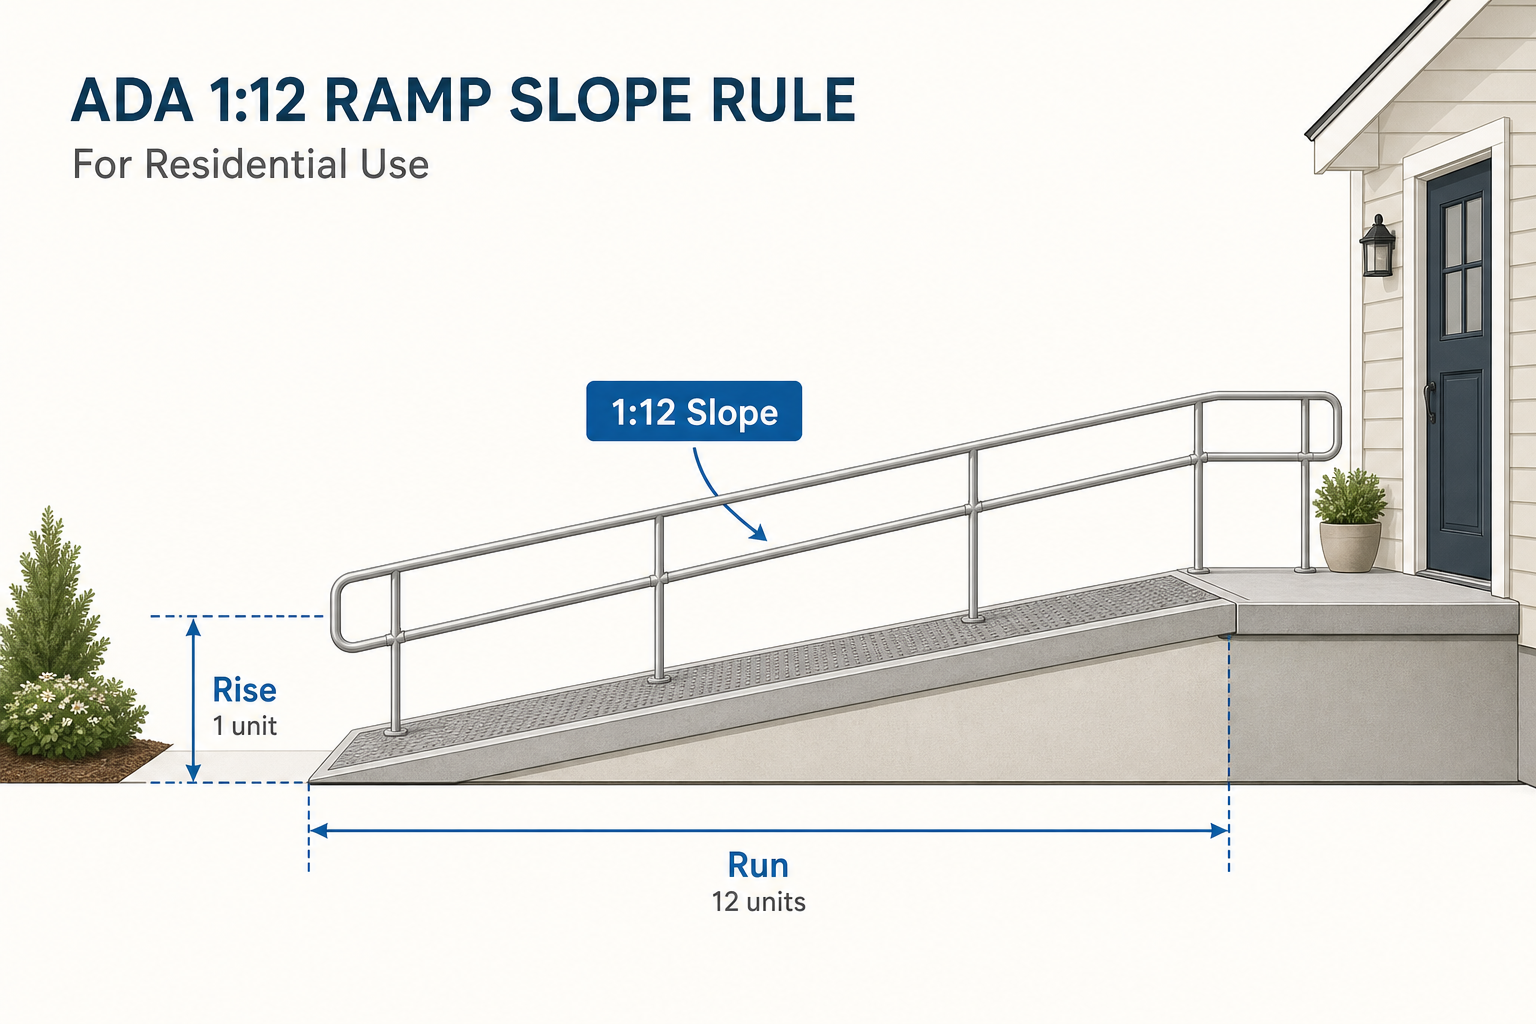
- Running slope: Maximum 1:12 (for every 1 inch of rise, 12 inches of horizontal run). This is the primary residential safety benchmark. Steeper slopes increase tipping and rollback risk for wheelchair users and significantly increase caregiver exertion.
- Clear width: Minimum 36 inches between handrails. This accommodates most standard wheelchairs and allows a caregiver to walk alongside. Some state codes require wider — Massachusetts mandates 48 inches under 521 CMR when state funding is involved.
- Landings: At least 60 × 60 inches at the top and bottom of each ramp run, and at any direction change. Landings must be level and must not accumulate standing water.
- Handrails: Required on both sides for any rise greater than 6 inches. Height: 34–38 inches above the ramp surface. Handrails must extend 12 inches horizontally beyond the top and bottom of the ramp run.
- Edge protection: A curb at least 4 inches high, or a floor surface extending at least 12 inches beyond the face of the handrail, to prevent wheels from rolling off the edge.
- Cross slope: Maximum 1:48 (perpendicular to the direction of travel). Steeper cross slopes cause wheelchairs to drift sideways.
- Drainage: Landings and ramp surfaces must be designed to prevent water accumulation. Standing water on a ramp surface is a serious fall hazard.
- Maximum rise per run: 30 inches. If the total rise exceeds 30 inches, an intermediate landing is required before the next run begins.
How to Calculate the Ramp Length You Need
The formula is straightforward: measure the rise (the vertical height from the ground to the top of the threshold in inches), then multiply by 12. The result is the minimum ramp length in inches at the 1:12 standard.
Rise (inches) × 12 = Minimum ramp length (inches)
| Entry Rise (inches) | Minimum Ramp Length at 1:12 | Notes |
|---|---|---|
| 4 inches | 4 feet (48 inches) | Portable folding ramp or small modular section |
| 8 inches | 8 feet (96 inches) | Modular aluminum or wood; handrails required on both sides |
| 12 inches | 12 feet (144 inches) | Modular aluminum most practical; permits likely required for wood |
| 18 inches | 18 feet (216 inches) | Modular aluminum strongly recommended; intermediate landing may be needed |
| 24 inches | 24 feet (288 inches) | Modular aluminum or concrete; consider whether a platform lift is more space-efficient |
When available horizontal space is genuinely constrained, steeper slopes are sometimes used: a 2:12 slope (approximately 10 degrees) cuts the required run in half, and a 3:12 slope (approximately 15 degrees) reduces it to one-quarter of the 1:12 length. However, slopes steeper than 1:12 increase the effort required to propel a manual wheelchair, raise tipping risk, and are challenging or unsafe for motorized scooters. These steeper options should be considered only when the 1:12 standard is physically impossible given the site.
Installation Pathway: Site Assessment, Permits, and Choosing a Contractor
A successful ramp installation begins with a thorough site assessment before any materials are ordered or permits are pulled.
Site Assessment Checklist
- Measure the rise precisely — from finished grade at the base of the entry to the top of the threshold, not the door frame.
- Measure available horizontal run from the threshold outward, accounting for any obstacles (landscaping, utility lines, adjacent structures).
- Assess the landing surface at the base: concrete or asphalt is acceptable; grass, gravel, or dirt is not — a ramp must terminate on a firm, level surface.
- Evaluate drainage: does water pool at the base of the entry? Standing water under or at the base of a ramp creates a serious fall hazard.
- Identify any grade changes, slopes, or obstacles along the ramp path that would require intermediate landings or direction changes.
- Determine whether the ramp will be used primarily by a manual wheelchair user, a power chair, or a scooter — each has different width and slope requirements.
DIY vs. Professional Installation
Threshold and portable folding ramps can be positioned by a family member without professional help. Modular aluminum systems can technically be assembled by a knowledgeable DIYer, but most manufacturers and accessibility professionals recommend professional installation to ensure correct slope, landing dimensions, handrail height, and edge protection — all of which directly affect fall risk.
Wood and concrete ramps should always be built by a licensed contractor. These require structural calculations, proper anchoring, and in most jurisdictions, a building permit with inspection.
Permit Requirements
- Permanent attached ramps (wood, concrete): Permits are required in nearly all jurisdictions. These ramps alter the structure of the property and must be inspected.
- Modular aluminum ramps: Most municipalities do not require permits for freestanding modular systems because they are not permanently attached. However, some jurisdictions do require permits even for non-permanent structures. Always verify locally.
- State-specific example — Massachusetts: Massachusetts requires permits for permanent ramps and enforces 521 CMR, which mandates a minimum ramp width of 48 inches (versus the federal ADA minimum of 36 inches) when state funding is involved. Massachusetts labor also runs 20–35% above the national average, which affects installed cost estimates.
The Role of a CAPS-Certified Contractor
For ramp projects, a Certified Aging-in-Place Specialist (CAPS) brings specific value beyond general contracting: they conduct site assessments through an accessibility lens, design ramps to ADA-aligned dimensions, and navigate local permit requirements for home modification projects. They can also anticipate future mobility needs — for example, sizing a ramp for a power wheelchair even if the current user relies on a walker — so the installation does not need to be rebuilt as needs change. For a full explanation of CAPS credentials and how to find a certified contractor, see our guide to what a CAPS-certified aging-in-place contractor does.
2026 Installed Cost Ranges by Ramp Type
All figures below are installed totals — meaning materials plus professional labor, basic site preparation, and standard handrails. Materials-only costs are meaningfully lower but do not reflect what a family will actually pay for a safe, code-compliant installation.
| Ramp Type | National Installed Range (2026) | Notes on Cost Drivers |
|---|---|---|
| Threshold / rubber ramp | $50–$300 | No installation labor; cost is materials only; not suitable for rises above 3 inches |
| Portable folding ramp | $100–$600 | No installation labor; price varies by length and weight capacity |
| Modular aluminum ramp | $2,000–$8,000 | Primary cost driver: ramp length (determined by rise). At ~$150/linear foot, a 24-inch rise = ~$3,600 before landings, handrails, and permits |
| Wood ramp | $1,500–$6,000+ | Labor-intensive; permit costs add to total; ongoing maintenance (sealing, painting) adds long-term cost |
| Concrete ramp | $3,000–$12,000+ | Highest upfront cost; long installation timeline; no relocation option; lowest long-term maintenance cost |
The most significant cost driver across all ramp types is ramp length, which is determined by the rise height. A 12-inch rise requires at minimum a 12-foot ramp; a 24-inch rise requires at minimum a 24-foot ramp. For modular aluminum systems, linear-foot pricing (typically $100–$200 per foot installed, depending on region and configuration) makes this relationship direct and predictable.
Funding Decision Framework: Reducing or Eliminating Out-of-Pocket Cost
Most families do not need to pay the full installed cost of a ramp out of pocket. Several federal, state, and nonprofit funding programs exist specifically for home modifications that support aging in place. The key is knowing which programs to pursue first — and in what order.
Primary Public Funding Pathways
| Program | Who Qualifies | Maximum Benefit | Key Requirements |
|---|---|---|---|
| VA HISA Grant (Home Improvement and Structural Alterations) | Veterans with service-connected or non-service-connected conditions requiring medically necessary home modifications | Varies; subject to annual adjustment — verify current amounts at va.gov | Medical necessity documentation; VA approval before work begins |
| VA SAH Grant (Specially Adapted Housing) | Veterans with specific severe service-connected disabilities affecting mobility | Up to ~$121,812 (as of 2025 data; subject to annual adjustment) | Specific disability criteria; limited number of awards per year |
| VA SHA Grant (Special Home Adaptation) | Veterans with qualifying mobility or vision impairments | Up to ~$24,405 (as of 2025 data; subject to annual adjustment) | Specific disability criteria; applied to owned or family member's home |
| Medicaid HCBS Waiver (Home and Community-Based Services) | Medicaid-eligible individuals; waiver availability varies by state | Varies by state; no federal cap | Prior authorization required; modification must support health, safety, or independence; contact state Medicaid office for specifics |
| USDA Section 504 Home Repair Grant | Very-low-income homeowners in rural areas; age 62+ for grant (vs. loan) | Up to $10,000 (grant); additional loan amounts available | Rural single-family home; income below 50% of area median; grant specifically to remove health and safety hazards |
| HUD Older Adults Home Modification Grant | Low- to moderate-income older adults; administered through local agencies | Up to $5,000 per household | Contact local HUD-approved housing agency for availability and eligibility |
| State and local programs | Varies by state and municipality | Varies widely | Contact your Area Agency on Aging or state housing agency |
| Nonprofit programs | Income-qualified homeowners; often limited to specific modifications | Varies; often covers smaller modifications or materials | Habitat for Humanity aging-in-place programs; local disability organizations; contact Area Agency on Aging for referrals |
| Assistive Technology (AT) Loan Programs | Varies by state; most states have a state AT program | Loan amounts vary; typically low-interest or interest-free | Repayment required; not a grant; useful when grants do not cover full cost |
Decision Sequence: Where to Start
- Veteran? Contact the VA first. HISA, SAH, and SHA grants can cover ramps and entry modifications. A VA benefits counselor can determine which grant applies to the specific disability and situation.
- Medicaid-eligible? Contact your state Medicaid office or HCBS waiver intake line. Waiver programs vary significantly by state — some cover ramps explicitly, others do not. Your local Area Agency on Aging can help identify whether a waiver is available and open to new applicants in your state.
- Low-income homeowner in a rural area? Apply to the USDA Section 504 program. Grants of up to $10,000 are available for qualifying very-low-income rural homeowners age 62 and older to remove health and safety hazards.
- None of the above? Contact your local Area Agency on Aging (find yours at eldercare.acl.gov). They can identify state-specific programs, nonprofit resources, and low-interest AT loan options available in your area. The HUD Older Adults Home Modification Grant (up to $5,000) may also apply through a local housing agency.
Ramp Safety and Seasonal Maintenance Checklist
A ramp that was safe at installation can become a fall hazard if maintenance is deferred. The following checks take less than 15 minutes and should be performed at least twice a year — and additionally before and after winter for aluminum ramps in cold climates.
- Non-slip surface: Inspect the ramp surface for worn, peeling, or missing non-slip material. On aluminum ramps, check that the grating or abrasive strips are intact. On wood ramps, check for smooth or wet surfaces that need recoating.
- Handrail tightness: Grip each handrail firmly and apply lateral pressure. Any movement or wobble indicates loose connections that need tightening. Handrails are the primary fall-prevention feature — a loose handrail can fail at the moment it is most needed.
- Drainage and standing water: After rain, check for pooling water on the ramp surface or landing. Clear any debris blocking drainage channels. On wood ramps, standing water accelerates rot.
- Edge protection: Verify that curbs or edge guards are intact and securely attached. Damaged edge protection can allow a wheel to slip off the ramp edge.
- Structural integrity (wood ramps): Press on the ramp surface in several locations. Soft spots or flex indicate rot or structural compromise. Check joist connections at the house attachment point for rust (if metal hardware) or rot.
- Modular aluminum connection points: Check that all section-to-section and section-to-landing connections are tight. Modular systems can loosen over time with repeated use.
- Winter preparation (aluminum ramps): Before the first freeze, verify that drainage is unobstructed so ice does not form on the surface. Use calcium chloride or sand — not rock salt, which can corrode aluminum hardware. Do not use a metal shovel on the ramp surface; use a plastic blade to avoid damaging the non-slip surface.
- Landing surface condition: Confirm that the base landing remains firm and level. Frost heave can shift concrete or pavers over a winter; check for unevenness that could catch a wheel or foot.
Related reading
Need a professional assessment?
Find a CAPS-credentialed professional or local aging services through our outbound resource list — we never name or rank individual contractors.
Find Local HelpNoticed something outdated or inaccurate on this page? Flag a correction. We review every report against CDC, NIA, and AARP HomeFit guidance before updating a page.