
Caregiver decision guide
Step-by-Step Safe Transfer Guide: Gait Belts, Hoyer Lifts, and Sit-to-Stand Techniques for Caregivers
Learn the correct techniques for using gait belts, Hoyer lifts, and sit-to-stand lifts to safely transfer a loved one at home. This guide focuses on body mechanics, sling placement, communication, and fall response to prevent injury to both you and the care recipient.
Why Proper Technique Matters — The Injury Toll
Family caregivers often enter the role without any training in safe patient handling. Yet the physical demands of transferring a loved one from bed to wheelchair or chair to toilet place enormous strain on the body. According to the Occupational Safety and Health Administration (OSHA), nursing assistants in 2017 experienced musculoskeletal disorder cases at a rate of 166.3 per 10,000 workers — more than five times the all‑industry average of 30.5 per 10,000. The direct and indirect costs of these injuries are estimated at $20 billion annually across healthcare settings.
The National Institute for Occupational Safety and Health (NIOSH) has established that the maximum safe force on the lumbar spine for a single‑person lift is 764 pounds. Yet biomechanical studies show that one person manually lifting a patient without equipment generates between 1,424 and 2,062 pounds of force on the lower back — well above the safe threshold. The result: more than 10% of family caregivers leave the field every year because of back injuries, and over half will experience chronic back pain during their caregiving tenure.
The good news is that mechanical devices — gait belts, Hoyer lifts, and sit‑to‑stand lifts — can dramatically reduce these loads when used correctly. A 2024 systematic review of 56 biomechanical studies in PMC found that floor and ceiling lifts were the most effective for reducing caregiver strain, while gait belts showed mixed results depending on technique. This reinforces the core message of this guide: the device matters far less than how you use it. Poor body mechanics, incorrect sling placement, and lack of communication cause most injuries — not the choice of equipment.
Universal Safety Principles for Every Transfer
Before you touch any device, ingrain these five principles. They apply whether you are using a gait belt, a Hoyer lift, or a sit‑to‑stand lift.
- Communicate the plan. Tell the person what you are going to do, step by step. Count “one, two, three” before lifting. This builds trust and gives them time to brace.
- Lock all brakes. Wheelchair brakes, bed brakes, lift casters — everything. A wheel that rolls mid‑transfer can cause a fall.
- Use nonskid footwear. Both you and the person you are moving should wear shoes with good traction. Socks or bare feet on a hardwood floor are dangerous.
- Keep the person close to your body. The further they are from your center of gravity, the more strain on your lower back. Hug them in tight during the pivot motion.
- Bend with your legs, not your back. Keep your spine straight, shoulders back, and lower yourself by bending at the knees and hips. Never twist your torso while carrying weight.
Using a Gait Belt: Step-by-Step Instructions
A gait belt is a stabilizing and guiding device — it is not a lifting device. Use it only for people who can bear weight on at least one leg and assist with standing. Follow these steps every time.
- Explain what you are going to do and ask for the person’s cooperation. Ensure they understand and agree.
- Lock the brakes on the bed, wheelchair, or chair. Remove any obstacles from the path.
- Wrap the gait belt around the person’s waist, over clothing, never against bare skin. Position it at the natural waist (just above the hips, near the navel). Center the buckle in front, slightly off to one side so it doesn’t press on the spine if the person leans back.
- Tighten the belt so it is snug. Use the two‑finger rule: you should barely be able to slide two fingers between the belt and the person’s body. Too loose and you lose control; too tight and it becomes uncomfortable.
- Position the person’s feet flat on the floor, shoulder‑width apart, with knees bent at about 90 degrees. Check that they are wearing nonskid shoes.
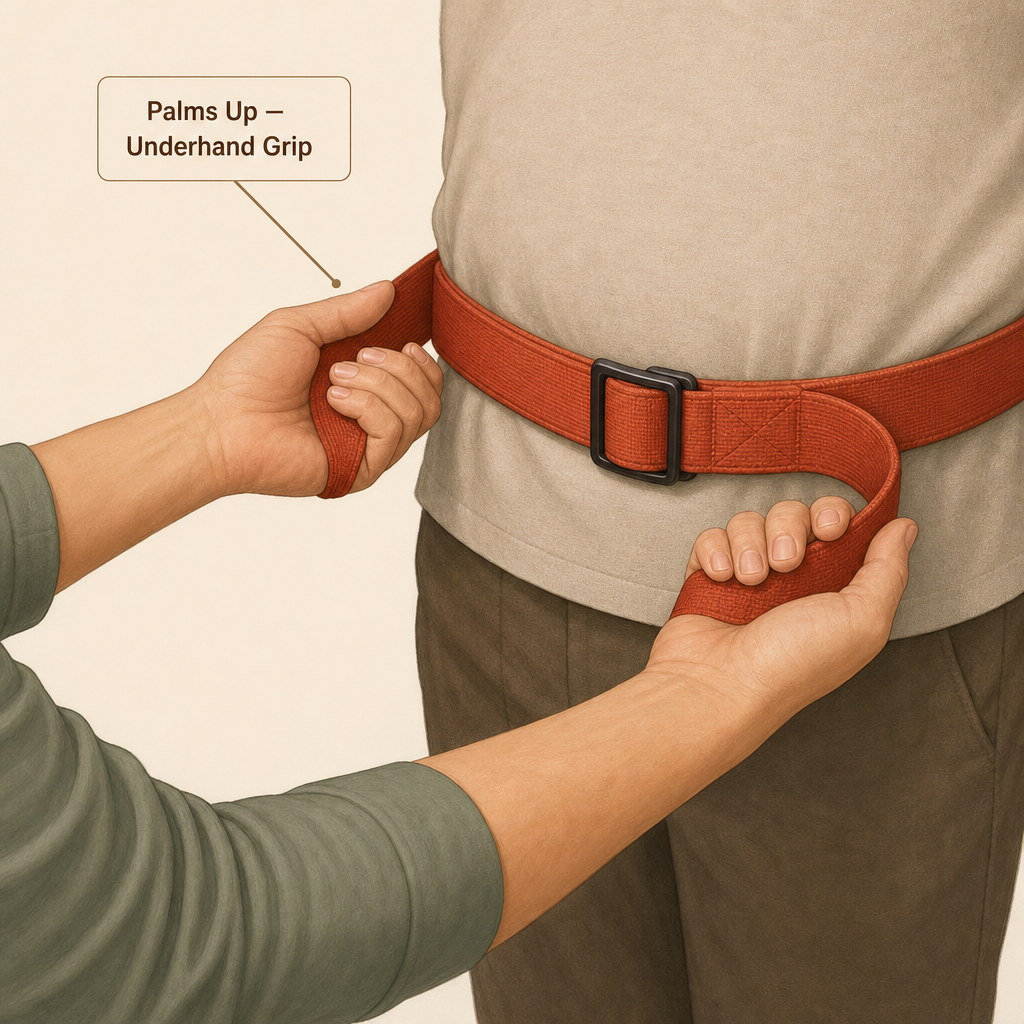
- Stand close to the person, feet shoulder‑width apart, knees bent. Place your hands on the belt using an underhand grip (palms facing up, fingers curled over the belt). This grip is stronger and reduces strain on your wrists and lower back.
- On the count of three, ask the person to push up from the bed or chair using their arms and legs. As they rise, keep your back straight, use your leg muscles, and pull upward — do not yank. Once standing, check their stability.
- To pivot, keep the person close to your body. Move your feet in small, sidestep motions (do not twist your torso). Guide them toward the destination chair.
- To sit, ask them to reach back for the chair armrests or seat. Bend your knees and lower them slowly, keeping a firm grip on the belt until they are fully seated and stable. Then unbuckle and remove the belt.
Using a Hoyer Lift: Step-by-Step Instructions
A full‑body Hoyer lift is used for people who cannot bear weight at all. It requires a two‑person team for safety: the driver (who operates the lift) must be at least 18 years old per federal guidelines, and a second caregiver assists with positioning and monitoring the person during the transfer.
Step 1: Pre‑Use Safety Checks
- Inspect the sling for tears, frays, or worn stitching. Replace if damaged.
- Check the lift’s straps, spreader bar, and wheels. Ensure nothing is bent or broken.
- Test the emergency lower mechanism (usually a red button or lever). Know where it is before you start.
- Verify the lift’s weight capacity. Standard lifts handle up to 400 pounds; bariatric lifts accommodate 600+ pounds.
Step 2: Sling Selection and Placement
Choose the correct sling based on the person’s mobility and the type of transfer. Below is a quick reference:
| Sling Type | Best For | Features |
|---|---|---|
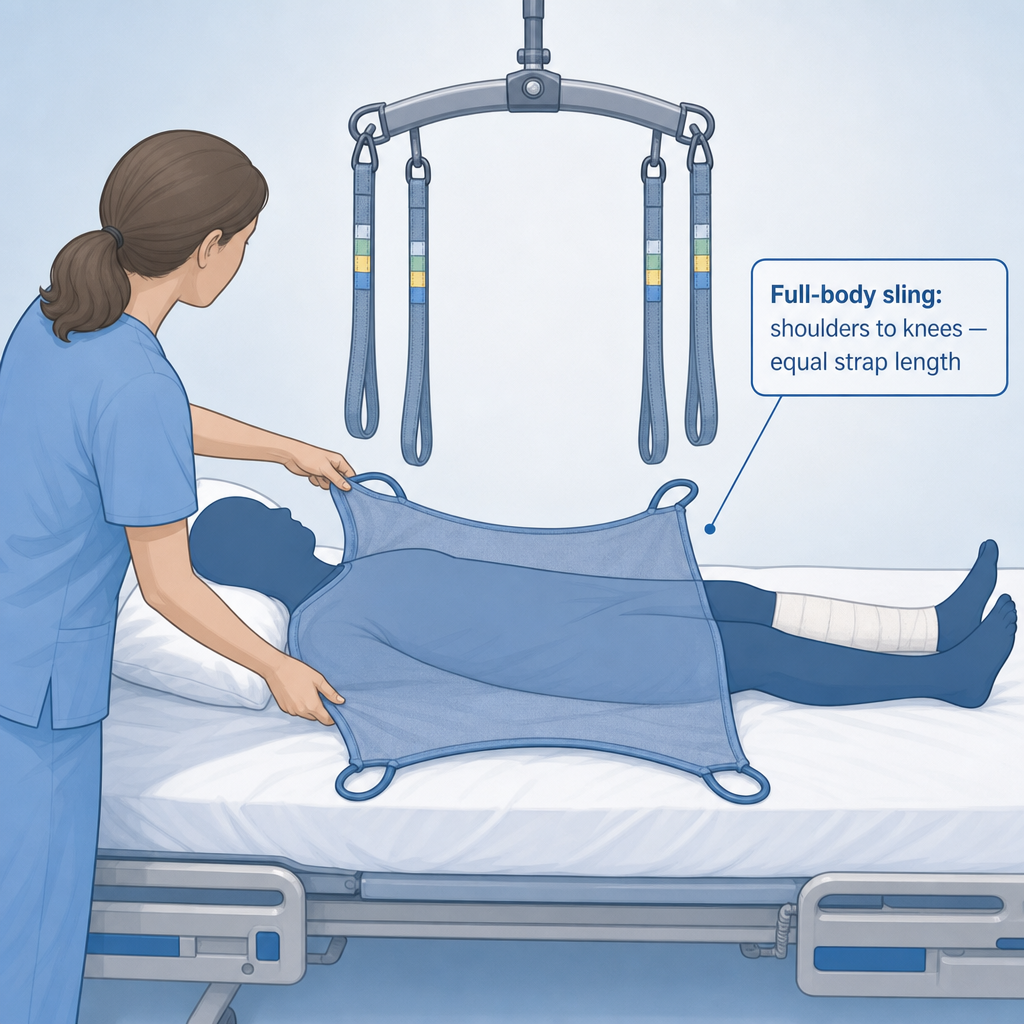
| Full‑body sling | Non‑weight‑bearing individuals; full bed‑to‑chair transfers | Supports head to buttocks (or shoulders to thighs); some have a head support |
| Split‑leg (butterfly) sling | Toileting and showering transfers | Open crotch area for access; often made of mesh for water drainage |
| Sit‑to‑stand sling | Partial weight‑bearing individuals | Wraps behind armpits and lower back; person remains seated on the lift’s seat |
To place the sling: roll the person onto one side, position the sling under them, then roll back. Center the sling so that it extends evenly from the shoulders to just above the knees. Attach the sling loops to the spreader bar hooks, making sure each strap is the same length so the person hangs balanced and comfortable.
Step 3: The Lift Operation
- Position the lift base under the bed or chair. Lock all four casters.
- Raise the sling just enough to clear the surface — go slowly. The person’s head should be slightly elevated, not flat.
- One person steadies the lift (driver) while the second caregiver monitors the person’s comfort and position. Communicate continuously.
- Move the lift to the destination. Push from the base frame, not the mast. Keep the person’s legs from swinging by placing your hand gently on their knee.
- Lower smoothly into the chair or wheelchair. Pause when the person is about six inches above the seat, then lower the rest of the way. Once fully seated, disconnect the sling straps.
Using a Sit‑to‑Stand Lift: Step-by-Step Instructions
A sit‑to‑stand lift (sometimes called a stand‑assist lift) is designed for people who can bear weight on their legs and follow simple commands but lack the strength or balance to stand independently. The sling wraps behind the armpits and lower back, allowing the person to assist actively.
- Position the lift’s base beneath the bed or chair. Lock the brakes.
- Place the sit‑to‑stand sling behind the person’s back, with the top edge just under their armpits. The leg strap (if present) goes under the thighs.
- Attach the sling loops to the lift’s arms. Ensure both sides are at equal height.
- Ask the person to scoot to the edge of the seat and place their feet flat on the floor. The lift’s knee pad (if available) should rest against their shins.
- On your count, the person leans forward and pushes up while you activate the lift. The lift’s arm raises, helping them rise to a standing position. They should bear as much weight as they safely can.
- Once standing, pivot the lift (or walk the person forward) to the destination. The lift’s wheels allow easy movement. Lower gently into the new chair.
What to Do If the Person Starts to Fall
Despite your best efforts, falls can happen — especially if the person becomes dizzy, loses coordination, or overestimates their strength. Your instinct may be to grab them and pull them upright, but that often causes more harm to both of you. Follow the controlled descent method instead.
- If you are using a gait belt: keep your underhand grip, stay close, and do not try to stop the fall. Instead, use the belt to guide the person down toward the floor. Bend your knees and lower your own body as you go. Aim to land the person on their buttocks or side — not flat on their back or head.
- If you are using a Hoyer lift: release the emergency lower mechanism to bring the person down slowly. If the lift is attached, you may be able to lower them to the floor in a sitting or supine position.
- If you are using a sit‑to‑stand lift: release the lift’s descent and guide the person down gently.
- Once the person is on the floor, check for injuries before attempting to help them back up. If there is any sign of a fracture or head strike, call 911. Otherwise, use a call button or phone to get assistance — trying to lift them from the floor alone can injure both of you.
When to Call a Physical Therapist for a Reassessment
Even with proper technique, circumstances change. A physical therapist should reassess your transfer plan if any of the following occur:
- The person has had a fall — even if no injury occurred. Mobility may have declined.
- You notice a change in their ability to bear weight, follow commands, or maintain balance.
- You acquire a new piece of equipment and need training on safe use.
- You or the other caregiver are experiencing persistent back pain, fatigue, or difficulty performing transfers.
- The person loses or gains a significant amount of weight, affecting sling fit and lift capacity.
A physical therapist can evaluate both the caregiver’s body mechanics and the care recipient’s functional status, then recommend adjustments to equipment or technique. Many home health agencies offer free assessments. Do not wait for an injury to call.
Questions to bring to a clinician or OT
This is not medical, legal, or a family's final decision — only a framework. Bring these questions to a clinician, occupational therapist, or your local Area Agency on Aging.
Find Local HelpRelated reading
Noticed something outdated or inaccurate on this page? Flag a correction. We review every report against CDC, NIA, and AARP HomeFit guidance before updating a page.