
Caregiver decision guide
How to Choose the Right Cane for a Senior: A Step-by-Step Guide for Caregivers
Choosing the right cane starts with identifying your parent's specific mobility problem — balance, pain, or weakness. This guide provides a simple three-question framework to match the correct cane type, handle, and fit, helping you reduce fall risk and support their independence.
Why Choosing the Right Cane Matters More Than You Think
If your parent has started stumbling on the carpet or gripping the kitchen counter to cross the room, you are likely thinking about a cane. It seems simple: pick one up at the pharmacy, hand it over, and the problem is solved. But the data tells a different story.
According to research cited by AARP, an estimated 70% of canes are used incorrectly or are the wrong height and design for the person using them. That is not a minor inconvenience — it is a direct contributor to fall risk. The National Health and Aging Trends Study (NHATS) found that 16.4% of adults aged 65 and older use a cane, making it the most common mobility device. Yet the same study, published by Gell et al. in 2015, reported that cane-only users had a 30% higher rate of activity-limiting worry about falls compared to older adults who used no device at all.
The problem is not the cane. The problem is that most people skip the diagnostic step. They buy a device before they understand what kind of mobility problem they are trying to solve. A cane designed for someone with mild balance issues will not help — and may harm — someone who needs to offload significant weight from an arthritic hip. This guide walks you through a structured decision process so you can match the cane to your parent's specific mobility challenge, not the other way around.
Step 1: Identify Your Parent's Mobility Problem — The Three-Question Framework
Before you look at any cane, sit down and observe your parent's walking pattern for a few minutes. The right cane type depends entirely on the answer to one question: what is the primary difficulty?
This framework is adapted from a clinical approach described by Lam in the Canadian Family Physician (2007), which divides gait disturbances into three categories. You do not need a medical degree to apply it — just honest observation.
- Is the problem primarily balance? Does your parent feel unsteady on their feet, sway when standing still, or stumble over uneven surfaces? Do they grab furniture or walls to stay upright? This points to a sensory or coordination issue.
- Is the problem primarily weight-bearing pain? Does your parent complain of hip or knee pain when standing or walking? Do they limp or favor one leg? This is common with osteoarthritis and points to a joint or skeletal problem.
- Is the problem primarily motor weakness? Does one leg feel heavy or drag when walking? Does your parent have difficulty initiating a step? This can occur after a stroke or with neurological conditions and points to a motor control problem.
If your parent's primary issue is balance, consider complementing cane use with targeted balance exercises to prevent falls. A cane can help with stability, but strengthening the underlying balance system is equally important.
Step 2: Match the Problem to the Right Cane Type
Once you have identified the primary mobility problem, the cane type practically chooses itself. The table below maps each problem category to the appropriate cane design, based on guidance from the Mayo Clinic, the Arthritis Foundation, and the clinical review by Lam (2007).
| Mobility Problem | Recommended Cane Type | Why It Works | Key Limitation |
|---|---|---|---|
| Balance issues (mild unsteadiness, sensory or coordination problems) | Single-point cane (standard straight cane) | Lightweight and easy to maneuver; provides a third point of contact for mild stability | Cannot support significant body weight; not suitable for moderate-to-severe balance impairment |
| Weight-bearing pain (hip or knee osteoarthritis, post-injury recovery) | Offset cane (also called a J-handle or ergonomic cane) | Handle directs force perpendicular to the ground, transferring weight through the cane's shaft more efficiently; reduces joint stress | Requires correct orientation during use; offset must face forward |
| Significant weakness or neurological impairment (post-stroke, hemiplegia) | Quad cane (four-pronged base) | Wider base of support provides greater stability; can handle more weight than a single-point cane | Heavier and bulkier; can interfere with a natural gait pattern; not ideal for most people with mild issues |
A cane can support approximately 15–25% of a person's body weight, according to HealthInAging.org (American Geriatrics Society) and the Lam review. If your parent needs to offload more weight than that, or if they cannot take a single step without holding onto something, a cane is no longer the right tool — a walker is.
Step 3: Choose the Right Handle for Comfort and Control
The handle is where your parent's hand meets the device every single step. An uncomfortable handle can cause hand pain, reduce grip strength, and make the cane feel more like a burden than a help. The three most common handle types serve very different needs.
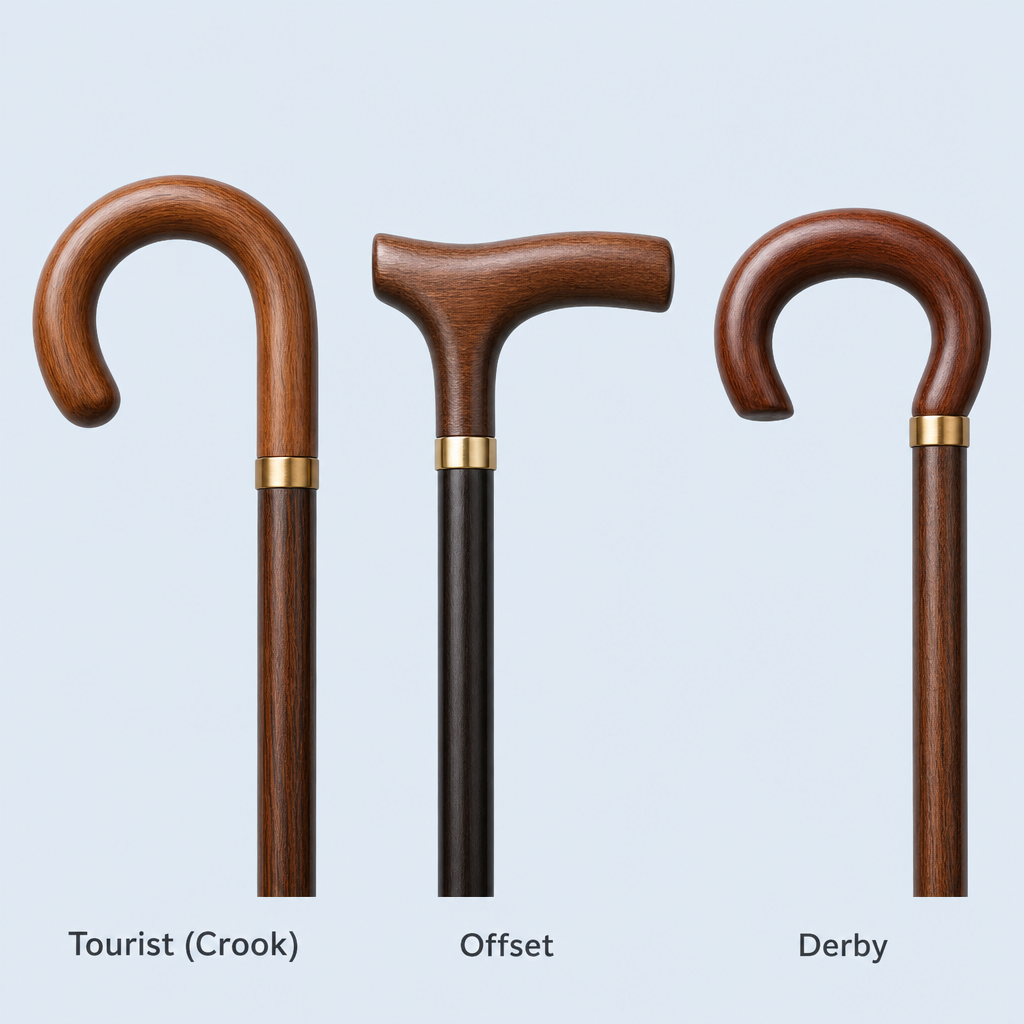
| Handle Type | Best For | Why | Considerations |
|---|---|---|---|
| Offset (ergonomic) handle | Weight-bearing needs, arthritis, hand or wrist pain | Directs force perpendicular to the ground, aligning the shaft with the forearm; reduces strain on the wrist and hand | Must be oriented correctly (offset faces forward); may feel unfamiliar at first |
| Derby / T-handle | Moderate support needs, even weight distribution | Curved shape distributes pressure across the palm; good for people who need moderate support without heavy weight-bearing | Less efficient for transferring significant body weight through the cane |
| Rounded tourist / crook handle | Light use only, occasional balance assistance | Familiar shape; can be hung on the arm when not in use | Concentrates pressure on the palm; not suitable for weight-bearing or prolonged use |
The Mayo Clinic and Arthritis Foundation both recommend foam or ergonomic grips for people with arthritis or hand weakness. Larger grips can help if your parent has difficulty making a tight fist. If the handle feels too small, a built-up foam sleeve can increase the diameter.
Step 4: Get the Fit Right — Sizing Your Parent's Cane
A cane that is the wrong height is not just uncomfortable — it is dangerous. The Mayo Clinic warns that a cane that is too long requires more effort to lift and clear the ground, while a cane that is too short causes the user to lean to one side, throwing off balance and increasing fall risk.
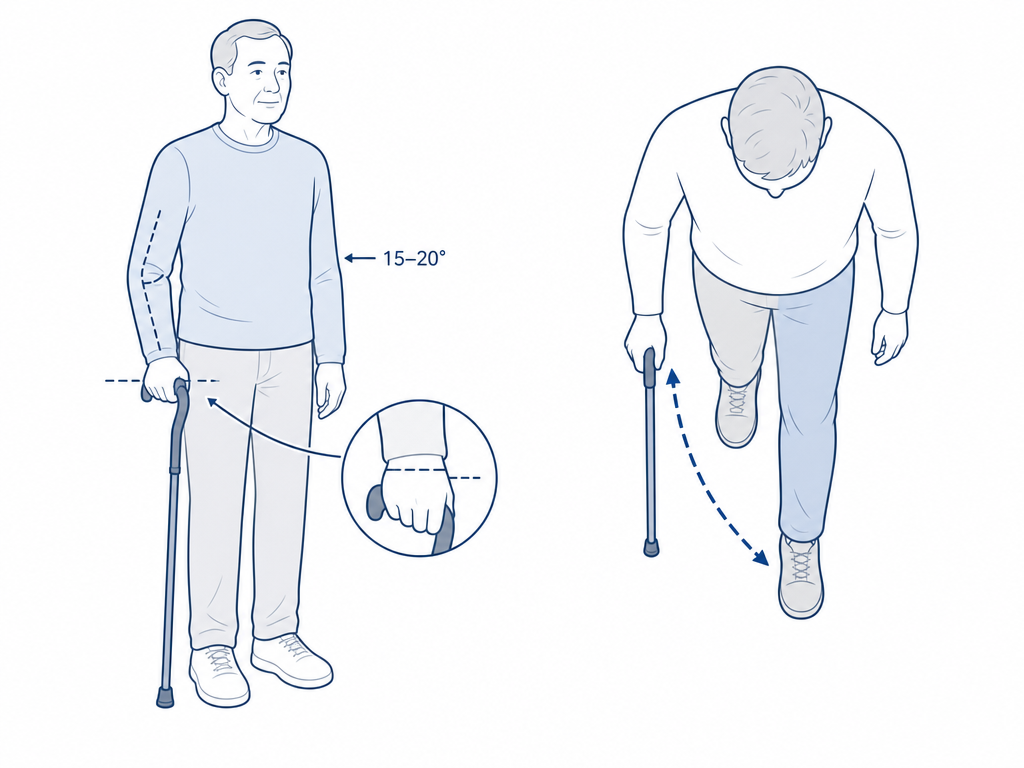
Here is how to size a cane correctly, using the wrist-crease method recommended by the Mayo Clinic, HealthInAging.org, and the Arthritis Foundation:
- Have your parent stand in the shoes they normally wear, with their arms relaxed at their sides.
- The top of the cane handle should align with the crease of their wrist (the distal wrist crease).
- When holding the cane, their elbow should have a comfortable bend of approximately 15 to 20 degrees — not locked straight and not bent sharply.
- The cane tip should rest on the ground about 2 inches to the side and slightly in front of their foot.
Most standard canes are adjustable. If the cane does not have a push-button or twist-lock adjustment mechanism, it is likely the wrong size. A wooden cane that is too tall can be cut down by a hardware store, but this is a permanent modification — measure twice.
Step 5: How to Walk Safely with a Cane — The Opposite-Hand Rule
The single most common mistake people make with a cane is holding it on the wrong side. The cane should always be held in the hand opposite the weak or painful leg. This is not intuitive — many people naturally reach for the cane on the same side as the pain — but the biomechanics are clear.
The clinical review by Lam (2007), citing Joyce and Kirby, found that using the cane on the opposite side reduces the force on the weak leg by nearly two-thirds. Here is why: when you step forward with the weak leg and the opposite-hand cane at the same time, the cane and the leg form a stable tripod. The cane carries a portion of the weight that would otherwise go through the painful joint.
The correct walking sequence, as described by the Mayo Clinic and HealthInAging.org:
- Hold the cane in the hand opposite the weak or painful leg.
- Advance the cane and the weak leg forward together, at the same time, for a comfortable step length.
- Place the cane tip on the ground about 2 inches to the side and slightly ahead of your foot.
- Step through with the strong leg.
- Repeat: cane + weak leg together, then strong leg.
For stairs, the Mayo Clinic and Arthritis Foundation both teach the same rule: up with the good, down with the bad. Going up, step first with the strong leg, then bring the cane and weak leg up together. Going down, place the cane on the lower step first, then step down with the weak leg, then bring the strong leg down. If there is a handrail, use it and hold the cane in the other hand.
Step 6: When a Cane Is Not Enough — Signs a Walker Is Needed
A cane is a wonderful tool, but it has limits. If your parent needs to offload more than 25% of their body weight, or if their balance is compromised to the point where they cannot take a step without holding onto furniture, a cane will not provide enough support. The Lam review notes a simple clinical test: if a single assisting hand helps, a cane may suffice; if both hands are needed, a walker is the safer choice.
- Your parent needs both hands for support when standing or walking.
- They cannot take a step without holding onto a wall, counter, or piece of furniture.
- Their balance is severely compromised — they sway or feel like they might fall even when standing still.
- They have a condition that affects both legs (e.g., bilateral arthritis, Parkinson's disease).
If any of these signs are present, a walker or rollator is likely the appropriate device. For detailed guidance on choosing between the two, see our clinical decision guide on walkers vs. rollators and the caregiver-focused guide to mobility aid selection.
Common Cane Mistakes and How to Avoid Them
Even with the right cane, small errors in use can undermine safety. Here are the most frequent mistakes and why they matter.
- Using the cane on the same side as the weak leg. This reduces the cane's effectiveness and throws off the natural walking pattern. The cane must go in the opposite hand to create a stable tripod and reduce force on the weak leg.
- Cane too short or too long. A cane that is too short causes the user to lean to one side, straining the back and hips. A cane that is too long forces the shoulder up and makes it harder to lift the cane off the ground. Use the wrist-crease method every time.
- Worn or smooth cane tip. The rubber tip is the only thing between your parent and the ground. The Mayo Clinic recommends replacing the tip when the tread wears down or the rubber stiffens. A worn tip can slip on smooth floors.
- Using a quad cane when a single-point cane would suffice. Quad canes are heavier and can interfere with a natural gait. The Arthritis Foundation notes that most people with arthritis only need a single-point cane. Reserve quad canes for significant weakness or neurological impairment.
- Relying on a cane for more than 25% of body weight support. A cane is not designed to carry a large portion of body weight. If your parent needs that much support, a walker is the appropriate device.
Quick-Reference Checklist: Choosing and Using a Cane
Use this checklist as a quick reference when selecting or evaluating a cane for your parent. Print it, save it, or keep it handy for your next visit.
- Identify the mobility problem: balance, weight-bearing pain, or motor weakness.
- Match the problem to the cane type: single-point for balance, offset for weight-bearing, quad for significant weakness.
- Select the handle: offset for arthritis and weight-bearing, derby for moderate support, tourist for light use only.
- Size the cane: top at wrist crease, elbow at 15–20 degree bend, standing in shoes.
- Use the opposite-hand technique: cane in the hand opposite the weak leg, advance together.
- Check the tip: replace when tread is worn or rubber is stiff.
- Know when to step up: if both hands are needed for support, switch to a walker.
Questions to bring to a clinician or OT
This is not medical, legal, or a family's final decision — only a framework. Bring these questions to a clinician, occupational therapist, or your local Area Agency on Aging.
Find Local HelpRelated reading
Noticed something outdated or inaccurate on this page? Flag a correction. We review every report against CDC, NIA, and AARP HomeFit guidance before updating a page.