
Caregiver decision guide
Transfer Aids and Techniques for Senior Caregivers: Matching Equipment to Mobility Level
A practical guide for family caregivers on selecting the right transfer aid for a senior's actual weight-bearing capacity and applying safe, step-by-step techniques for the most common home transfer scenarios — from bed to wheelchair to car — including special considerations for seniors with dementia.
Why Transfers Are the Highest-Risk Moment in Home Caregiving
Of all the physical tasks involved in caring for an older adult at home, transfers — moving a person from bed to wheelchair, from chair to toilet, from seat to standing — carry the highest injury risk for both the caregiver and the person being moved. This is not a matter of strength or effort. It is a matter of biomechanics, equipment, and preparation.
The data from professional healthcare settings are striking. According to OSHA, nursing assistants experienced musculoskeletal disorder (MSD) incidence rates of 166.3 per 10,000 workers in 2017 — more than five times the all-industry average of 30.5 per 10,000 workers. Direct and indirect costs of back injuries in healthcare are estimated at $20 billion annually. Patient handling — which includes transfers, repositioning, and lifting — is identified by CDC/NIOSH as the single greatest musculoskeletal disorder risk factor for caregivers.
A six-year NIOSH field study replacing manual patient lifting with mechanical equipment in nursing homes found a 61% reduction in workers' compensation claims rates, a 46% decrease in OSHA recordable injury rates, and a 72% reduction in caregiver assaults during resident transfers. These figures point to a clear conclusion: the right equipment matters far more than physical strength or good intentions.
Falls during transfers are among the most serious risks for the senior as well. Rather than restating fall statistics covered elsewhere on this site, see our guide to balance exercises to prevent falls in older adults for that evidence base.
Becoming the person who physically assists your parent with daily movement is also one of the most significant role shifts in caregiving. If you are navigating that transition alongside the practical demands, our guide on navigating role reversal with an aging parent addresses the emotional dimension of this change.
Assessing Your Loved One's Functional Mobility Level
Before choosing any transfer aid or technique, you need to know one thing: how much weight can your loved one bear through their legs? This is the single most important decision gate in transfer planning. Using the wrong aid for the wrong mobility level — most commonly, using a gait belt for someone who cannot bear weight — is how both caregivers and seniors get hurt.
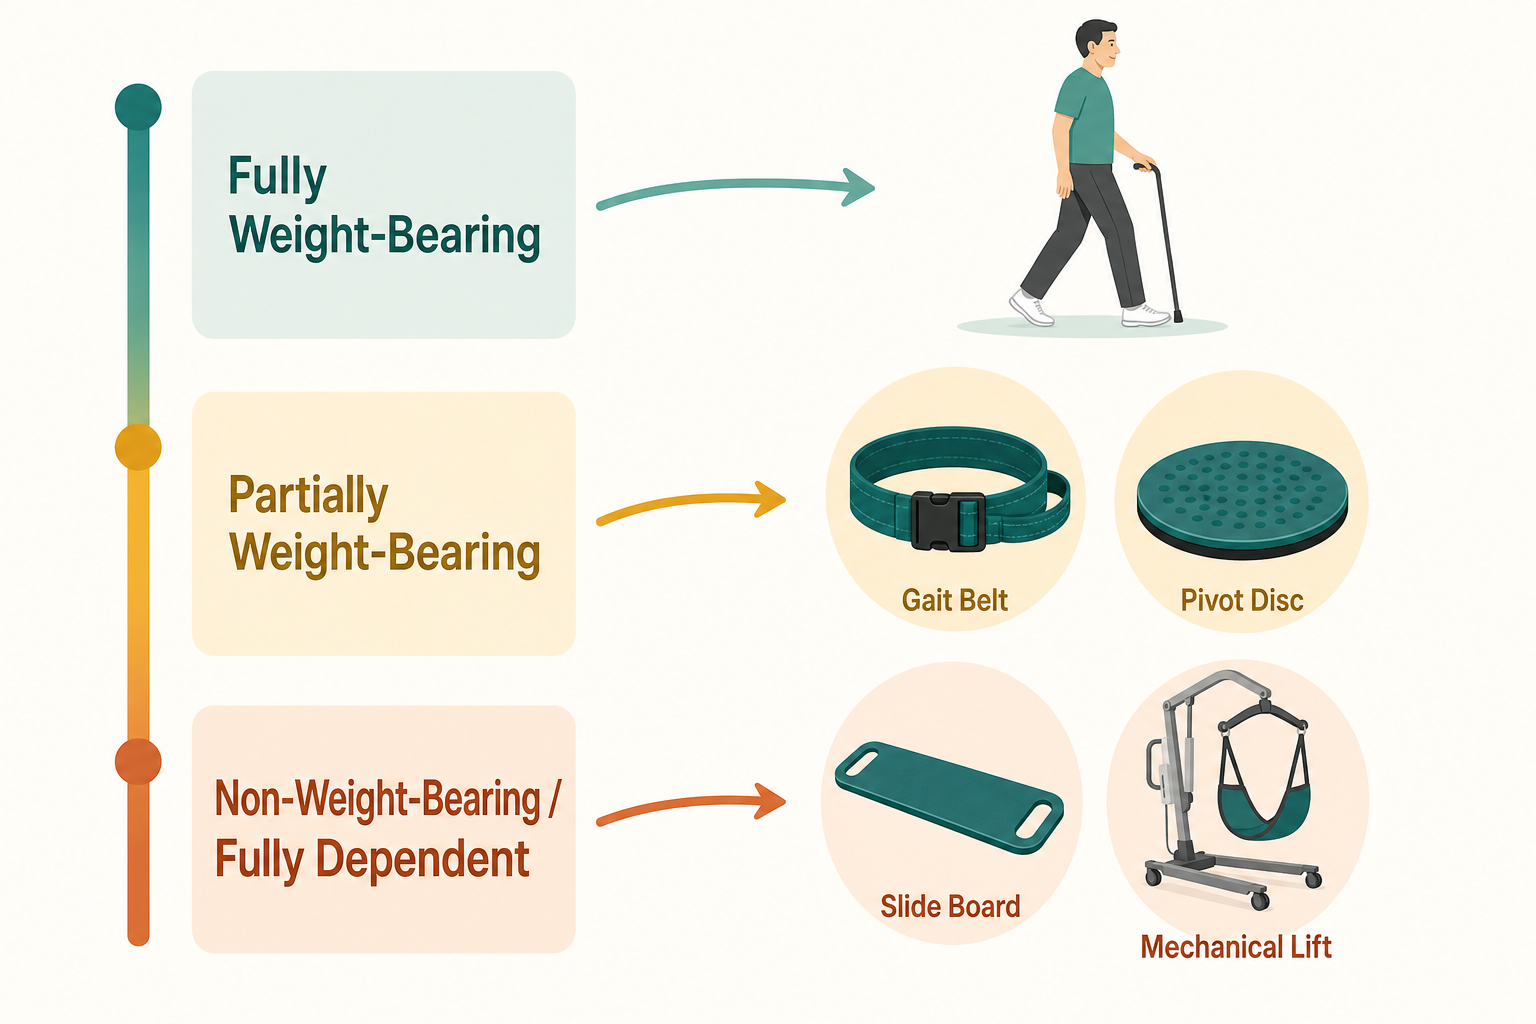
The weight-bearing spectrum has three practical tiers. Use the table below to identify where your loved one currently falls.
| Mobility Tier | What It Looks Like | Key Behavioral Indicators |
|---|---|---|
| Fully Weight-Bearing | Can stand and take steps independently or with minimal steadying support | Rises from a chair with one hand on armrest; walks short distances with or without a cane or walker; can shift weight from foot to foot |
| Partially Weight-Bearing | Can bear some weight through one or both legs but needs physical assistance and support to stand and pivot | Cannot rise without a firm pull or lift assist; can hold standing briefly with support; may be able to take one or two shuffle steps during a pivot |
| Non-Weight-Bearing / Fully Dependent | Cannot bear weight through the legs; requires full mechanical support for all transfers | Legs buckle or collapse when standing is attempted; no meaningful push-up from sitting; cannot sustain standing even with full caregiver support |
Transfer Aid Categories: Choosing the Right Tool for the Mobility Level
Six main transfer aid categories are used in home caregiving. Each has a specific mobility tier where it is appropriate, and each has contraindications — situations where using it increases rather than reduces risk. The table below organizes them by mobility level.
| Transfer Aid | Appropriate Mobility Tier | Primary Use | Key Contraindications |
|---|---|---|---|
| Gait Belt | Partially weight-bearing | Provides a stable grip point for the caregiver during standing pivot and walking assist transfers | Never appropriate for fully dependent individuals; contraindicated when the person cannot bear weight through at least one leg |
| Transfer / Slide Board | Partially or non-weight-bearing with upper extremity strength | Lateral transfers between two surfaces at similar heights (bed to wheelchair seat) | Not suitable for individuals with quadriplegia or those who cannot follow commands or assist with upper body push |
| Pivot Disc / Swivel Cushion | Partially weight-bearing | Reduces rotational force on the caregiver during standing pivot transfers by allowing the senior's feet to rotate with the turn | Not appropriate for non-weight-bearing individuals; requires the person to maintain standing briefly |
| Stand-Assist Device | Partially weight-bearing | Powered or spring-assisted lift that supports the senior from sitting to standing and back; caregiver guides rather than lifts | Requires the person to have sufficient leg strength to bear weight during the transition; not for fully dependent individuals |
| Floor Mechanical Lift | Non-weight-bearing / fully dependent | Full-body mechanical transfer using a sling; eliminates manual lifting for fully dependent individuals | Requires adequate floor space to maneuver; sling fitting must be correct; two caregivers are strongly recommended for safety |
| Ceiling Lift | Non-weight-bearing / fully dependent | Track-mounted lift that removes the need to reposition floor equipment; reduces caregiver biomechanical load more than floor lifts | Requires installation of ceiling track; upfront structural modification cost; professional installation required |
The biomechanical evidence for mechanical lifts is strong. A 2024 systematic review of 57 biomechanical studies (Fray & Davis, published in Human Factors) found that floor and ceiling lifts were the most effective aids in reducing biomechanical load on caregivers. All studies investigating ceiling lifts found decreases in harmful biomechanical outcomes, and ceiling lifts outperformed floor lifts on spine load and trunk moment measures across multiple studies.
Gait belts show a more nuanced picture. The same review found that gait belts reduced nonneutral postures and hand forces in some studies, but produced inconsistent spine-load results — with one study finding increased spinal compression when a belt was used. The key takeaway is not that gait belts are unsafe, but that they are a tool for partially weight-bearing individuals, not a universal transfer solution.
For broader guidance on wheelchair use at home — including positioning, brake habits, and home environment setup — see our wheelchair safety guide for family caregivers. This article focuses specifically on the transfer task itself.
Step-by-Step Techniques for the Four Most Common Home Transfers
The following techniques are drawn from guidance published by the National Library of Medicine, StatPearls/NCBI, and Agrace Hospice caregiver education resources. They apply to partially weight-bearing individuals unless otherwise noted. If your loved one cannot bear weight through at least one leg, a mechanical lift is required — not a manual assist.
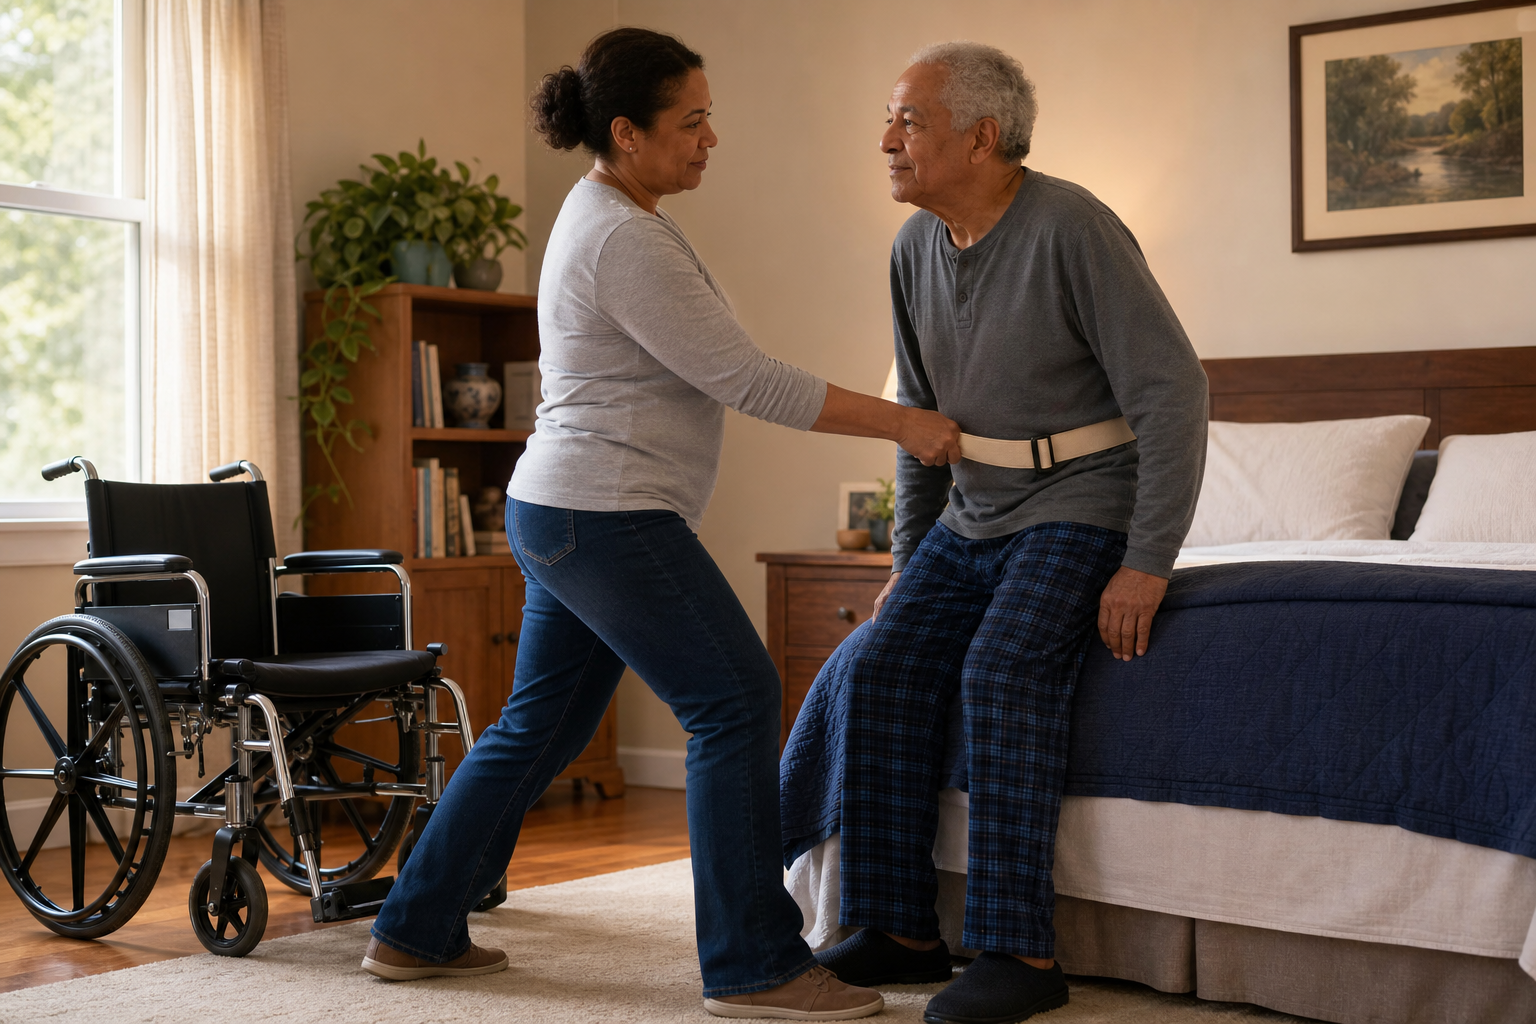
1. Bed-to-Wheelchair Pivot Transfer
This is the most common single-person home transfer for a partially weight-bearing senior. Correct setup before the transfer begins is as important as the technique itself.
- Position the wheelchair at a 45-degree angle to the bed on the senior's stronger side, with brakes locked and footrests swung out of the way.
- Help the person sit upright at the edge of the bed with feet flat on the floor. Allow a moment for any dizziness to clear before proceeding — this is especially important after lying down for an extended period.
- Apply the gait belt snugly around the waist over clothing, with the buckle on the outside. You should be able to fit two fingers under the belt.
- Stand close in front of the person, feet shoulder-width apart in a wide stance. Place the person's outside foot (farthest from the wheelchair) between your knees for support.
- Grasp the gait belt from underneath — not over the top. On a count of three, use a gentle rocking motion to bring the person to standing, keeping your back straight and bending through your hips and knees.
- Once standing, pause. Allow the person to get their bearings and achieve stability before pivoting. Do not rush this step.
- Pivot your feet — do not twist your torso — rotating the person until the back of their knees touches the wheelchair seat.
- Bend your knees and lower the person slowly into the seat, asking them to reach for the armrest as they descend.
2. Wheelchair-to-Toilet Transfer
Bathroom transfers introduce specific challenges: limited floor space, clothing management, and the need for the person to be positioned correctly over a surface they cannot see behind them.
- Position the wheelchair as close to the toilet as the space allows, angled toward the toilet on the person's stronger side. Lock brakes.
- Manage clothing before initiating the transfer — attempting to lower clothing mid-transfer while supporting the person's weight is a common cause of falls.
- Help the person scoot forward to the edge of the wheelchair seat before standing. Feet should be flat on the floor.
- Apply gait belt if available. Use the same standing pivot technique as the bed-to-wheelchair transfer.
- Back the person toward the toilet until they can feel the edge of the seat against the back of their legs — this provides physical confirmation that the surface is there before they lower themselves.
- Lower slowly, keeping your back straight and bending through your knees. A grab bar on the wall beside the toilet allows the person to assist with lowering themselves and reduces the load on the caregiver.
3. Sitting-to-Standing Assist
This transfer applies when helping a person rise from a chair, couch, or bed edge — not necessarily to pivot to another surface, but simply to achieve a standing position for walking or further transfer.
- Ask the person to scoot forward to the edge of the seat so their hips are not fully back in the chair.
- Feet should be flat on the floor, positioned slightly behind the knees — not stretched out in front.
- Instruct the person to lean forward — nose over toes — before pushing up. This forward weight shift is what makes standing mechanically possible; without it, the person is trying to rise straight up rather than using momentum.
- Apply gait belt. Stand facing the person, one foot slightly behind the other for stability.
- Grasp the gait belt from underneath. On a count of three, cue the person to push up from the armrests while you assist the lift through the belt — not by pulling on their arms or shoulders.
- Once standing, pause and allow the person to stabilize before initiating any walking or pivot.
4. Car Transfer
Car seats present a unique challenge: they are typically much lower than a wheelchair or standard chair, and the door frame limits the caregiver's positioning. The technique varies depending on whether the person can bear weight.
- Park as close to the destination as possible to minimize walking distance after the transfer. Open the car door fully.
- Position the wheelchair as close to the car door as possible, at an angle. Lock brakes.
- For a partially weight-bearing person: use the standing pivot technique described above, pivoting the person until their back is to the car seat, then lowering them slowly into the seat. Ask the person to reach for the door frame or dashboard for support as they descend.
- For a non-weight-bearing person: a transfer board (slide board) can be used to bridge the gap between the wheelchair seat and the car seat, allowing a lateral slide transfer without standing. The wheelchair seat and car seat should be at approximately the same height for this to work effectively.
- Once seated, assist the person in swinging their legs into the car. Do not lift both legs simultaneously from a bent position — use one hand under the knee and one under the ankle, and move one leg at a time.
Caregiver Body Mechanics: Five Rules That Protect Your Back During Every Transfer
Body mechanics matter — but they are not a substitute for the right equipment. The following five rules reduce your injury risk during the technique itself. They work in combination with appropriate transfer aids, not instead of them.
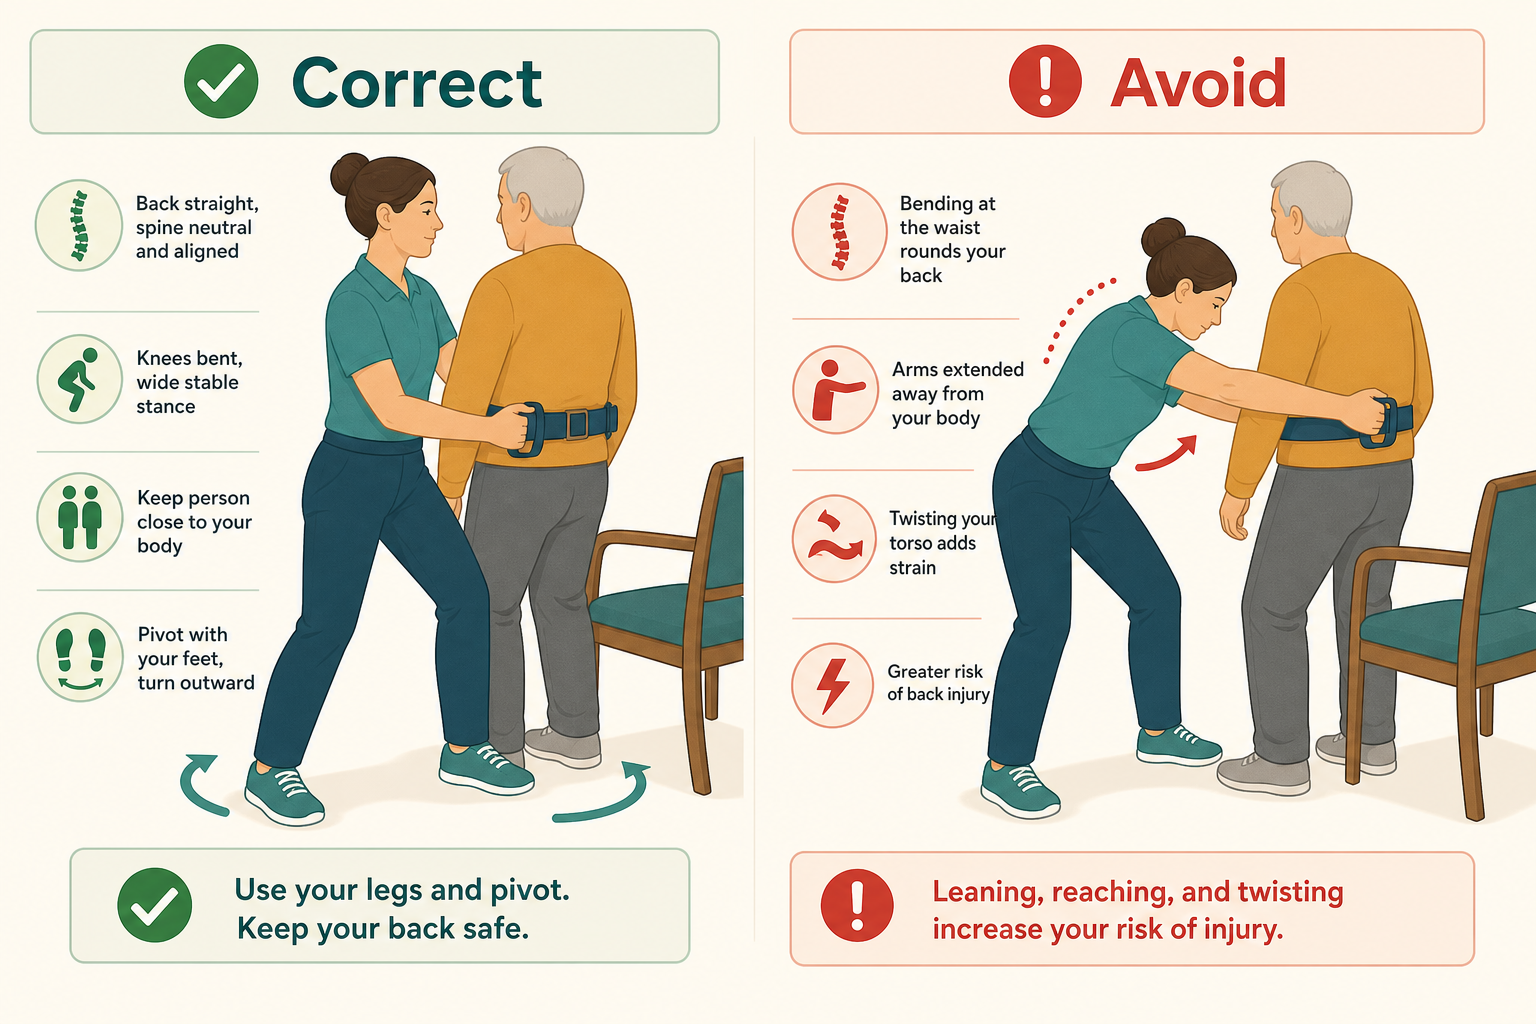
- Wide stance, stable base. Keep your feet shoulder-width apart or slightly wider throughout the transfer. A narrow stance reduces your base of support — if the person shifts unexpectedly, you have less margin to absorb the movement without losing your balance or twisting your spine.
- Back straight, core engaged. A straight spine during the lift phase distributes load across the vertebral column. A rounded or forward-flexed back concentrates compressive force at the lumbar discs — the most common site of transfer-related injury. Think of bracing your core as if expecting a light punch to the abdomen.
- Bend at hips and knees, not at the waist. Lowering yourself by bending your knees keeps your spine in a safer position than hinging at the waist. This is most important during the lowering phase of a transfer, when the person's weight is fully on you and your spine is under the most load.
- Keep the person close to your body. The further the person is from your center of gravity, the greater the torque on your spine. Reaching out to support someone at arm's length multiplies the effective load your back must manage. During a pivot, close contact also gives you better control of the person's movement.
- Pivot your feet, not your torso. Rotating your torso while supporting a person's weight — especially during the pivot phase of a bed-to-wheelchair transfer — generates significant shear and compressive forces on the lumbar spine. Move your feet to redirect your body rather than twisting at the waist.
Transfers for Seniors with Dementia: A Modified Protocol
Transfers for a person living with dementia require a different approach from the outset. Cognitive changes affect a person's ability to understand instructions, anticipate movement, and cooperate with the caregiver — which means that standard verbal cueing and technique sequencing often fail without modification.
If your loved one is in early-stage Alzheimer's, understanding how cognitive changes affect cooperation and communication during care tasks is essential — our early-stage Alzheimer's care guide for family caregivers covers this in broader depth.
Before and During the Transfer
- Approach from the front and make eye contact before speaking. Approaching from behind or the side can startle a person with dementia and trigger a defensive response. Eye contact establishes connection before any instruction is given.
- Reduce environmental distractions first. Turn off the television, pause music, and minimize background noise before beginning. Competing sensory input reduces the person's ability to process verbal instructions.
- Give one-step directions with pauses. Say "Place your hands on the armrest" — then wait for the action before giving the next instruction. Multi-step instructions overwhelm processing capacity at most stages of dementia.
- Demonstrate when words fail. If the person does not respond to verbal instruction, physically demonstrate the movement — touch your own hands to the armrest, or gently guide their hands. Mirror-and-movement cues can reach people who can no longer process verbal language effectively.
- Back the person toward the surface before sitting. Guide the person backward until they can feel the edge of the chair, toilet seat, or bed against the back of their legs before asking them to sit. This gives physical confirmation that the surface is there — without it, sitting down into a surface they cannot see is a common trigger for fear and resistance.
- Monitor behavioral cues throughout. Muscle tension, pulling away, facial grimacing, or verbal agitation are signals to pause — not to push through. These cues indicate that the person's anxiety is rising, and continuing the transfer at that moment increases the risk of a sudden defensive movement.
Managing Resistance
If the person refuses or resists the transfer, do not force it. Forcing a transfer when someone with dementia is resisting escalates the situation and significantly increases fall and injury risk for both of you.
- Step back and change the subject entirely. Talk about something pleasant for two minutes — a favorite memory, a family member, the weather.
- Offer a glass of water or a small snack to shift the person's focus.
- After the anxiety has cleared, try the transfer again with the same calm, one-step approach.
- If resistance is a recurring pattern at a specific time of day, consider adjusting the transfer schedule. Sundowning and fatigue affect cooperation — earlier in the day is often easier.
Pre-Transfer Environment Setup: A Checklist for Every Transfer
Most transfer accidents are preventable through setup — not technique. The following checklist covers the immediate transfer environment. It is not a whole-home safety assessment; for that, see our wheelchair safety guide. Run through this list before initiating any transfer.
- Lock all wheels. Wheelchair, commode, shower chair, and adjustable hospital bed — every wheeled surface involved in the transfer must have its brakes engaged before the transfer begins.
- Clear the pathway. Remove rugs, loose cords, footrests, and any objects from the path between the origin and destination surfaces. You will be moving while supporting another person's weight — there is no safe way to step over an obstacle mid-transfer.
- Ensure non-slip footwear on the senior. Socks alone on a hard floor are a fall hazard during any weight-bearing transfer. Shoes or non-slip footwear should be in place before the transfer begins.
- Set surface heights correctly. For adjustable beds, raise the bed to approximately caregiver waist height for repositioning, then lower it so the senior can sit at the edge with knees bent at 90 degrees and feet flat on the floor before rising. Correct height reduces the mechanical work of the transfer for both parties.
- Verify adequate lighting. Dim or shadowed environments increase the risk of missed footing and spatial disorientation, particularly for people with dementia or low vision.
- Pre-position the destination surface. The wheelchair, chair, or commode should be in its final position — angled, braked, and ready — before you begin the transfer. Do not attempt to reposition equipment mid-transfer.
- Check current medications for dizziness or balance effects. Several medication classes significantly increase fall and stumble risk during transfers. Before beginning a transfer routine, review whether your loved one's current medications affect balance or cause orthostatic hypotension — see our resource on medications that increase fall risk in older adults for specifics.
When to Request an Occupational Therapist Home Assessment
Of all the professional referrals available to family caregivers performing daily transfers, an occupational therapist (OT) home assessment is the single highest-value one. It is also among the most underused.
An OT home visit in the transfer context covers three things that no article can replicate: direct observation and correction of your specific technique with your specific loved one, prescribing the appropriate transfer aid matched to the person's current functional level, and simultaneous assessment of the home environment for modifications that would make transfers safer. All three happen in a single visit.
Request an OT home assessment in any of these situations:
- You are beginning a transfer routine for the first time and want to start correctly.
- Your loved one has recently been discharged from a hospital or rehabilitation facility with a changed mobility level.
- An existing transfer routine feels unsafe, is causing you physical pain, or has resulted in a near-fall or fall.
- You are unsure which transfer aid category is appropriate for your loved one's current functional level.
- Your loved one's dementia has progressed to a point where the current transfer approach is no longer working.
Questions to bring to a clinician or OT
This is not medical, legal, or a family's final decision — only a framework. Bring these questions to a clinician, occupational therapist, or your local Area Agency on Aging.
Find Local HelpRelated reading
Noticed something outdated or inaccurate on this page? Flag a correction. We review every report against CDC, NIA, and AARP HomeFit guidance before updating a page.