How to Prioritize Aging-in-Place Home Modifications by Fall Risk and Cost
bathroomenvironmentalReviewed: 2026-06-24
How to Prioritize Aging-in-Place Home Modifications by Fall Risk and Cost
A practical, evidence-based framework for adult children and family caregivers to prioritize home modifications after a parent's fall — ranked by fall-risk impact per dollar, from quick under-$500 fixes to long-term renovations.
By Editorial Team
grab bars
bathroom safety
stair safety
home hazard audit
home modification cost
Your parent fell last week. The hospital discharged them with a referral for physical therapy and a standard “be careful” warning. You walk into their bathroom and see a slippery white floor, a towel rack they use for balance, a dim bulb that casts shadows. More than one in four older adults falls every year, according to the CDC. Three million emergency room visits, one million hospitalizations, 319,000 hip fractures — most from falls at home. Yet only about 10% of homes are considered “aging-ready.” That gap is not because families don’t care. It is because they see the price range — from $25 for a grab bar to $50,000 for a full bathroom renovation — and freeze.
The most common mistake I see: families skip the cheap, immediate fixes and start with a $12,000 walk-in shower conversion because that’s what a contractor pitched. Meanwhile, a $30 grab bar next to the toilet would have prevented the next fall while they saved up for the bigger project. This article gives you a different order of operations — one that ranks every modification by how much fall risk it removes per dollar spent.
Where to start: spend on the biggest risk first
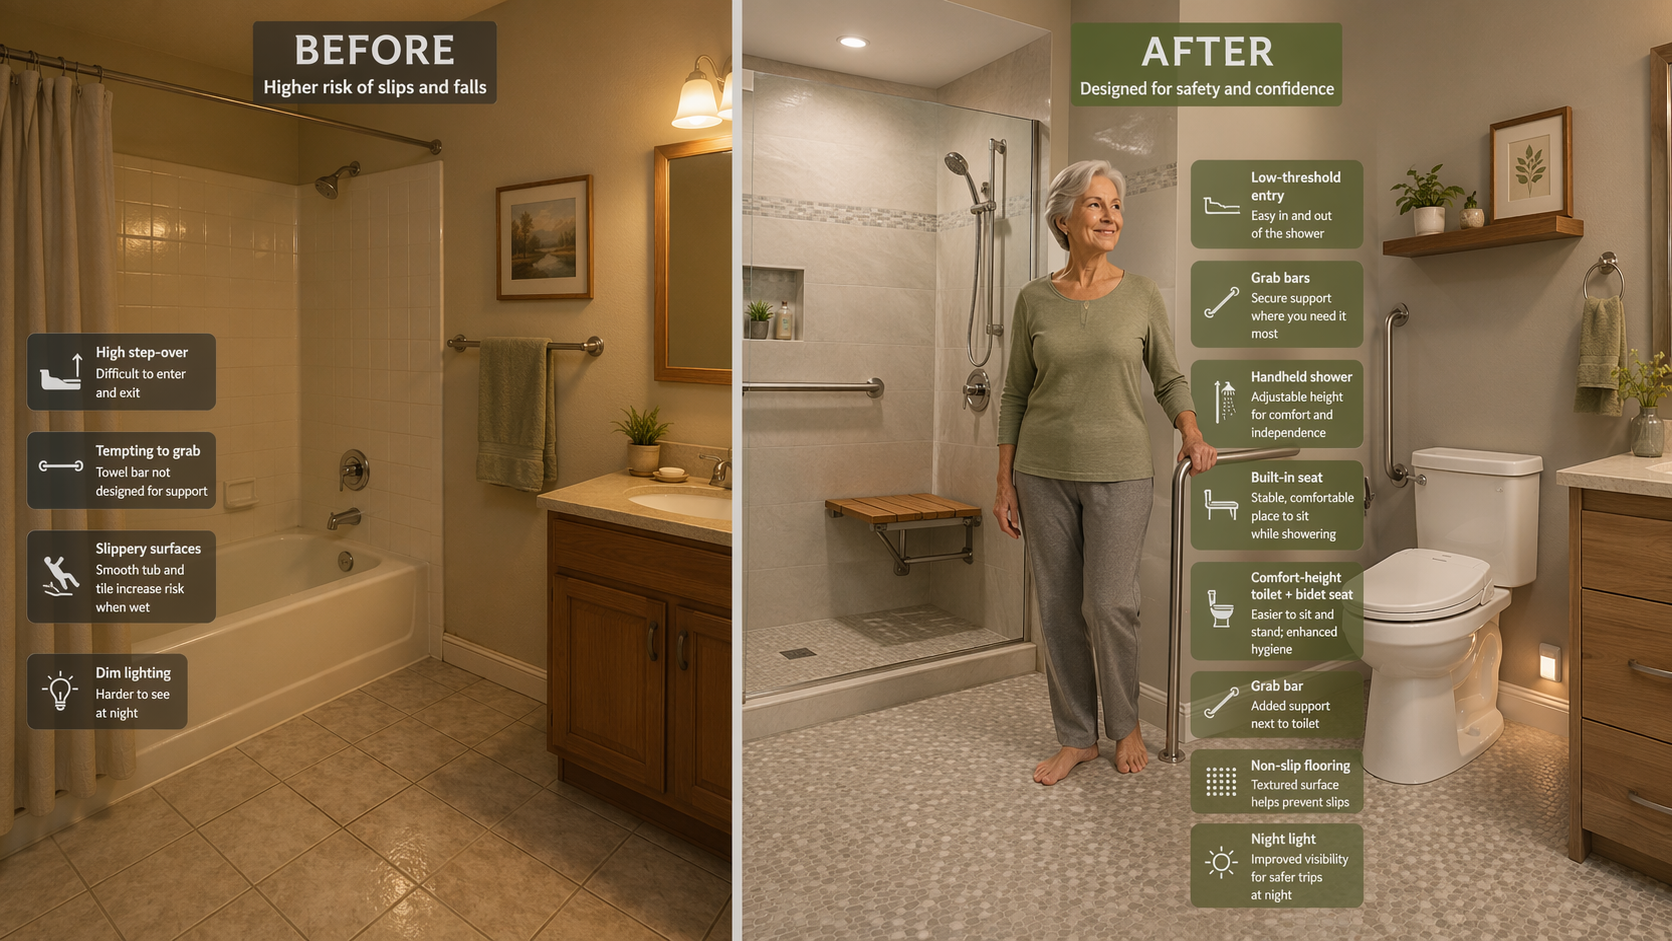
Forget room-by-room checklists. The only framework you need: spend your money where it reduces the highest risk for the least cost. That means bathrooms first — they are the most hazardous room in the house, according to occupational therapists. A study found that nearly 28% of bathroom injuries in people 65+ involve the toilet. A separate study showed that older adults with grab bars were almost 76% more likely to recover their balance than those without. That is nearly four out of five extra recoveries — not a small effect.
The bathroom is the highest-risk room, but targeted, modest-cost modifications can transform it into the safest space.
Start with the cheap stuff: under $500, do this week
These are the quick fixes that directly prevent falls. The National Institute on Aging recommends mounting grab bars near toilets and inside and outside the tub or shower, using nonskid mats, and installing night-lights. None require a contractor, and none cost more than a dinner out. The evidence is direct: grab bars improve balance recovery by 76%. Nearly 28% of bathroom injuries involve the toilet — so a $30 grab bar next to the toilet is your single best investment.
Grab bar (standard): ~$20. Install it into a stud (or use a heavy-duty suction model for temporary use).
Nonslip bath mat: ~$15–30. Use a mat with suction cups inside the shower and a textured mat outside.
Night-lights: ~$10–20. Plug them into bathroom hallways and near the toilet.
Clear clutter: $0. Move throw rugs, electrical cords, anything that crowds the walking path.
Lever-style door handles: ~$25–50 each. Easier to open than round knobs for someone with weak grip.
Cost estimates are national averages and vary by region and contractor. The point: a $30 grab bar installed today removes more fall risk than a $12,000 renovation planned for next year. Do not let perfect be the enemy of done.
When you compare two modifications in the same cost tier, use this hierarchy: safety risk first (fix direct fall hazards), then frequency of use (daily areas win), then ease of installation (can a handyman do it?), then likelihood of future need. For example, between a stair lift and a walk-in shower: the shower is used more often and in the highest-risk room, so it wins. The stair lift can wait.
Next: $500–$5,000 — upgrades for this quarter
These reduce risk in daily-use areas but require a bigger purchase or a handyman visit. Still well below the cost of a major renovation.
Stair handrails on both sides: ~$200–600 installed. Stairs are the second most common fall location. A second rail provides support for both hands.
Toilet riser: ~$60–150. Adds 3–4 inches of height, making it easier to stand up. Use it with a grab bar for best results.
Shower chair: ~$50–200. Allows seated showering, removing the risk of slipping while standing. Pair it with a handheld showerhead ($30–80).
Improved lighting: ~$30–200. Motion-activated lights for stairs, brighter bulbs in hallways, night-lights in every room used at night.
A stair lift for a straight staircase runs $2,500 to $8,000 — firmly in the next tier. If your parent can use a handrail and a cane, start with the handrail. The stair lift is for when balance or strength makes stair climbing unsafe even with support.
$5,000–$15,000: projects that need planning
These require contractor bids, permits, and planning. They are justified when the area is used frequently and cannot be made safe with cheaper upgrades.
Cost estimates are national averages. Always get at least three contractor bids.
Modification
Typical cost range
When it makes sense
Walk-in shower conversion
$6,000 – $12,000
Cannot step over a tub edge; uses shower daily
Stair lift (straight stairs)
$2,500 – $8,000
Cannot climb stairs even with handrails; multiple trips per day
Entry ramp
$1,500 – $4,000
Steps at front or back door block walker or wheelchair access
First-floor bedroom setup
Varies ($2,000+ for furniture/install)
Sleeping upstairs is no longer safe; need a bed and bathroom on main floor
Notice that a walk-in shower conversion is almost twice the cost of a stair lift. Yet many families install a stair lift before they address bathroom safety, even though the bathroom is the highest-risk room. Flip that order: bathrooms first, then stairs.
$15,000+: long-term structural changes — when to consider them
Full bathroom renovations, doorway widening, curbless showers, and elevators. These are not the place to start. Consider them only after Tiers 1–3 are in place and a professional assessment — ideally from a CAPS-certified contractor and an occupational therapist — confirms they are needed.
When a wheelchair or walker is needed full-time, modifications like widening doorways to 36 inches and installing a curbless shower become safety necessities, not luxuries. But even then, start with the grab bars, the nonslip floor, and the proper lighting while you plan the big project. Incremental progress is safer than waiting to afford everything at once.
The cost-tier prioritization framework: start at the base and work up.
Pick one cheap fix today
The single most important thing you can do right now is pick one item from the under-$500 list — a grab bar next to the toilet, a night-light, a nonslip mat — and install it within 24 hours. Not next week. Not after you talk to a contractor. Today.
You do not need a full plan. You do not need $5,000. You need a $30 grab bar installed into a stud. That action alone reduces fall risk more than any amount of planning or saving. After that, move to the next item in the cheap list, then to the next tier, and so on. The staircase image above is not a checklist to finish in one weekend — it is a ladder that you climb one rung at a time.
For the full research breakdown — which modifications have the strongest evidence and which studies are still preliminary — see our evidence-based home modification guide.
The fall happened. The hospital visit is over. What you do this week will determine whether there is a next fall. Start small, start cheap, start now.


Comments
Join the discussion with an anonymous comment.