Bathroom Remodel for Elderly Parents: A Family Caregiver's Crisis Guide from Fall to Finish
bathroomequipment installation~$250–$720 for emergency package; $6,600–$28,000 for full remodelReviewed: 2026-06-19
Bathroom Remodel for Elderly Parents: A Family Caregiver's Crisis Guide from Fall to Finish
After a parent's bathroom fall, the remodel decision feels overwhelming. This guide sequences what to do immediately — from medical assessment to the $1,000 emergency safety package — through a phased remodeling timeline, with communication strategies for talking to parents and avoiding common renovation mistakes.
Estimated cost range: $250–$720 for emergency package; $6,600–$28,000 for full remodel
Potential funding: Medicare Part B covers OT evaluations; brief mention only
Cost ranges are estimates. Verify eligibility directly with each program.
By Editorial Team
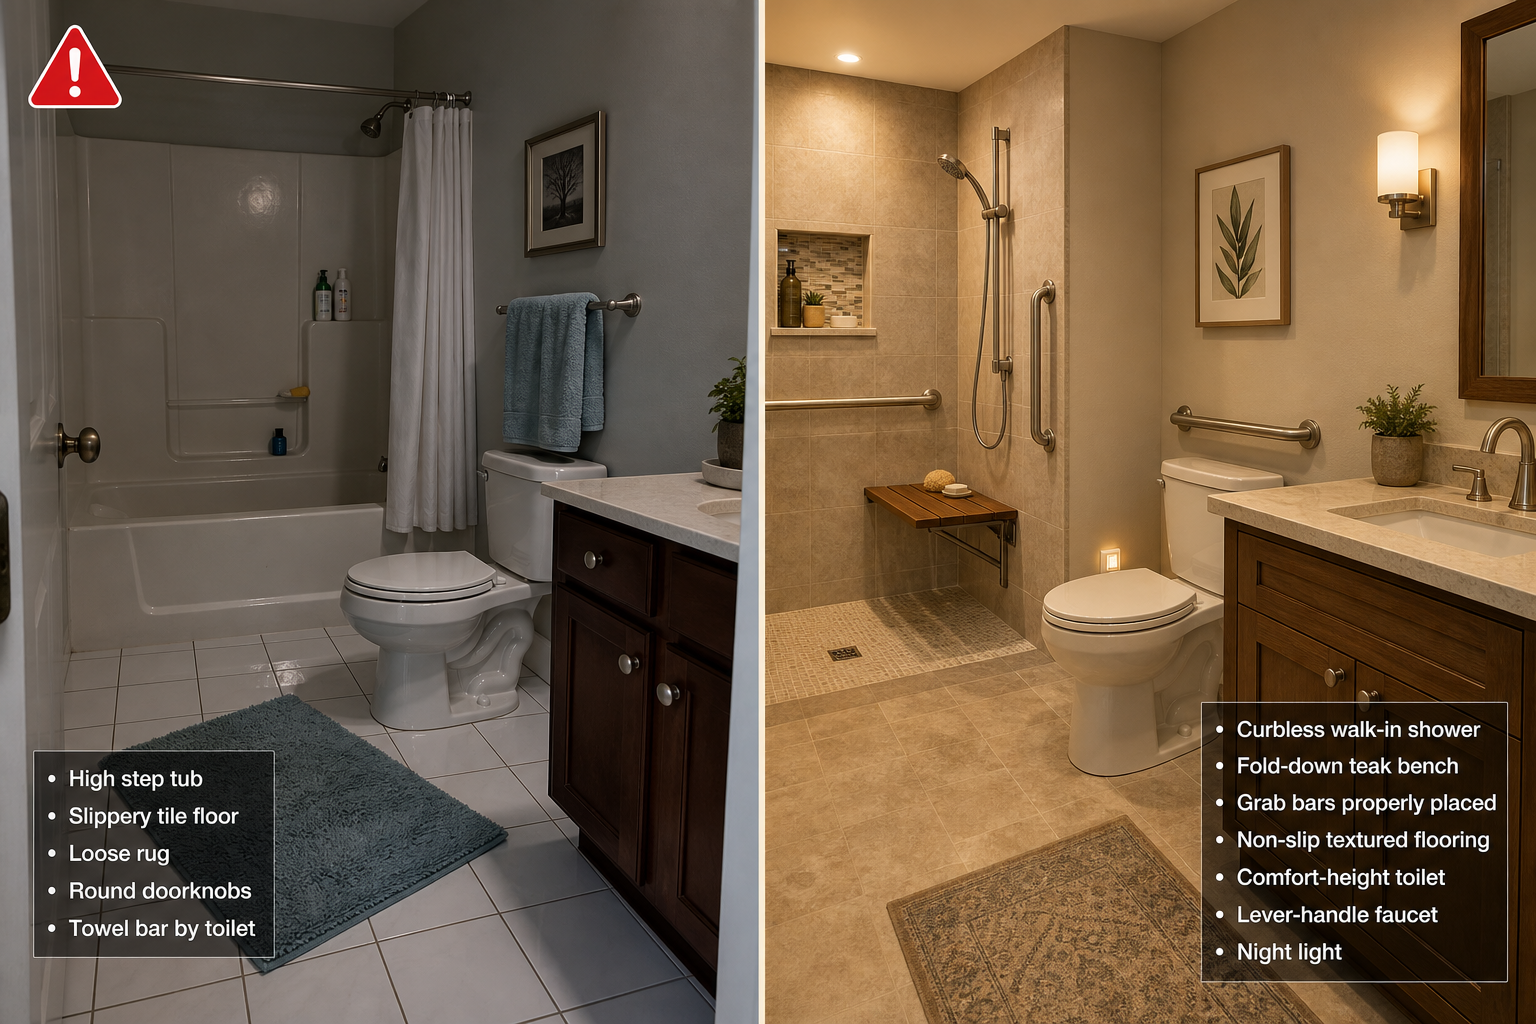
The difference between a fall hazard and a safe, dignified bathroom. The left side shows common risks; the right side shows the same space after a senior-friendly remodel.
What to Do Immediately After a Bathroom Fall
The phone call no adult child wants to get has happened. Your parent fell in the bathroom. They may say they're fine, that it was just a slip, that they don't need help. Your instinct is to rush into remodel planning, but the first 48 hours require a different sequence entirely. Here is what to do before you call a single contractor.
Step 1: Get a Medical Assessment — Even If They Say They're Fine
Many older adults downplay a fall, especially if they managed to get up on their own. But the CDC reports that about 3 million older adults end up in the emergency room each year because of falls, and falls are the cause of 88% of emergency room visits for hip fractures in older adults. A fall that seemed minor can mask a developing injury — a hairline fracture, a slow bleed, or a head injury that doesn't show symptoms until hours later. If your parent has hit their head, is on blood thinners, or cannot get up independently, take them to urgent care or the ER. If they refuse, call their primary care physician and describe the fall. Many doctors will ask the patient to come in for a same-day check.
Step 2: Do a Calm, Non-Accusatory Home Safety Walkthrough
Once your parent is medically cleared, walk through the bathroom together. Your goal here is not to diagnose every hazard — it's to observe and document. Bring a notebook or your phone and note the following without making your parent feel criticized:
The exact spot where the fall happened and what your parent was doing (getting out of the shower, reaching for a towel, standing up from the toilet)
What they reached for to try to catch themselves (a towel bar, the sink edge, the shower curtain rod)
Floor surfaces: is the tile glossy or textured? Is there a loose bath mat or rug?
Lighting: can the bathroom be seen clearly at night without turning on a bright overhead light?
The height of the toilet seat and the step-over height of the tub or shower
Any existing grab bars or safety equipment and whether they feel secure when you put weight on them
This walkthrough serves two purposes. First, it gives you a concrete list of hazards to address. Second, it shifts the conversation from "you fell because you're unsteady" to "the bathroom has some things we can fix together." That reframing matters enormously for the conversations ahead.
Step 3: Document the Bathroom Layout for Planning
Take photos of the bathroom from multiple angles. Measure the door width, the distance from the toilet to the nearest wall, the shower or tub dimensions, and the height of the toilet seat. Write down what the walls are made of (drywall, tile, plaster) and whether you can see or feel any studs. This documentation will save you time when you talk to a contractor or occupational therapist, and it will help you make immediate decisions about what can be installed this week versus what requires a full remodel.
The $1,000 Emergency Safety Package: What to Install This Week
A full bathroom remodel can cost between $6,600 and $28,000 and take months to plan and execute. But you don't need to wait for the full renovation to make the bathroom safer. For roughly $1,000 or less, you can install four items this week that address the most common fall scenarios. A 2025 systematic review of 20 studies on home modifications found that 65% of studies confirmed the effectiveness of home modifications in fall prevention, with bathroom modifications and grab bars among the most impactful interventions.
The $1,000 emergency safety package: four items that can be installed within a week to immediately reduce fall risk while you plan the full remodel.
Item
Cost Range
Installation Time
What It Addresses
Grab bars (3 locations)
$200 – $600 installed
1–2 hours per bar
Provides stable support at the toilet, shower entry, and shower wall
Raised toilet seat
$30 – $80
5 minutes
Reduces squatting and standing distance by 2–3 inches
Non-slip mats or adhesive strips
$10 – $15
10 minutes
Prevents slipping on wet tub or shower floor
Automatic night light
$10 – $25
Plug in or mount
Illuminates the path from bed to toilet without fumbling for a switch
The Three Essential Grab Bar Locations
Grab bars are the single highest-impact modification you can make this week. The National Institute on Aging recommends mounting grab bars near toilets and on both the inside and outside of tubs and showers. For most bathrooms, you need three bars:
Beside the toilet: A horizontal bar on the wall next to the toilet, positioned so your parent can reach it while sitting and use it to stand up or lower themselves down.
At the shower or tub entry: A vertical or angled bar mounted outside the shower or tub, giving your parent something secure to hold while stepping over the threshold.
Inside the shower or tub: A horizontal bar on the wall where your parent would naturally reach if they felt unsteady while standing or turning.
The three essential grab bar locations: beside the toilet, at the shower entry, and inside the shower. Note the wall studs visible through the cutaway — proper mounting is critical.
For confident DIYers, we have a detailed step-by-step grab bar installation guide that covers stud finding, drilling, and mounting. But if you have any doubt about the wall structure, hire a professional. A grab bar that fails when someone grabs it is worse than no grab bar at all.
How to Do a Bathroom Safety Assessment Yourself
Before you call any professional, you can identify most bathroom hazards yourself. Use this checklist to evaluate the bathroom room-by-room. Mark each item as safe, needs attention, or not applicable.
Floor surfaces: Is the tile or flooring non-slip? Does it have a coefficient of friction (COF) rating of at least 0.42? Are there any loose rugs or mats that could slide?
Toilet height: Measure from the floor to the top of the seat. Standard toilets are 14–15 inches. A comfort-height toilet is 17–19 inches. If the seat is below 17 inches, a raised toilet seat or replacement toilet is needed.
Shower or tub entry: How high is the step-over? Can your parent lift their leg that high safely? Is there a secure grab bar to hold while stepping in and out?
Lighting: Is there a light switch at the bathroom entrance? Is there a night light or automatic light that turns on in the dark? Can the bathroom be seen clearly without turning on a bright overhead light that might be disorienting at night?
Storage: Are frequently used items (towels, soap, shampoo) within easy reach without bending or stretching? Are there any items stored on high shelves that require reaching?
Existing grab bars or towel bars: Put your full weight on any bar that is currently installed. Does it feel solid? Is it anchored into a stud? If it moves even slightly, it is not safe to use as a grab bar.
Doorway width: Measure the clear opening of the bathroom door. If it is less than 32 inches, a wheelchair or walker may not fit through. This is a longer-term concern but worth noting now.
After you finish the bathroom assessment, use our full home fall prevention checklist to assess the rest of the home. Falls often happen on the path between the bedroom and the bathroom, especially at night.
When to Call an Occupational Therapist vs. a CAPS Contractor
One of the most common mistakes caregivers make is calling a contractor first. A contractor knows how to build things. An occupational therapist (OT) knows how your parent moves, balances, and performs daily tasks — and can recommend exactly what modifications will help. The right sequence is: OT first, then contractor.
If you cannot get an OT evaluation quickly — wait times can be weeks in some areas — you can proceed with the $1,000 emergency package on your own. Grab bars, non-slip mats, raised toilet seats, and night lights are standard safety interventions that benefit nearly every older adult regardless of their specific functional limitations. The OT can refine your choices later.
What to Ask a CAPS-Certified Contractor Before Hiring
Not all contractors understand aging-in-place work. A general contractor may install beautiful tile but mount grab bars into drywall anchors instead of studs. A CAPS-certified contractor has specific training in universal design and accessibility standards. Here are the questions to ask before you hire anyone:
"How many aging-in-place bathroom projects have you completed in the past two years?" — Look for someone who has done at least 5–10 bathroom safety remodels, not just kitchen and basement work.
"Do you install blocking for future grab bars as a standard part of your bathroom remodels?" — The right answer is yes. Installing blocking during a remodel costs almost nothing at construction time but saves hundreds of dollars later.
"What load rating are your grab bars rated for, and how do you ensure they are anchored into studs?" — Grab bars must be rated for 250+ pounds and anchored into studs or blocking. If the contractor hesitates on this question, move on.
"Can you provide references from two clients who had bathroom safety remodels for aging parents?" — Call those references and ask: Did the contractor listen to the parent's preferences? Did they complete the work on time? Did they install blocking for future modifications?
"Are you CAPS-certified?" — If not, ask if they have equivalent training or experience. CAPS certification is not legally required, but it signals that the contractor has invested in understanding aging-in-place design.
Phased Remodeling Timeline: Week 1, Months 1–3, Year 1+
A full bathroom remodel is a significant investment — national benchmarks from 2026 put the cost between $6,600 and $28,000, with an average of $11,200. But you don't have to do it all at once. The most effective approach is to phase the work so that safety improvements happen immediately while larger structural changes are planned and budgeted over time.
Phased bathroom remodeling timeline: from the emergency package this week to future-proofing in year one and beyond.
Phase
Timeline
What to Do
Estimated Cost
Key Considerations
Emergency safety package
Week 1
Install grab bars at 3 locations, add raised toilet seat, non-slip mats, and night light
$250 – $720
Do not wait for the full remodel. These items reduce fall risk immediately.
Short-term upgrades
Months 1–3
Replace toilet with comfort-height model (17–19 inches), install non-slip flooring, replace tub faucet with lever handles
$1,500 – $4,000
Comfort-height toilet replacement costs $300–$1,200. Non-slip flooring professionally installed: $6,400–$11,000, but you can start with a smaller area.
Major structural changes
Months 3–12
Curbless shower conversion ($3,000–$15,000), walk-in tub ($3,000–$15,000), doorway widening ($200–$7,000)
$6,000 – $28,000+
These are the most expensive items. Plan carefully and get multiple quotes. Install blocking for future grab bars during any structural work.
Future-proofing
Year 1+
Upgrade lighting with motion sensors or automatic night lights, install handheld showerhead, add fold-down shower bench
$200 – $1,500
These are relatively low-cost additions that improve daily usability and safety.
One of the most important upgrades for nighttime safety is ensuring the path from the bed to the bathroom is well-lit and clear. Our guide on nighttime fall prevention for the bed-to-bathroom route covers motion-sensor lighting, clear pathways, and other strategies that complement your bathroom remodel.
How to Make Decisions for Aging Parents Without Overstepping
The hardest part of a bathroom remodel is often not the cost or the construction — it's the conversation. Your parent may see the bathroom as their private space and your suggestions as criticism of their ability to live independently. Here are strategies that respect their dignity while ensuring their safety.
Frame the Conversation Around Safety, Not Decline
Instead of saying "You fell because you're unsteady," say "The bathroom floor is slippery when it's wet, and that's dangerous for anyone. Let's fix the floor so it's safer." This shifts the problem from your parent's body to the environment. It's not about their age or ability — it's about the bathroom design.
Involve Your Parent in Every Decision
Ask your parent what they want. Do they prefer a shower seat or a bench? What color grab bars would they find acceptable? Would they rather have a walk-in tub or a curbless shower? When parents feel they have control over the choices, they are far more likely to accept and use the modifications. A grab bar that your parent chose is a grab bar they will actually hold onto.
Use the Fall as a Shared Concern, Not a Weapon
If your parent is resistant, say something like: "I know you want to stay in this house. I want that too. But I can't sleep at night knowing the bathroom isn't safe. Let's fix a few things so we can both feel good about you being here." This frames the remodel as something you are doing together for a shared goal — staying at home — rather than something you are imposing on them.
Respect Preferences Where Safety Is Not Compromised
If your parent hates the look of grab bars, there are options in different finishes (brushed nickel, chrome, white) and styles (straight, curved, angled). If they refuse a raised toilet seat, consider a comfort-height toilet replacement instead — it looks like a normal toilet but is 2–3 inches higher. The goal is to find solutions that meet safety requirements while respecting your parent's sense of home and dignity.
Common Renovation Mistakes That Create New Hazards
A well-intentioned remodel can introduce new safety problems if you don't know what to watch for. Here are the most common mistakes caregivers make — and how to avoid them.
Using towel bars as grab bars: Towel bars are not designed to bear weight. They are mounted with small screws into drywall anchors. Under the load of a person falling or pulling themselves up, they will pull out of the wall. Always install load-rated grab bars anchored into studs or blocking.
Installing glossy or high-slip floor tiles: Polished porcelain or marble tiles look beautiful but become dangerously slippery when wet. Choose textured or matte-finish tiles with a coefficient of friction (COF) rating of at least 0.42. The AARP recommends this standard for bathroom flooring.
Choosing a tub with a high step-in: A standard tub requires lifting the leg 12–16 inches to step over the side. For an older adult with reduced hip or knee mobility, this is a fall risk every time they bathe. A walk-in tub or curbless shower eliminates this hazard entirely.
Placing grab bars too high or too low: A grab bar beside the toilet should be positioned so the user can reach it while sitting and use it to stand. A bar that is too high forces the user to pull themselves up at an awkward angle. A bar that is too low requires bending. The standard height for a toilet grab bar is 33–36 inches from the floor, but an occupational therapist can recommend the exact height for your parent.
Failing to install blocking for future grab bars: If you are remodeling the bathroom now, have the contractor install plywood blocking between the studs in the walls where grab bars might go in the future. This costs almost nothing during construction but saves hundreds of dollars and prevents wall damage later.
Choosing round doorknobs instead of lever handles: Round doorknobs require grip strength and twisting motion that many older adults struggle with. Lever handles can be operated with a closed fist or elbow. This is a simple, low-cost swap that improves daily accessibility.


Comments
Join the discussion with an anonymous comment.