
Room checklist
How to Install Grab Bars in the Bathroom: A Step-by-Step DIY Guide for Family Caregivers
Learn how to safely install grab bars in the bathroom with this step-by-step guide. Covers tool lists, stud mounting, ADA placement, and the 250-lb pull test to ensure your parent’s safety.
Why Grab Bar Installation Matters: The Fall Risk in Your Bathroom
Every year, more than 14 million older adults—roughly one in four Americans age 65 and older—report falling, according to the CDC’s Behavioral Risk Factor Surveillance System. Those falls send about 3 million people to emergency departments annually and lead to nearly 1 million hospitalizations. The age-adjusted fall death rate jumped 21% between 2018 and 2024, from 64.7 to 78.4 per 100,000 older adults. And once someone falls, their chance of falling again doubles.
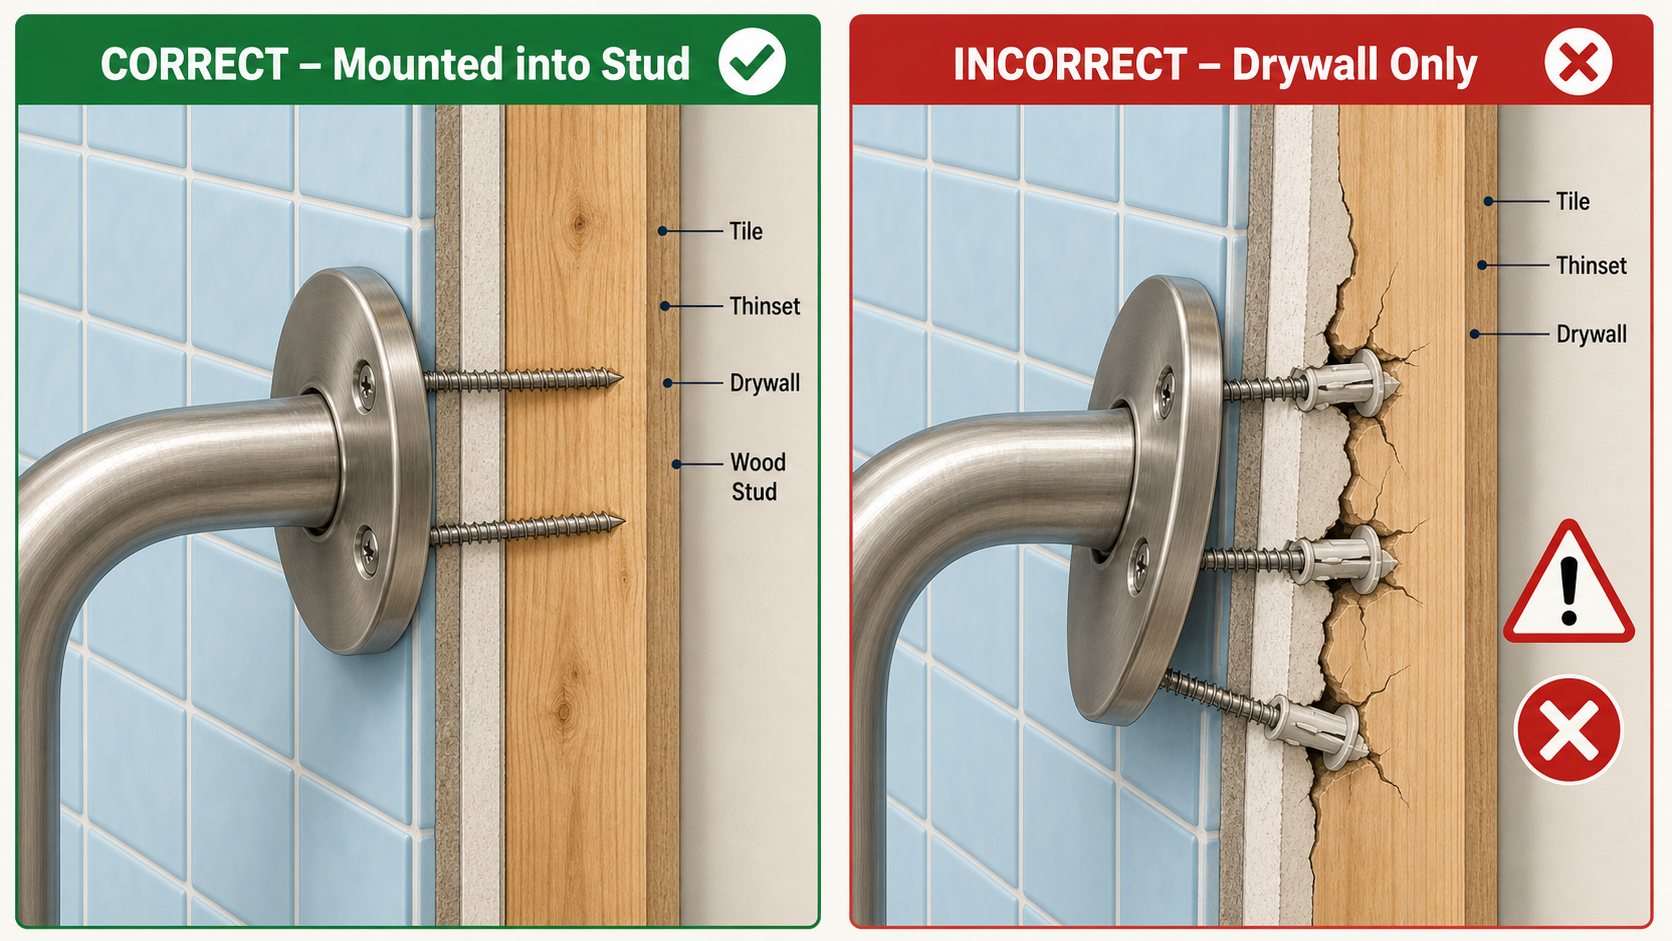
The bathroom is the most dangerous room in the house. Wet surfaces, hard tile, and the need to transfer in and out of the shower or onto the toilet create a perfect storm. A properly installed grab bar can mean the difference between a steady recovery and a broken hip. But here’s the catch: a grab bar is only as safe as its installation. A bar anchored into drywall instead of a stud can tear out under load. Suction-cup bars—which have been shown to fail at weights as low as 70 to 92 pounds in controlled testing—give a false sense of security. If you install it wrong, you might as well not have installed it at all.
Choosing the Right Grab Bar for Your Parent’s Bathroom
Not all grab bars are created equal, and the choice you make directly affects the installation process. Here’s what to look for before you pick up a drill.
| Feature | What to Look For | Why It Matters for Installation |
|---|---|---|
| Type | Wall-mounted (screw-in) is the gold standard. Avoid clamp-on tub bars and especially suction-cup bars. | Wall-mounted bars require drilling into studs; clamp-on bars can damage tub rims and still slip. |
| Material | Stainless steel (preferably 304-grade) or brass. Plastic bars are less durable. | Stainless steel resists corrosion in wet bathrooms and provides the rigidity needed for a solid mount. |
| Length | 12 to 48 inches. Common lengths: 16, 18, 24, 32, 36 inches. | Longer bars span more studs (e.g., a 24-inch bar at 45° exactly spans 16-inch stud spacing). |
| Diameter | ADA recommends 1.25 to 2 inches. Most adults grip best at 1.5 inches. | Diameter affects flange size and screw hole pattern; confirm your bar’s flange fits the available wall space. |
| Weight Capacity | Look for 250–500 lbs. ADA requires 250 lbs minimum. | The fasteners and mounting method must match the capacity; a 500-lb bar demands at least 2.5-inch screws into studs. |
| Slip Resistance | Textured grip or knurled surface. | Smooth bars become slick when wet; textured bars reduce the risk of hand slip, but the mounting is what holds weight. |
For most residential bathrooms, a straight stainless steel grab bar with concealed screws (like those from Moen Home Care or similar models) works well. These bars meet ADA compliance for diameter and clearance and support up to 500 lbs—far beyond the 250-lb minimum. If you’re installing in a shower stall, a 16- or 18-inch bar on the side wall is often sufficient. For the toilet area, a 36-inch bar on the rear wall and a 42-inch bar on the side wall give the most versatility.
Placement Planning: Where to Put Grab Bars in Shower, Tub, and Toilet Areas
Placement is as critical as the bar itself. The ADA Accessibility Standards provide the best reference for residential bathrooms, even though they are not legally required in private homes. The three key zones are the shower, the bathtub, and the toilet area.
- Shower: Install a vertical bar on the wall near the entry (18–24 inches from the showerhead end) to help with stepping in and out. Mount a horizontal bar on the side wall at 33–36 inches above the finished floor. In roll-in showers without a seat, ADA requires grab bars on three walls with extensions to the entry.
- Bathtub: Place a horizontal or diagonal bar on the back wall 8–10 inches above the tub rim. Add a vertical bar at the faucet end (30–36 inches above the floor) to assist with standing from a seated position. A single 24-inch bar installed at a 45° angle will span the standard 16-inch stud spacing and offer both push and pull support for users of different heights.
- Toilet: Mount a 42-inch bar on the side wall and a 32- to 36-inch bar on the rear wall, both at 33–36 inches above the floor. The side bar should be long enough to allow the user to reach forward for leverage when standing. If the toilet is enclosed, a fold-down bar can save space.
When mounting adjacent to a toilet or shower, maintain at least 1.5 inches of clearance between the bar and the wall surface. This prevents knuckles from scraping the wall and provides a secure grip. Diagonal bars (45°) are particularly helpful when multiple family members will use the same bathroom, because they accommodate a range of heights and grip preferences.

Tools and Materials Checklist
Before you start, gather everything you’ll need. Proper tools prevent damage to tile, reduce frustration, and ensure a secure mount.
- Stud finder (electronic, not magnetic—magnetic stud finders can miss fiberglass or metal studs)
- Electric drill (corded or battery; a hammer-drill mode helps if you hit hard tile)
- 1/8-inch masonry bit (for pilot holes through tile)
- 1-1/4-inch carbide-tipped hole saw (for enlarging holes; use diamond-tipped for porcelain or very hard tile)
- Stainless steel screws, at least 2.5 inches long (for stud mounting)
- WingIts or toggle bolts (for hollow walls where no stud is available—never use plastic molly bolts)
- Level (at least 24 inches long for accuracy)
- 100% silicone caulk and a caulk gun (for sealing flanges in wet areas)
- Clean rag and rubbing alcohol (to wipe surfaces before caulking)
Step-by-Step Installation: From Stud-Finding to Pull-Testing
Follow these steps in order. Skipping any step—especially the pull test—risks a failure when it matters most.
- Use the stud finder to locate wall studs. Mark the center of each stud with a pencil. Standard stud spacing is 16 inches on center, but always verify with the finder. For a 24-inch bar mounted horizontally, you should hit at least two studs.
- Measure the desired height (33–36 inches above the finished floor) and mark the location for the bar’s mounting flanges. Use the level to ensure the marks are even.
- Drill 1/8-inch pilot holes through the tile at each mark. Use a slow drill speed and steady pressure. Stop as soon as you feel the bit punch through the tile—this prevents cracking.
- Switch to the 1-1/4-inch carbide-tipped hole saw and enlarge each pilot hole to the size of the flange screw heads. Be careful not to oversize the hole; the flange should cover it completely.
- Fasten the bar into the studs using stainless steel screws at least 2.5 inches long. Screw until tight—do not strip the head. If a stud is not behind a hole, use a WingIt or toggle bolt rated for the wall material (e.g., 1/2-inch drywall). Never use plastic expansion anchors.
- Mount the bar onto the fasteners and tighten all screws. Check with the level to confirm horizontal alignment. Tighten just beyond finger-tight; do not overtighten.
- Apply a smooth bead of 100% silicone caulk around the edges of each flange where it meets the tile. Wipe away excess with a damp rag. This prevents water from seeping behind the tile and causing mold or wall damage.
- Perform the 250-lb pull test: grasp the bar with both hands and pull firmly in all directions—outward, downward, and upward. The bar should not shift, wobble, or make any creaking sounds. If it does, tighten the screws or consult a professional.
Once installed and tested, give the silicone caulk 24 hours to cure before allowing water contact. The bar is now ready for daily use. For a complete bathroom safety check, review our Bathroom Safety Checklist for Seniors to identify any other hazards.
When to Hire a Professional: Cost and Warning Signs
Not every bathroom is a weekend DIY project. If your parent’s bathroom has fiberglass or acrylic shower walls (which cannot support a grab bar without reinforcement behind them), or if you cannot locate studs because of thick tile or metal studs, a professional installer is the safer route. Similarly, if the wall behind the tile has no blocking and the only mounting points fall in hollow areas, you may need a contractor to add blocking before you can safely install a bar.
| Scenario | DIY or Pro? | Estimated Cost (per bar) |
|---|---|---|
| Tile walls with accessible wood studs | DIY (with proper tools and care) | $20–$150 (bar only) |
| Tile walls, studs hard to locate or spacing uneven | Pro recommended if unsure | $150–$450 installed |
| Fiberglass or acrylic shower walls | Pro required; walls need backing reinforcement | $200–$500 installed (including reinforcement) |
| Hollow drywall with no studs behind tile | Pro required; may need wall repair and blocking | $200–$450 installed |
| Multiple bars (2–4) in one visit | Pro often offers package pricing | $300–$900 for 2–3 bars |
Professional handypersons typically charge $50–$80 per hour, while plumbers run $75–$150 per hour. Installation takes about 20–45 minutes per bar, so labor for a single bar runs $80–$200. If you decide to hire, look for a CAPS-certified contractor who specializes in aging-in-place modifications. Always get at least three written estimates and verify that the contractor is licensed, insured, and offers a warranty on their work.
Common Mistakes to Avoid (and How to Fix Them)
Even experienced DIYers make mistakes. Here are the most frequent errors and what to do if you’ve already made one.
- Mounting into drywall only. This is the most dangerous mistake. Drywall anchors can fail at under 100 pounds. If you’ve already installed a bar into drywall, remove it, patch the holes, and reinstall into a stud or use a proper WingIt toggle for hollow wall areas.
- Missing the stud entirely. If your pilot hole spins freely after drilling, you missed the stud. Fill the hole with silicone, move the flange over an inch, and try again. Use the level to re-mark alignment.
- Failing to caulk around flanges. Water can seep behind the tile, leading to mold and eventual wall failure. If you forgot to caulk, clean the area, apply 100% silicone, and let it cure 24 hours before use.
- Using suction-cup grab bars for weight support. As noted, these bars hold under 100 lbs in testing and are not recommended by occupational therapists. If your parent is using one, replace it with a wall-mounted bar as soon as possible. Use it only as a temporary handhold, never as a fall-stop.
- Not testing the bar after installation. A bar that looks secure may still have loose screws. Always perform the 250-lb pull test. If you feel any movement, tighten all fasteners and test again.
If you’ve made any of these mistakes, don’t panic. Most can be corrected with the right tools and a re-do. The key is to ensure that every bar you install can confidently stop a fall. Your parent’s safety depends on it. After you’ve finished, take a walk through the entire home with our Home Fall Prevention Checklist to catch hazards in other rooms.
Related reading
Need a professional assessment?
Find a CAPS-credentialed professional or local aging services through our outbound resource list — we never name or rank individual contractors.
Find Local HelpNoticed something outdated or inaccurate on this page? Flag a correction. We review every report against CDC, NIA, and AARP HomeFit guidance before updating a page.