The Phased Approach to an Aging-in-Place Remodel: What to Prioritize First
bathroomReviewed: 2026-06-24
The Phased Approach to an Aging-in-Place Remodel: What to Prioritize First
Most aging-in-place checklists overwhelm you with a room-by-room laundry list. This guide offers a staged strategy organized by urgency—immediate safety fixes, medium-term accessibility upgrades, and long-term structural investments—so you can prevent costly rushed decisions and spread expenses over time.
Potential funding: VA Specially Adapted Housing, VA Special Home Adaptation, USDA Rural Housing Repair, Medicare Advantage
Cost ranges are estimates. Verify eligibility directly with each program.
By Editorial Team
Why a room-by-room checklist will fail you
If you search for “aging in place remodel” right now—perhaps after your mother took a hard fall in the bathroom, or after the doctor said “no more stairs”—you will find page after page of room-by-room checklists. New light fixtures. Lever handles. Bathroom grab bars. Curbless shower. Walk-in tub. Stair lift. Kitchen counters at different heights. Each list is correct. Each list is also useless.
The problem is not the items. The problem is that a flat list treats every modification as equally urgent. It tells you nothing about what to do tonight, what can wait until next month, and what requires a contractor, a permit, and a loan. Occupational therapist Matt Haase describes the experience as “drinking out of a fire hydrant.” He is right: a comprehensive list is not a plan.
What actually works is a phased strategy organized by urgency. Immediate safety fixes come first. Medium-term accessibility upgrades come second. Long-term structural investments come last. This approach prevents panic spending, keeps you from pouring money into a stair lift when grab bars would have prevented the fall in the first place, and spreads the financial burden over months or years. Let me show you how.
Phase 1: What you can do tonight
If you are in crisis mode, this is your only section. Read it, act on it, and then decide later whether you need Phase 2 and Phase 3. Every item here is low-cost, requires no contractor, and can be done within hours.
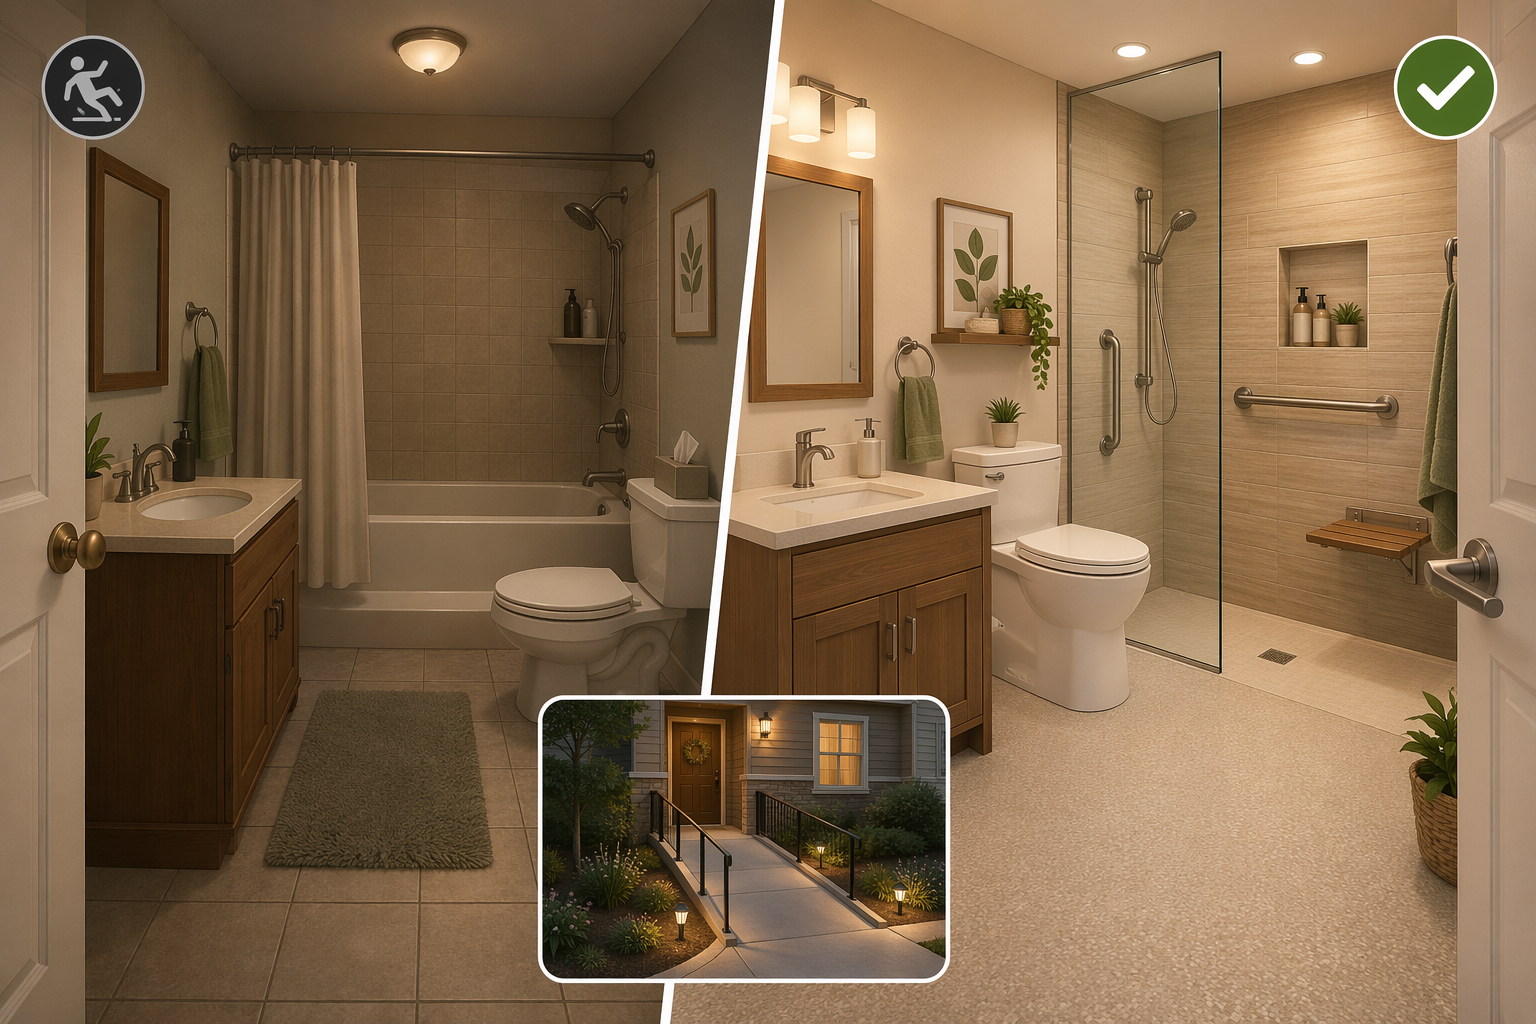
The same bathroom before and after. Phase 1 tackles the hazards on the left; Phase 2 transforms it into the right.
Install grab bars. Costs $15 to $80 for a basic model at any hardware store. A study in the journal Human Factors found that people with a grab bar were 75.8% more likely to recover their balance during a slip. That is a $30 part that can prevent a $30,000 hip replacement. But—and this is important—the grab bar must be screwed into wall studs or blocking. That study used 63 adults in a lab, so treat the number as promising but not a guarantee. The National Association of Home Builders requires bracing to support 250–300 pounds. A suction-cup bar is better than nothing, but it will not stop a fall. If you are not comfortable drilling into studs, hire a handyman for one hour of labor.
Replace round door knobs with lever handles. About $15 each, and they eliminate the need to grip and twist—a huge difference for arthritic hands. You can do this yourself.
Add night lights in the hallway, bathroom, and bedroom. Also add a motion-activated light path to the bathroom. Falls happen most often at night. This costs under $50 total.
Remove throw rugs and secure loose carpet edges. Throw rugs are a classic fall hazard. Roll them up and store them. If you need a non-slip surface in the bathroom, install anti-slip treads or a mat with a rubber backing that does not slide.
Install a threshold ramp or beveled transition strip if there is a raised sill between rooms or at the front door. A simple rubber ramp costs $30–$80 and eliminates a tripping point.
Phase 1 costs roughly $50 to $500 and can be completed in a weekend. Do not get distracted by bigger projects. Fix the hazards first.
Phase 2: The medium-term upgrades that buy you time
These modifications require planning, contractors, and a larger budget. They belong in Phase 2 because they address accessibility and ease of daily living—but they do not prevent the fall that could happen tonight. If you are still in crisis, skip down to Phase 3 later. If you are planning ahead, this is where you should focus after Phase 1.
The cost ranges below come from multiple sources (Fixr, NerdWallet, 3 Birds Accessibility, Forbes). They vary widely—Fixr may show a curbless shower at $2,500–$9,000 while 3 Birds puts it at $8,000–$18,000. That is not an error. It reflects geography, scope of work, and whether you choose a prefabricated unit or a custom tile job. I would treat these as directional—do not bet on the low end without checking local rates first.
Phase 2 upgrades. All require a contractor and planning. Costs vary by location, materials, and scope.
$2,000 – $5,000 (Forbes) to $2,500 – $18,000 (3 Birds); curved staircases cost significantly more
Widened doorways (at least 32 inches clear width)
$600 – $2,000 per doorway (NerdWallet)
Wheelchair ramp
$1,100 – $3,600 average $2,300 (NerdWallet); up to $12,000+ for longer runs (3 Birds)
A few things to note. The stair lift figure varies dramatically because straight staircases are cheap and curved staircases require custom rails. For a typical straight run, expect $2,000–$5,000. For a curved or outdoor installation, budget $10,000–$24,000. Similarly, a walk-in shower can be under $1,000 with a prefabricated insert, but a custom tiled curbless shower with proper drainage and waterproofing runs $8,000 and up. Do not let the low-end number trick you into underestimating the real cost for your home.
The three-phase approach: immediate safety, then accessibility, then structural investments.
Phase 3: Structural investments that future-proof your home
These are the big-ticket projects that require significant capital, professional design, and often a reassessment of the home's layout. They come last for two reasons: they are expensive, and they cannot be executed correctly until Phase 1 and Phase 2 are done.
Do not mistake the order for lack of importance. If your parent cannot safely use the stairs today, a stair lift should move up to Phase 2. But for most families, the structural list represents the difference between a home that merely accommodates and a home that genuinely supports aging in place over the long term.
Phase 3. These projects offer the highest ROI for long-term aging in place, but they require professional design and funding.
Project
Typical cost range
Notes
Home elevator
$20,000 – $50,000 (Forbes)
Requires structural assessment and permits.
Vertical platform lift
$9,000 – $20,000
For outdoor or indoor use; no shaft needed.
Full first-floor suite addition
$15,000 – $60,000+ (3 Birds)
Depends on square footage and complexity.
Full kitchen remodel for accessibility
$8,000 – $50,000
Counters at different heights, pull-out shelves, roll-under sink.
A well-planned universal design bathroom can return 68–70% of its cost in home value, according to AgingInPlace.com. But the real return is avoiding assisted living, which averages $4,500 per month or more. Compared to that, a $20,000 stair lift looks like a bargain.
Where a CAPS assessment fits in (and when to call a pro)
The ideal sequence is: do Phase 1 yourself, then bring in a Certified Aging-in-Place Specialist (CAPS) before committing to Phase 2. A CAPS professional does not just tell you what to install—they produce a prioritized plan that staggers costs and prevents ordering mistakes. Eve Hill, a CAPS specialist quoted in Forbes, says the best time to start is before a person needs it, because a rushed remodel after a fall costs more and is harder to execute.
I know that advice is hard to swallow if you are already in crisis. If that is you, do Phase 1 now, then book a CAPS assessment before you sign any Phase 2 contracts. The assessment fee (typically $300–$800) can save you thousands in misordered or unnecessary work. For a detailed walkthrough of how to find and hire a qualified contractor, read How to Choose an Aging-in-Place Contractor.
Budget pacing: when to spend what
Here is a simple three-row table to make the financial timeline concrete. Use it as a planning tool, not a fixed budget.
Budget pacing by phase. Phase 1 is cash; Phases 2 and 3 can often tap external funding.
Phase
Typical cost
Timing
How to pay
Phase 1: Immediate safety
$50 – $500
Tonight to this weekend
Out of pocket. Receipts may be deductible if medically necessary.
Phase 2: Medium-term accessibility
$2,000 – $20,000
Within 3–12 months
Savings, grants (see below), or home equity line. Professional installation required.
Phase 3: Long-term structural
$20,000 – $60,000+
1–5 years
VA grants, USDA loans, Medicare Advantage (for some chronic conditions), or contractor financing.
I would be doing you a disservice if I pretended that the biggest barrier is cost or contractor availability. The biggest barrier is a parent who does not want the house changed.
A grab bar feels like a surrender. A raised toilet feels like a medical device. You can have the best phased plan in the world and still face a closed door. Here are two tactics that actually work.
Do not frame it as a need. Frame it as a convenience. “I want to be able to carry laundry without worrying about the step,” or “I want the bathroom to be easier for the grandkids.” If they already have a mobility challenge, try: “This grab bar is for me so I can help you without hurting my back.”
Start with a trial. Install a temporary suction-cup grab bar in the shower. Leave it for a week. Once they use it and find it helpful, you can say, “Great, let’s put a permanent one in so it’s safe for both of us.”
Occupational therapists can be effective neutral third parties. If your parent resists your suggestions, a single home visit from an OT can change the conversation. The OT does not carry the emotional weight of a child suggesting that a parent is failing.
Start where you are, plan where you're going
A phased approach does not mean delaying safety. It means spending your time and money where they matter most right now, then building on that foundation over months and years. For the crisis reader: your Phase 1 list is above. Start tonight. For the planner: get a CAPS assessment and begin Phase 1 basics while you explore Phase 2 and Phase 3.
Aging in place is not a single renovation. It is a journey of adjustments, some fast and cheap, some slow and expensive. By separating the urgent from the important, you avoid the mistake that burns the most families: pouring money into the wrong upgrade at the wrong time. The $50 billion fall bill is not going to shrink. But your parent's risk can—starting tonight.


Comments
Join the discussion with an anonymous comment.