Bathroom Remodel for Elderly Safety: A Phased Fall-Prevention Guide from $200 Fixes to Full Renovation
A practical, phased guide for adult children and caregivers planning a bathroom remodel to prevent falls. Covers immediate low-cost fixes, mid-range upgrades, and full structural renovations, with cost ranges, financing options, and contractor guidance.
By Editorial Team
bathroom safety
grab bars
non-slip flooring
home hazard audit
checklist
Why the Bathroom Is the Most Dangerous Room in the House
If you are reading this after your parent took a bad slip in the shower or struggled to get off the toilet, you already know the bathroom is a hazard zone. The numbers back that instinct up. According to the Ohio Department of Aging and Age Safe America, roughly 80% of falls that happen at home among older adults occur in the bathroom. That single room, which most of us use six to eight times a day, is where the combination of wet surfaces, tight quarters, and physically demanding transitions — sitting, standing, stepping over a tub wall — turns a routine trip into a trip to the ER.
The scale of the problem is substantial. The CDC reports that each year, about 3 million emergency department visits are due to falls among older adults, and more than one out of four older people falls annually. Porchlight at Home cites a figure of approximately 235,000 Americans over 65 visiting ERs annually for bathroom-related falls — a number that, while drawn from older CDC data, underscores how concentrated the risk is in this one room.
The financial stakes are equally high. A semi-private nursing home room averages about $7,900 per month, and assisted living runs roughly $4,500 per month, according to Retirement Living. That works out to more than $54,000 a year for assisted living. A comprehensive bathroom remodel, by contrast, typically costs between $8,000 and $25,000 — a one-time investment that can keep a parent safe at home for years.
The good news is that you do not need to spend $25,000 all at once to make a meaningful difference. A systematic review by Cha (2025), published in Healthcare, examined 20 studies on home modifications and found that 65% confirmed their effectiveness in fall prevention, functional independence, and cost savings. Bathroom modifications, grab bars, and stair railings were identified as the most impactful interventions. Hollinghurst et al. (2022), in a study of 657,536 older adults, found that home modifications reduced fall-related emergency admissions by 3% per quarter. Even small, low-cost changes — a grab bar here, a non-slip mat there — produce measurable risk reduction.
This guide is structured as a phased approach. Each phase is an independent investment in safety, not a stepping stone to a single expensive remodel. You can stop at any phase and still have a meaningfully safer bathroom. The three phases are:
Phase 2 — Mid-range upgrades from $1,000 to $3,000 (comfort-height toilet, handheld showerhead, fold-down bench, anti-scald valve)
Phase 3 — Full structural renovation from $5,000 to $25,000 (curbless shower, widened doorway, non-slip flooring, wall blocking)
Before you start, it is worth understanding the broader context. The Fall Prevention at Home: How to Build a Complete Aging-in-Place Safety System article on this site explains how bathroom modifications fit into the CDC STEADI framework (Screen, Assess, Intervene) and how they work alongside clinical fall risk assessment and community services. The bathroom is one piece of a larger safety system, but it is the piece where falls are most concentrated — which makes it the right place to start.
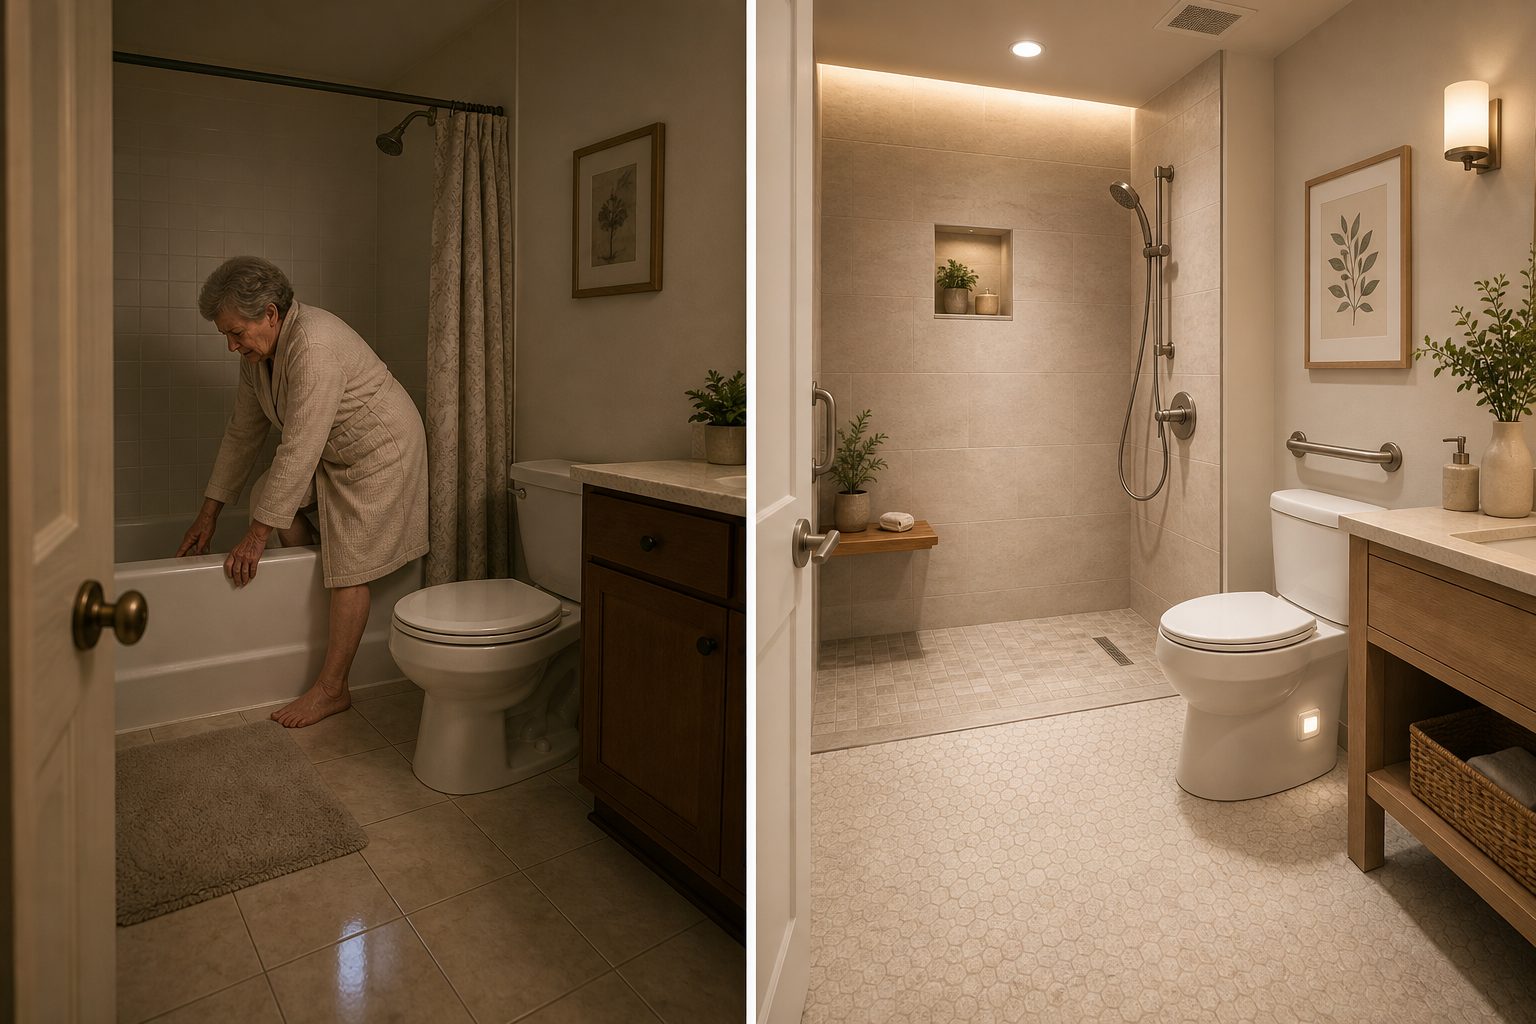
The difference between a standard bathroom (left) and a safety-optimized bathroom (right) is not just about equipment — it is about eliminating the physical barriers that cause falls.
Phase 1: Immediate Safety Fixes Under $500
Phase 1 is for the caregiver who needs to act this week. These are the highest-impact, lowest-cost modifications that can be done in an afternoon or a weekend. None of them require a contractor, though some — like grab bar installation — require basic DIY skills or a handyman.
Grab Bars: The Single Most Important Safety Device
A properly installed grab bar can support 250 pounds or more. A towel bar, by contrast, is designed to hold a rolled towel — roughly 10 to 15 pounds. When a person grabs a towel bar during a fall, it pulls out of the drywall, and the fall continues unimpeded. This is not a hypothetical: the NIA explicitly recommends mounting grab bars near toilets and on both the inside and outside of the tub and shower, and Age Safe America notes that grab bars must be anchored into wall studs.
The difference between a grab bar anchored into a stud (left) and a towel bar mounted with drywall anchors (right). Only one of these will stop a fall.
Porchlight at Home recommends a minimum of five grab bar locations in a bathroom: one next to the toilet, one at the tub or shower entry, one inside the shower or tub for balance while standing, one at the sink for support during transfers, and one near the bathroom door for entry and exit stability. The bars should have a diameter of 1.25 to 1.5 inches for a secure grip, per Age Safe America.
Non-Slip Mats and Flooring
Wet bathroom floors are the most obvious fall hazard. The NIA recommends placing non-skid mats, strips, or carpet on all surfaces that may get wet. For shower and tub floors, look for mats with a Dynamic Coefficient of Friction (DCOF) of 0.60 or higher — this is the industry standard for wet-area slip resistance. For bathroom floors, the AARP recommends a coefficient of friction of at least 0.42. A simple non-slip bath mat costs $15 to $40 and can be installed in seconds.
Raised Toilet Seat
Standard toilets have a seat height of about 14 to 15 inches. For an older adult with reduced hip or knee strength, sitting down and standing up from that height requires significant effort and increases fall risk. A raised toilet seat adds 3 to 5 inches of height, bringing the total to 17 to 19 inches — the same range as a comfort-height toilet. These devices cost $30 to $80 and can be installed without tools. They are a temporary solution, but they work immediately.
Motion-Activated Night Lights
The NIA recommends leaving a light on in the bathroom at night or using a night light that turns on automatically in the dark. Motion-activated lights that plug into electrical outlets cost $10 to $25 and eliminate the need to fumble for a switch in the dark. For a parent who gets up two or three times a night to use the bathroom, this is one of the cheapest and most effective interventions available.
Lever Faucet Handles
Round or cross-shaped faucet knobs require grip strength and wrist rotation to operate. Lever-style handles can be operated with a closed fist or the side of the hand — a significant advantage for someone with arthritis or reduced hand strength. Retirement Living reports that installing lever taps on faucets costs $150 to $330, depending on the faucet model.
Phase 2: Mid-Range Upgrades for $1,000 to $3,000
Phase 2 upgrades require more planning and a modest budget, but they do not require a full renovation. These are the modifications that address the most common bathroom fall scenarios: transferring to and from the toilet, entering and exiting the shower, and maintaining balance during bathing.
Comfort-Height Toilet
A comfort-height toilet has a seat height of 17 to 19 inches, compared to the standard 14 to 15 inches. This 2- to 3-inch difference reduces hip and knee strain during sit-to-stand transfers by as much as 50%, according to Age Safe America. The AARP notes that comfort-height toilets reduce the risk of falls by making it easier to stand up without losing balance. A comfort-height toilet costs $200 to $600, plus installation.
Handheld Showerhead with Slide Bar
A fixed showerhead forces the user to stand directly under the water stream, which can be destabilizing. A handheld showerhead on a slide bar allows the user to sit on a shower bench or chair while bathing, reducing the risk of falling during the shower. The AARP describes a handheld sprayer as a DIY-friendly upgrade. A quality handheld showerhead with a slide bar costs $50 to $200.
Fold-Down Shower Bench
A fold-down shower bench provides a stable, seated position for bathing. It eliminates the need to stand on a wet surface while washing. The bench should be installed on the wall opposite the showerhead, with grab bars nearby for support during transfers. A fold-down bench costs $100 to $300, plus installation.
Anti-Scald Mixing Valve
Older adults have thinner skin and reduced sensitivity to temperature, making them more vulnerable to scalding. An anti-scald mixing valve regulates water temperature to prevent burns. It is a relatively simple plumbing upgrade that costs $50 to $150 for the valve, plus installation. Porchlight at Home includes this as a standard Phase 2 recommendation.
Cost ranges are national averages from Retirement Living (2026) and Porchlight at Home (2026). Actual costs vary by region, contractor rates, and material choices.
Modification
Phase
Cost Range
Key Benefit
Grab bars (5 locations)
1
$100–$500
Provides stable support during transfers; prevents falls
Non-slip mats (DCOF ≥ 0.60)
1
$15–$40
Reduces slip risk on wet surfaces
Raised toilet seat
1
$30–$80
Reduces hip/knee strain during sit-to-stand
Motion-activated night light
1
$10–$25
Eliminates fall risk in dark bathroom trips
Lever faucet handles
1
$150–$330
Easier operation with reduced grip strength
Comfort-height toilet (17–19 in)
2
$200–$600
Permanent solution for easier transfers
Handheld showerhead with slide bar
2
$50–$200
Allows seated bathing; reduces standing risk
Fold-down shower bench
2
$100–$300
Provides stable seated position for bathing
Anti-scald mixing valve
2
$50–$150
Prevents burns; regulates water temperature
Curbless shower conversion
3
$3,000–$15,000
Eliminates step-over fall risk
Widened doorway (32–36 in)
3
$200–$7,000
Allows wheelchair/walker access
Non-slip flooring (DCOF ≥ 0.60)
3
$6,400–$11,000
Permanent slip-resistant surface
Wall blocking for future grab bars
3
$200–$500
Prepares for future grab bar installation
Phase 3: Full Structural Renovation for $5,000 to $25,000
Phase 3 is for the caregiver who has decided that the current bathroom layout is fundamentally unsafe and needs to be rebuilt. These projects require a licensed contractor — ideally a CAPS-certified one — and a budget of $5,000 to $25,000. The return on investment is not just financial; it is the ability for an older adult to bathe independently and safely for years to come.
Tub-to-Curbless-Shower Conversion
The single most dangerous feature in a standard bathroom is the bathtub wall. Climbing over a 12- to 20-inch tub wall requires lifting one leg high while balancing on the other — a movement that is difficult for many older adults and dangerous for anyone with reduced strength or balance. A curbless (zero-threshold) shower eliminates this step-over entirely. The shower floor is level with the bathroom floor, allowing the user to walk in or enter with a walker or wheelchair.
Age Safe America notes that curbless or low-threshold showers with built-in seating are a key ADA-inspired modification. The AARP reports that curbless showers cost $6,000 to $10,000, while Porchlight at Home gives a broader range of $3,000 to $15,000. The variation depends on whether the existing drain location can be used, whether the subfloor needs to be sloped, and the quality of the shower fixtures.
Widened Doorway (32 to 36 Inches)
Standard bathroom doorways are 24 to 28 inches wide — too narrow for a walker or wheelchair to pass through. Widening the doorway to 32 to 36 inches ensures that a mobility aid can enter and exit the bathroom without scraping the door frame. Retirement Living reports a cost range of $200 to $7,000 for widening an entry door, depending on whether the wall is load-bearing and whether the door frame needs to be relocated.
Non-Slip Flooring Throughout
Glossy ceramic or porcelain tile is beautiful but dangerously slippery when wet. For a senior-safe bathroom, the flooring should have a DCOF of 0.60 or higher for wet areas. Textured porcelain tile, luxury vinyl plank with a slip-resistant finish, or rubber flooring are all good options. Professional installation of non-slip flooring costs $6,400 to $11,000, according to Retirement Living, though DIY materials can be under $3 per square foot.
Wall Blocking for Future Grab Bars
During a full renovation, it is inexpensive to install horizontal blocking (2x6 or 2x8 lumber) between wall studs at grab bar height. This creates a solid mounting surface for future grab bars, regardless of where the studs are located. Porchlight at Home recommends this as a standard Phase 3 upgrade. The cost is minimal — $200 to $500 in additional labor and materials — but it eliminates the need to open up the wall later.
Cost Comparison Table: What Each Modification Costs
The table below summarizes all the modifications discussed in this guide, organized by phase, with national average cost ranges and the primary safety benefit of each. Use it to compare options at a glance and to build a phased plan that fits your budget.
Cost ranges are national averages from Retirement Living (2026) and Porchlight at Home (2026). Actual costs vary by region, contractor rates, and material choices.
Modification
Phase
Cost Range
Primary Safety Benefit
Grab bars (5 locations)
1
$100–$500
Provides stable support during transfers
Non-slip mats (DCOF ≥ 0.60)
1
$15–$40
Reduces slip risk on wet surfaces
Raised toilet seat
1
$30–$80
Reduces hip/knee strain during sit-to-stand
Motion-activated night light
1
$10–$25
Eliminates fall risk in dark bathroom trips
Lever faucet handles
1
$150–$330
Easier operation with reduced grip strength
Comfort-height toilet (17–19 in)
2
$200–$600
Permanent solution for easier transfers
Handheld showerhead with slide bar
2
$50–$200
Allows seated bathing; reduces standing risk
Fold-down shower bench
2
$100–$300
Provides stable seated position for bathing
Anti-scald mixing valve
2
$50–$150
Prevents burns; regulates water temperature
Curbless shower conversion
3
$3,000–$15,000
Eliminates step-over fall risk
Widened doorway (32–36 in)
3
$200–$7,000
Allows wheelchair/walker access
Non-slip flooring (DCOF ≥ 0.60)
3
$6,400–$11,000
Permanent slip-resistant surface
Wall blocking for future grab bars
3
$200–$500
Prepares for future grab bar installation
How to Pay for a Bathroom Remodel: Grants, VA Benefits, and Loans
The cost of a bathroom remodel can be daunting, but several funding sources exist to help offset the expense. Medicare does not cover home modifications — it covers durable medical equipment (shower chairs, commodes) if prescribed, but not grab bars, walk-in showers, or other structural changes. The following programs are the most common sources of funding for aging-in-place modifications.
Medicaid Home and Community-Based Services (HCBS) Waivers
Medicaid HCBS waivers allow states to use Medicaid funds to pay for home modifications that enable older adults to remain in their homes rather than moving to a nursing facility. The amount varies by state and waiver type, but Porchlight at Home reports a typical range of $5,000 to $15,000 per project. Eligibility is based on income, assets, and functional need. Contact your state Medicaid office or local Area Agency on Aging to learn about available waivers.
VA Grants: SAH, HISA, and SHA
The Department of Veterans Affairs offers three main grant programs for home modifications:
Specially Adapted Housing (SAH) Grant: Up to $121,812 (2026) for veterans with service-connected disabilities that require major structural changes. This is the most generous VA grant but has the strictest eligibility requirements.
Home Improvements and Structural Alterations (HISA) Grant: Up to $6,800 for medically necessary modifications. This grant is available to veterans with qualifying conditions, regardless of service connection.
Special Home Adaptation (SHA) Grant: Up to $24,405 for veterans with mobility or vision impairments. This grant is for less extensive modifications than the SAH grant.
These figures come from 101 Mobility (2025) and Harmar (2026). The VA updates grant amounts annually, so verify current limits before applying.
USDA Section 504 Home Repair Program
The USDA Section 504 Home Repair Program provides grants of up to $10,000 to very-low-income homeowners aged 62 and older in rural areas. The grants can be used for home repairs and modifications, including bathroom safety upgrades. The program is administered by the USDA Rural Development office. Eligibility is based on income and location.
HUD Older Adults Home Modification Grant
The HUD Older Adults Home Modification Grant provides up to $5,000 per household for safety modifications. This program is relatively new (established in 2023) and is administered through local grantees. Availability varies by location. Check the HUD website or contact your local HUD office for current information.
Area Agency on Aging Programs
Local Area Agencies on Aging (AAAs) often have small grant programs or low-interest loan programs for home modifications. The NIA directs readers to the Eldercare Locator (800-677-1116) or their local AAA to find home modification programs. These programs vary widely by region, but they are often the easiest place to start because they are local and can connect you to other resources.
How to Find and Hire a CAPS-Certified Contractor
For Phase 3 renovations — and even for some Phase 2 upgrades — you will need a contractor who understands aging-in-place design. A Certified Aging-in-Place Specialist (CAPS) is a contractor who has completed training through the National Association of Home Builders (NAHB) on universal design, home modifications, and the specific needs of older adults. CAPS certification does not guarantee a perfect outcome, but it does mean the contractor has studied the principles of safe, accessible design.
When interviewing contractors, ask the following questions:
Are you CAPS-certified? If not, have you completed any aging-in-place training?
How many bathroom remodels for older adults have you done in the past two years?
Can you provide references from clients who needed similar modifications?
Do you carry general liability insurance and workers' compensation insurance?
Will you handle permits and inspections, or will that be my responsibility?
What is your estimated timeline, and how do you handle unexpected issues (e.g., mold, outdated plumbing)?
Use this checklist to audit your parent's bathroom and identify which modifications are needed. Each item is linked to the phase where it is most cost-effective to address. Check off what is already done, and prioritize the items that address the highest-risk areas first.
Shower and Tub Area
Grab bars installed on both the inside and outside of the tub or shower (Phase 1)
Non-slip mat or strips on the tub or shower floor (Phase 1)
Handheld showerhead with slide bar installed (Phase 2)
Fold-down shower bench or built-in seat (Phase 2)
Anti-scald mixing valve installed (Phase 2)
Curbless shower conversion completed (Phase 3)
Toilet Area
Grab bar installed next to the toilet (Phase 1)
Raised toilet seat or comfort-height toilet installed (Phase 1 or 2)
Clear floor space of at least 30 by 48 inches for wheelchair maneuvering (Phase 3)
Sink and Vanity Area
Lever-style faucet handles installed (Phase 1)
Grab bar installed near the sink for support during transfers (Phase 1)
Vanity height allows wheelchair or walker access underneath (Phase 3)
Floor and Doorway
Non-slip flooring installed throughout (DCOF ≥ 0.60 for wet areas) (Phase 1 or 3)
Doorway widened to at least 32 inches (Phase 3)
Threshold is flush with the floor (no step-over) (Phase 3)
Lighting and Electrical
Motion-activated night light installed (Phase 1)
Light switch is accessible from the doorway (Phase 1)
Bright, even lighting throughout the bathroom (Phase 1 or 3)
📄
A printable checklist version of this resource is available. Use your browser's print function (Ctrl+P / ⌘P) to save or print.


Comments
Join the discussion with an anonymous comment.