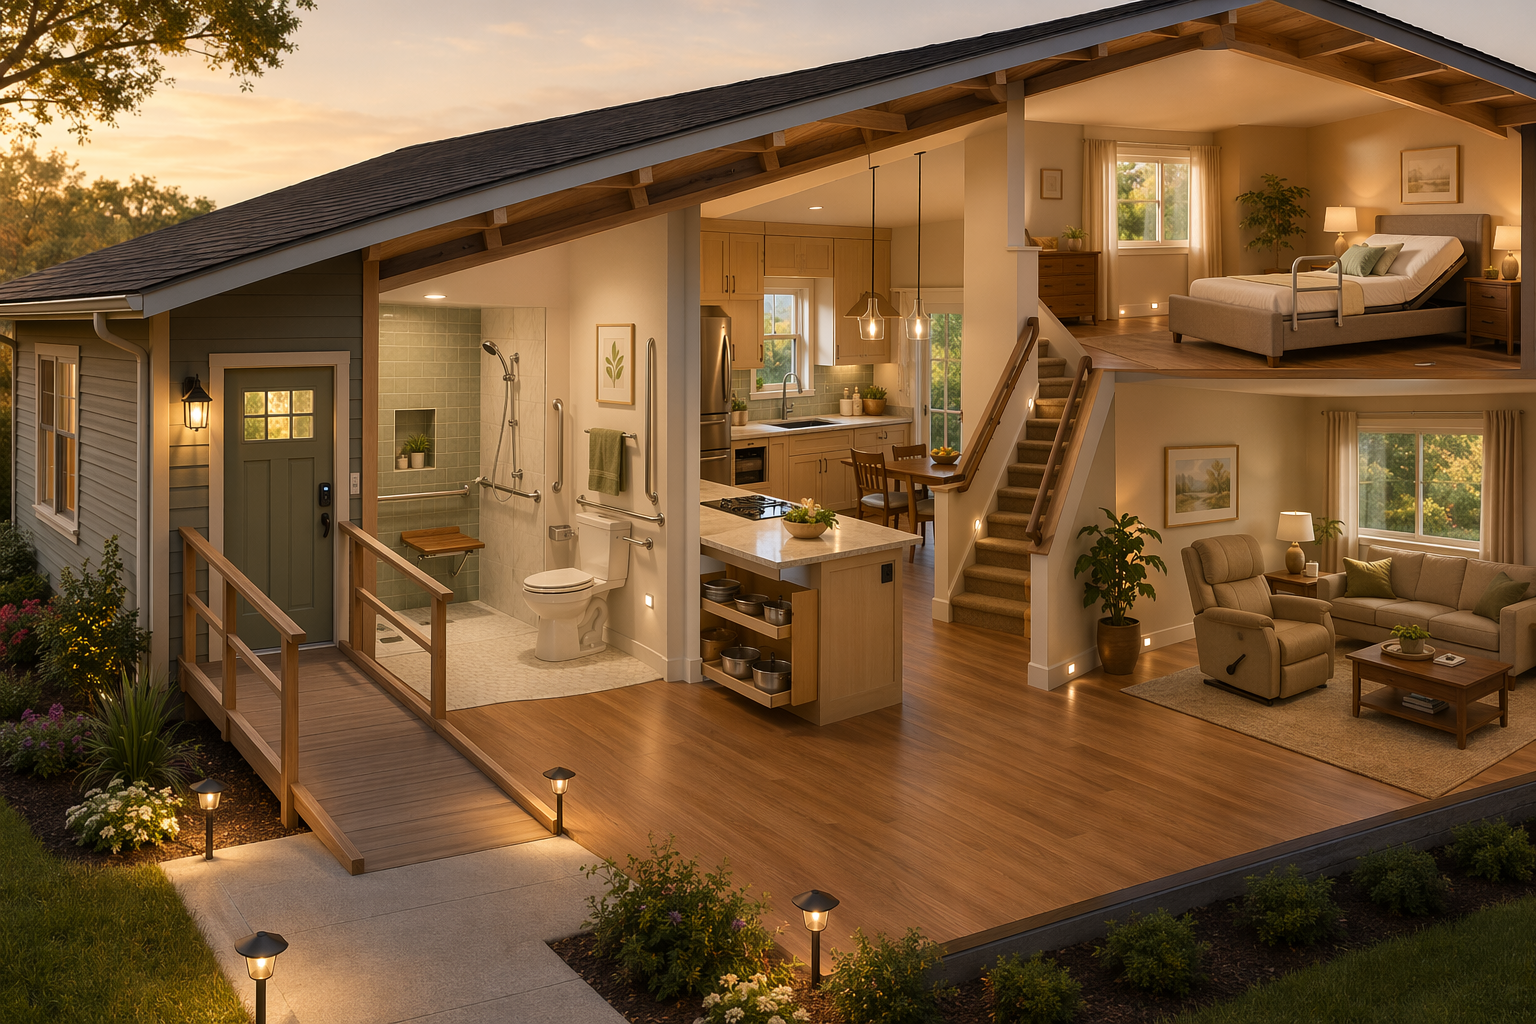
Aging in Place Home Modifications: A Room-by-Room Safety Checklist with Expert OT Guidance
bathroom, exterior, stairs, kitchen, bedroom, living roomstructural, equipment installation, design/lighting~$50–$400 for grab bars; $1,500–$12,000+ for ramps; $2,500–$18,000+ for stair lifts; $8,000–$18,000+ for curbless showers; $700–$2,000 for door wideningReviewed: 2026-06-21
Aging in Place Home Modifications: A Room-by-Room Safety Checklist with Expert OT Guidance
A practical, evidence-based room-by-room safety checklist for families and older adults, grounded in occupational therapy principles. Learn how to systematically identify hazards and prioritize modifications from the bathroom (highest-risk room) to every other area of the home.
Estimated cost range: $50–$400 for grab bars; $1,500–$12,000+ for ramps; $2,500–$18,000+ for stair lifts; $8,000–$18,000+ for curbless showers; $700–$2,000 for door widening
Cost ranges are estimates. Verify eligibility directly with each program.
By Editorial Team
A room-by-room approach to aging-in-place modifications helps families systematically identify hazards and prioritize changes.
Why a Room-by-Room Approach Works: The OT Assessment Model
When you walk through a home you've lived in for decades, the hazards blur into the background. That loose throw rug near the kitchen sink, the dim hallway between the bedroom and bathroom, the shower ledge you step over without thinking — they become invisible through familiarity. Occupational therapists (OTs) train their eyes to see these risks because they use a structured framework called the Person-Environment-Occupation (PEO) model, which examines how a person's physical abilities interact with their home environment and the daily tasks they need to perform.
The data backs up the need for this systematic approach. According to the National Council on Aging (NCOA), over half of all falls take place at home. A room-by-room assessment — the same method OTs use during a home evaluation — breaks that overwhelming statistic into manageable, actionable pieces. Instead of asking "Is this house safe?" you ask "Is the path from the bed to the bathroom clear at night?" and "Can Mom reach her plates without climbing?"
This checklist is designed as a practical, immediately scannable reference for families who are ready to act. It is organized by room, starting with the highest-risk areas, and each modification includes a brief note on why it matters from an OT perspective. For a deeper understanding of how OTs conduct full home assessments and how to request one, see our Occupational Therapist's Guide to Aging-in-Place Home Modifications. If you are unsure whether to start with an OT or a CAPS-certified contractor, our decision guide can help you choose the right professional first.
Exterior and Entry: Creating a Safe First Step
The transition from outside to inside is a high-risk moment. Carrying groceries, managing keys, stepping over a threshold, and navigating uneven pavement all challenge balance. A safe entry reduces fall risk before the person even crosses the door.
Exterior and Entry Checklist
Zero-step entry or ramp: Eliminate the need to step over a threshold. Modular aluminum ramps cost between $1,500 and $12,000+ depending on length and configuration (3 Birds Accessibility, 2025). A permanent concrete ramp may be more expensive but requires less maintenance.
Well-lit walkway: Install motion-sensor lights along the path from the driveway or sidewalk to the front door. Path lights should be bright enough to illuminate cracks, uneven pavement, and steps.
Grab bar near the door: A vertical or angled grab bar mounted beside the entry door provides a stable handhold while unlocking and opening the door, especially when carrying items.
Lever-handle door hardware: Lever handles require less grip strength and fine motor control than round knobs. They can be operated with a closed fist or an elbow, which is critical for someone with arthritis or reduced hand strength.
Keypad or smart lock: Eliminates the need to fumble with keys. A keypad lock with a backlit display is easier to use in low light.
Doorway width: The minimum clearance for a standard doorway is 32 inches (ADA specification). For wheelchair or walker users, 36 inches is preferred. Widening a doorway costs between $700 and $2,000 (3 Birds Accessibility, 2025).
Estimated costs are national averages from 2024–2026 sources and vary by region and home condition.
Modification
Estimated Cost Range
OT Rationale
Modular ramp
$1,500 – $12,000+
Eliminates step-over fall risk; supports walker and wheelchair access
Grab bar near door
$50 – $200
Provides stable handhold during entry transition
Lever-handle hardware
$20 – $80 per handle
Reduces grip strength requirement; operable with fist or elbow
Door widening
$700 – $2,000
Accommodates walkers, wheelchairs, and future mobility changes
Stairs and Hallways: Preventing the Most Dangerous Falls
Stair-related falls are among the most serious because they involve greater height and impact force. A fall on stairs can result in hip fractures, traumatic brain injuries, and long-term mobility loss. The goal of stair modifications is to reduce the risk of a fall occurring and to provide something to grab if balance is lost.
Stair and Hallway Checklist
Handrails on both sides: This is non-negotiable. A single handrail forces the user to rely on one side of their body. Dual handrails allow for balanced weight distribution and provide a backup if one hand slips. Handrails should extend the full length of the staircase, including beyond the top and bottom steps.
Non-slip stair treads: Apply adhesive treads or replace carpet with slip-resistant material. Avoid polished wood or tile on stairs without a non-slip finish.
Improved lighting: Install a light switch at both the top and bottom of the stairs (three-way switch). Motion-sensor lights that activate when someone approaches the stairs are ideal.
Stair lift: For individuals who cannot safely climb stairs even with handrails. Straight stair lifts cost between $2,500 and $18,000+ (3 Birds Accessibility, 2025). Curved stair lifts for spiral or multi-landing stairs start around $10,000 (Forbes Health, 2024).
Catchall baskets or a small table: Place a basket or small table at the top and bottom of the stairs so items are not carried up and down. Carrying objects while climbing stairs significantly increases fall risk.
Clear hallways: Remove clutter, cords, and low furniture from hallways. Hallways should be at least 36 inches wide to accommodate a walker or wheelchair.
Cost ranges are national averages. Stair lift costs vary significantly by brand, stair configuration, and installation complexity.
Modification
Estimated Cost Range
OT Rationale
Handrails (both sides)
$100 – $300 per rail
Provides balanced support; reduces fall risk by 50%+ when both hands are used
Non-slip stair treads
$2 – $10 per tread
Increases traction; reduces slipping on smooth surfaces
Stair lift (straight)
$2,500 – $18,000+
Eliminates stair climbing entirely for those with significant mobility limitations
Motion-sensor stair lights
$30 – $100
Ensures stairs are always visible when in use
Bathroom: The Highest-Risk Room in the Home
Occupational therapists consistently identify the bathroom as the most dangerous room in the house. As OT Cheryl Hall told Wirecutter, "You're naked and wet. So it's definitely the most risky place that you're gonna have." Wet surfaces, limited mobility, and the need to transfer on and off the toilet and into the shower create a perfect storm for falls.
The data is stark. The CDC reports that almost 28% of bathroom injuries among adults 65 and older are toilet-related. A 2021 study (PubMed ID 34963373) found that people using grab bars were nearly 76% more likely to recover their balance during a slip or loss of balance. These two facts alone make the bathroom the highest-priority room for modifications.
A well-designed aging-in-place bathroom prioritizes safety without sacrificing dignity or comfort.
Bathroom Checklist
Grab bars: Install grab bars at the toilet (beside and in front) and in the shower (vertical and horizontal). A 2021 study found that grab bar users were 76% more likely to recover balance during a slip. Grab bars cost between $150 and $400 each installed (3 Birds Accessibility, 2025). Do not use suction-cup grab bars — they are not reliable.
Shower chair or bench: As OT Matt Haase explained to Wirecutter, a shower chair "takes balance completely out of the equation." A sturdy, adjustable shower chair allows the user to sit while bathing, eliminating the risk of standing on a wet surface.
Handheld showerhead: A handheld showerhead on a sliding bar allows the user to direct water while seated. It also makes it easier for a caregiver to assist with bathing.
Bidet or toilet seat riser: A bidet reduces the need to twist and reach for toilet paper. A raised toilet seat (adding 2–4 inches) or an ADA-height toilet (17–19 inches from floor to seat) makes sitting and standing easier.
Curbless (barrier-free) shower: A curbless shower eliminates the step-over threshold, which is a major trip hazard. Installation costs range from $8,000 to $18,000+ (3 Birds Accessibility, 2025).
Non-slip flooring: Replace glossy tile with slip-resistant vinyl, cork, or textured tile. Non-slip bath mats with suction cups can be a temporary solution but require regular cleaning to prevent mold.
Motion-sensor night-light: A night-light that activates when someone enters the bathroom prevents falls during nighttime trips.
For a more detailed, zone-by-zone bathroom safety assessment, see our Bathroom Safety Checklist for Seniors. That guide covers every zone of the bathroom in greater depth, including sink areas, storage, and emergency access.
Kitchen: Reorganizing for Safety and Independence
The kitchen presents a different set of risks: reaching for items on high shelves, carrying hot liquids, bending to access lower cabinets, and navigating around open drawers and appliances. The goal of kitchen modifications is to bring frequently used items within easy reach and reduce the need for bending, reaching, and carrying.
OT Matt Haase, interviewed by Wirecutter, observed that "90% of homes I go to, plates and cups are stored up high." This simple observation highlights a widespread problem: kitchens are designed for able-bodied adults, not for someone with reduced reach, balance, or strength.
Kitchen Checklist
Store frequently used items between waist and shoulder height: This is the single most impactful kitchen change. Move plates, cups, pots, and pantry staples to cabinets between 24 and 48 inches from the floor. Use pull-out shelves or lazy Susans for deep cabinets.
Single-lever faucet: A single-lever faucet with a pull-out spray head is easier to operate than two-handle faucets. It requires less grip strength and can be operated with one hand.
Induction cooktop: Induction cooktops heat only the pan, not the surface, reducing the risk of burns. They also have no open flame and automatically shut off when the pan is removed.
Rolling tables or carts: A rolling cart can be used to transport heavy items from the counter to the table, reducing the need to carry. It also provides extra prep space.
Shallow-basin sink: A sink that is 5–6 inches deep instead of the standard 8–10 inches allows the user to wash dishes while seated. It also reduces the need to lean forward.
Anti-fatigue mats: Standing for long periods on hard flooring is tiring and can increase fall risk. Anti-fatigue mats provide cushioning and reduce leg fatigue.
D-handle pulls: Replace knobs with D-shaped pulls that are easier to grip with arthritic hands.
Bedroom: Supporting Restful and Safe Nights
The bedroom is where nighttime falls are most likely to occur — when an older adult gets up in the dark to use the bathroom, disoriented and unsteady. The goal of bedroom modifications is to create a clear, well-lit path from the bed to the bathroom and to make dressing and undressing safer.
Bedroom Checklist
Adjustable bed: An adjustable bed allows the user to raise the head and feet independently, making it easier to get in and out of bed. It also helps with conditions like acid reflux and sleep apnea.
Bed rails or transfer pole: Bed rails provide a handhold for turning over and sitting up. A transfer pole (a floor-to-ceiling pole with a handle) can be used to pull oneself up from a seated position.
Sturdy chair for dressing: A chair with armrests placed near the bed provides a safe place to sit while putting on socks, shoes, and pants. Standing to dress is a common fall risk.
Adaptive dressing tools: Long-handled shoehorns, sock aids, and button hooks reduce the need to bend over.
Motion-sensor night-light: Place a night-light in the bedroom and along the path to the bathroom. Motion-sensor lights that activate automatically are ideal.
Paddle light switches: Replace toggle switches with large paddle-style switches that are easier to operate with limited hand dexterity.
Clear pathway to the bathroom: Remove furniture, cords, and rugs from the path between the bed and the bathroom door.
Living Room: Clearing the Path for Daily Activity
The living room is where most people spend their waking hours at home. It should be a space for relaxation and social connection, not a obstacle course. The primary risks in the living room are trip hazards (rugs, cords, clutter) and furniture that is difficult to get in and out of.
Living Room Checklist
Remove throw rugs: Throw rugs are one of the most common fall hazards. They curl at the edges, slide on hard flooring, and catch walker tips. If rugs are essential for comfort, use double-sided carpet tape or a non-slip rug pad.
Secure cords and wires: Tape cords to the baseboards or use cord covers. Loose cords across walkways are a tripping hazard.
Widen pathways: Arrange furniture so there is a clear, unobstructed path at least 36 inches wide through the room. Remove low coffee tables and ottomans that block walkways.
Lift recliner: A lift recliner uses a motor to tilt the chair forward, helping the user stand up. This is especially helpful for individuals with knee or hip arthritis.
Robot vacuum: A robot vacuum reduces the need to push a heavy vacuum cleaner, which can be a fall risk. It also keeps floors clear of small debris that could cause a slip.
Universal remote: A single, large-button universal remote replaces multiple small remotes and reduces the need to get up to change the TV or stereo.
Lighting Throughout: The Overlooked Safety Foundation
Lighting is the single most cost-effective home modification, yet it is often overlooked. Poor lighting — dim hallways, dark staircases, unlit bathrooms — turns every room into a fall risk. The goal is to eliminate dark zones entirely and ensure that every pathway is well-lit without requiring the user to fumble for a switch.
Lighting Checklist
Motion-activated night-lights: Install in hallways, bathrooms, and the bedroom. These lights turn on automatically when someone passes by, eliminating the need to find a switch in the dark.
Under-cabinet lighting in the kitchen: LED strip lights under upper cabinets illuminate countertops and reduce shadows that can hide spills or clutter.
Anti-glare LED bulbs: Replace standard bulbs with anti-glare or frosted LED bulbs that reduce harsh shadows and eye strain.
Paddle light switches: Replace small toggle switches with large paddle switches that are easier to operate with limited hand dexterity.
Consistent lighting levels: Avoid sudden changes in brightness between rooms. A dark hallway leading from a bright living room can cause temporary blindness and disorientation.
How to Prioritize: A Framework for Families
Facing a long list of potential modifications can feel overwhelming. The key is to prioritize by urgency and impact, not by cost or convenience. Use this three-tier framework to decide what to do first, what to plan for, and what can wait.
Prioritization framework based on OT home assessment principles. Individual needs may shift items between tiers.
Priority Tier
What It Includes
Examples
Typical Timeline
Tier 1: Immediate Safety Hazards
Modifications that address an active fall risk or a known hazard that could cause injury today
Grab bars in the bathroom, removing throw rugs, installing handrails on both sides of stairs, adding motion-sensor night-lights
Within 1–2 weeks
Tier 2: Mobility Barriers
Modifications that prevent the person from moving safely through the home or accessing essential rooms
Widening doorways, installing a ramp or stair lift, creating a curbless shower, adding a shower chair
Within 1–3 months
Tier 3: Convenience and Independence
Modifications that make daily tasks easier but are not urgent safety issues


Comments
Join the discussion with an anonymous comment.