The Complete Bathroom Safety Remodel: What to Prioritize, What It Costs, and How to Pay — A Step-by-Step Guide for Family Caregivers
bathroom~$2,830–$5,500Reviewed: 2026-06-23
The Complete Bathroom Safety Remodel: What to Prioritize, What It Costs, and How to Pay — A Step-by-Step Guide for Family Caregivers
This step-by-step guide helps family caregivers prioritize bathroom modifications that prevent falls, understand cost ranges, and find funding options—without the need for a full gut renovation.
Estimated cost range: $2,830–$5,500
Potential funding: Medicare Part B, USDA Section 504, VA SAH/SHA, Medicaid HCBS waivers
Cost ranges are estimates. Verify eligibility directly with each program.
By Editorial Team
I Learned the Hard Way That a Full Gut Renovation Isn’t the Only Way
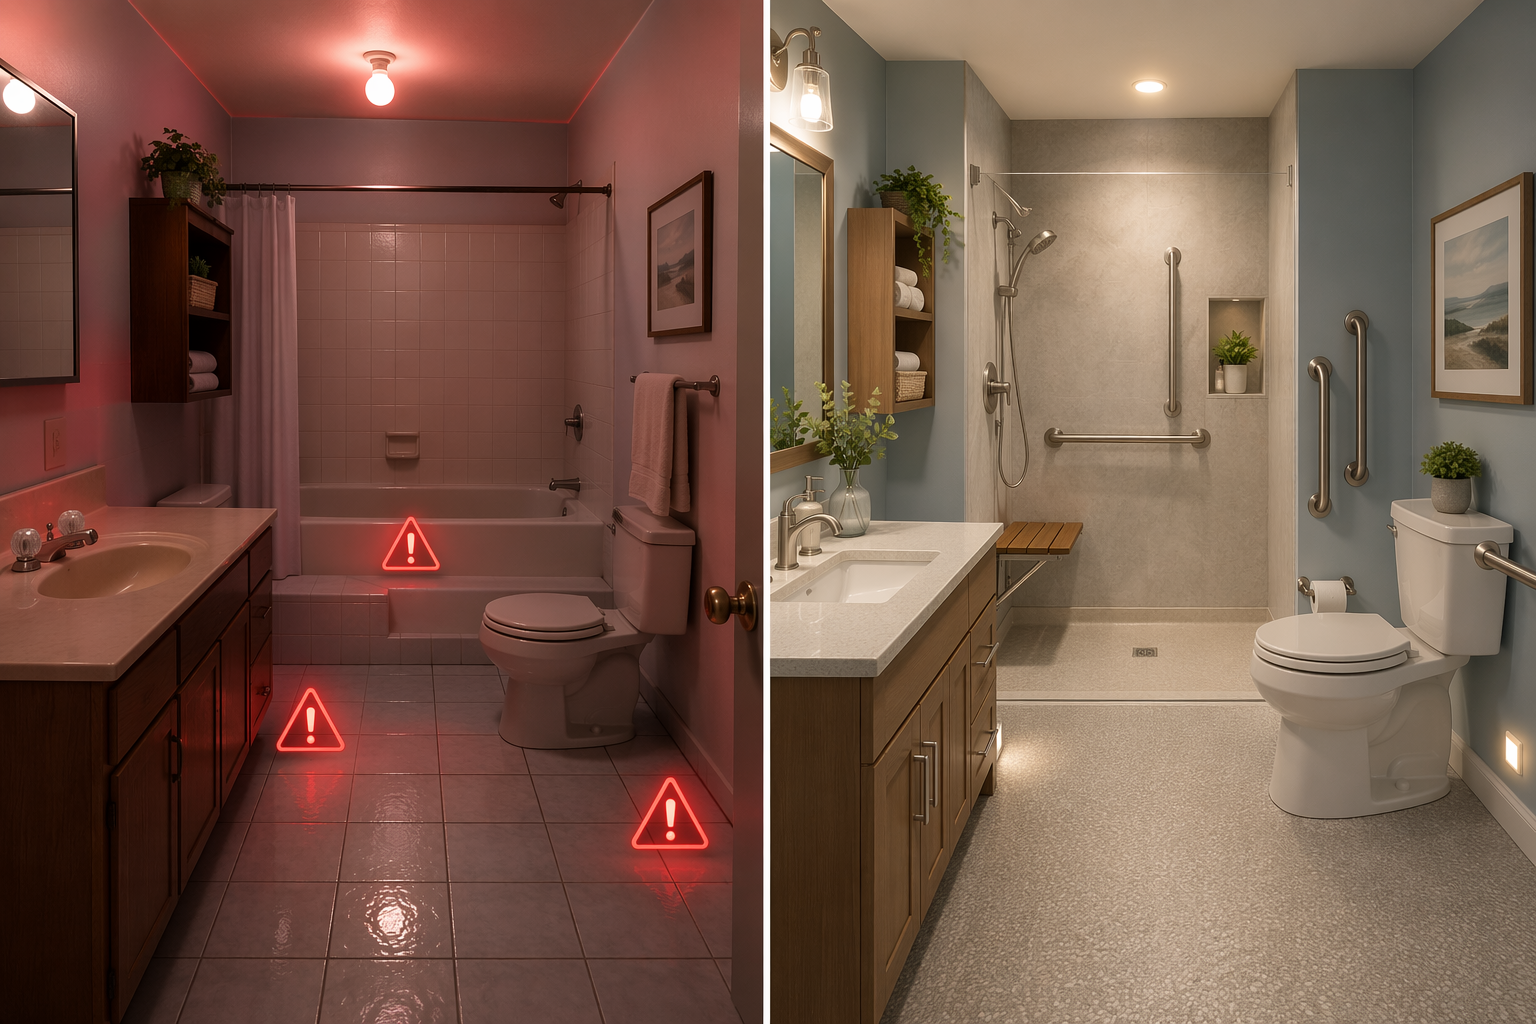
My mother slipped getting out of the shower last year. No broken bones, but enough bruising and fear to start me down the rabbit hole of bathroom modifications. The number that stopped me was this: the Ohio Department of Aging, citing CDC data, says almost 80% of falls in the home occur in the bathroom. More than 200,000 seniors end up in ERs each year from bathroom injuries alone. The CDC also reports 1 in 4 older adults falls every year, and the total health care cost of non-fatal falls hit $80 billion in 2020.
Most families I talked to assumed the only fix was a full gut renovation: rip out the tub, redo the floor, replace everything. That can run $15,000–$30,000-plus. But the reality is more practical—and cheaper. The trick is knowing which changes matter most and which can wait.
Eighty Percent of the Safety Benefit for Under $3,000—If You’re Honest About Labor
The core insight is sound: the first five modifications—grab bars, non-slip flooring, anti-scald valve, handheld shower with bench, and motion-sensor night lights—address the most common fall scenarios. That’s stepping out of the shower, losing balance on wet tile, reaching for a towel, or navigating a dark bathroom at night. The full list of nine covers everything, but the top five deliver disproportionate safety gains.
Now, about that $3,000 figure. Porchlight at Home estimates $2,830 in materials for the top five. That assumes DIY or minimal labor. If you hire a licensed contractor—which I strongly recommend for anything structural—expect to add 50–100% for labor. Even so, a contractor-installed set of those five runs $4,000–$5,500. That still beats a $15,000 full remodel. But don’t go into this thinking you’ll spend $3,000 out the door unless you’re doing the grab bars and night lights yourself.
Nine modifications ranked by safety impact, with material cost ranges from Porchlight at Home. For most items, labor adds 50–100%.
Modification
Cost Range (Materials Only)
Safety Impact
Grab bars (toilet + shower)
$250 – $1,000
High – prevents the most falls
Non-slip flooring (DCOF ≥0.60, ≥0.80 in shower)
$300 – $1,200
High – reduces slips everywhere
Anti-scald valve + lever faucets
$150 – $600
Medium – prevents burns, not falls
Handheld shower head + transfer bench
$100 – $500
High – allows seated showering
Motion-sensor night lights
$30 – $150
Medium – reduces nighttime fall risk
Comfort-height toilet (17–19 inches)
$200 – $800
Medium – eases sit-to-stand
Improved general lighting
$200 – $800
Medium – increases visibility
Curbless shower conversion
$3,000 – $15,000
High – eliminates step-in hazard
Wider doorway + pocket door (if needed)
$500 – $2,500
Low – only needed for wheelchair access
Notice that the two most expensive items—curbless shower and wider doorway—are at the bottom of the priority list unless you already need wheelchair access. That order matters.
The difference between a hazardous bathroom and a safe one doesn’t require a full gut job, just the right priority.
Safety Upgrades Don’t Have to Look Institutional
A common worry is that grab bars and non-slip floors will make the bathroom look like a hospital. They don’t have to. Brushed nickel or oil-rubbed bronze grab bars, textured tile that mimics natural stone, and a teak bench in the shower can look intentional rather than clinical. I’ve seen it done. We’ve written a separate guide on universal design that doesn’t look institutional, covering finishes and resale value. The safety upgrades in this article work with any aesthetic.
The Five That Matter Most—What They Actually Cost
1. Grab Bars – The Non-Negotiable
ADA and IRC codes require grab bars to support a minimum of 250 pounds and be installed at 33 to 36 inches above the finished floor. They must be screwed into wall studs—not just drywall anchors. A contractor will charge $50–$150 per bar for installation plus the bar itself. When you see the range “$250–$1,000 for materials,” that’s the cost of buying the bars. Actual installed cost for two bars (one by the toilet, one in the shower) runs $500–$1,500 with labor. If your parent needs bars on both sides of the toilet and inside the shower, budget on the high end.
2. Non-Slip Flooring – The Silent Enabler
Slippery tile is the second most common fall cause. Look for flooring with a DCOF (Dynamic Coefficient of Friction) rating of 0.60 or higher for general bathroom areas, and 0.80 or higher for the shower floor. Porcelain tile that meets these specs costs $300–$1,200 for a typical bathroom, plus $200–$400 for installation. Vinyl sheet flooring can be cheaper and more slip-resistant, but if you’re renovating anyway, tile with textured finish is more durable.
3. Anti-Scald Valve and Lever Faucets
An anti-scald pressure-balancing valve prevents sudden temperature spikes from other water use in the house. This isn’t a fall prevention directly but it prevents burns and the jerking reaction that can cause falls. Lever-handle faucets are easier to use for arthritic hands. Cost: $150–$600 for the valve plus faucet, including professional installation.
4. Handheld Shower Head and Transfer Bench
The shower is the highest-risk location. A transfer bench allows your parent to sit outside the tub, swing legs over, and slide in. A handheld shower head on a slide bar lets them wash while seated. This combination costs $100–$500 and should be installed before any other shower modification—it works with a standard tub. If you’re planning a curbless shower later, add a built-in bench for permanent sitting.
5. Motion-Sensor Night Lights
The path from bed to bathroom at night is a major fall zone. Motion-sensor night lights along baseboards or in outlets cost $30–$150 for a pack of six. They’re cheap and instantly actionable. Don’t skip them.
The $50 Upgrade That Saves You $200–$400 Later
If you’re opening any wall—for tile replacement, plumbing changes, or new flooring—spend an extra $50 per location to have the contractor install plywood blocking between studs where grab bars might go in the future. That way, when your parent eventually needs a bar, the installer can screw directly into solid wood without ripping open the wall again. Porchlight at Home estimates this saves $200–$400 per location. This only works if the walls are already open, so ask your contractor during the job.
Walk-In Tub vs. Curbless Shower: One Is Safer, Period
At some point you’ll need to decide between a walk-in tub and a curbless (zero-entry) shower. The marketing for walk-in tubs emphasizes safety and therapeutic jets, but the safety comparison isn’t equal.
Curbless shower (left), walk-in tub (center), tub-to-shower conversion (right). Safety and practicality differ significantly.
Curbless showers eliminate the step-in hazard entirely; walk-in tubs still require stepping over a threshold and the watertight door can be dangerous during a fall.
Feature
Curbless Shower
Walk-In Tub
Step-over height
Zero – nothing to step over
3–7 inches – still a step
Door hazard
No door (open or glass panel)
Watertight door – could trap during a fall
Access during a fall
Can be easily accessed by caregiver
Door mechanism delays entry
Fill/drain time
Instant – walk in
10–15 minutes to fill, same to drain
Therapeutic benefits
None built-in
Hydrotherapy jets, heated seats
Cost (conversion)
$3,000 – $15,000
$3,000 – $8,000 (plus installation)
Best fit
Permanent safety solution
Primary safety concern is bathing, not mobility
If your parent has moderate to severe mobility limitations or is at high fall risk, the curbless shower is the safer choice. Walk-in tubs still have a step (typically 3–7 inches) and a sealed door that can trap someone who falls during filling or draining. The therapeutic jets are nice for arthritis, but not worth the safety trade-off for most families. A tub-to-shower conversion—removing the old tub and installing a low-threshold shower base—is a middle ground that costs $5,000–$10,000 and eliminates the step hazard while keeping the same footprint.
What Medicare Actually Pays For—And What It Doesn’t
Let’s be blunt about funding. Medicare Part B covers 80% of the Medicare-approved amount for grab bars if a doctor prescribes them as durable medical equipment. But the approved amount is often less than the retail cost, and you’re responsible for the remaining 20% plus any excess charges. Most other bathroom modifications—curbless showers, walk-in tubs, widened doorways—are not covered by standard Medicare. In 2020, only 148 out of 3,148 Medicare Advantage plans offered any in-home support services. That number may have increased, but it’s still the exception, not the rule.
Medicaid Home and Community-Based Services (HCBS) waivers can cover home modifications in some states, but waitlists are common and can stretch for years. If your parent qualifies financially, it’s worth applying, but don’t count on it for an immediate project.
The two most realistic funding sources are:
USDA Section 504 Home Repair Grant – Up to $10,000 for homeowners age 62 and older, for safety modifications including bathroom accessibility. But eligibility is limited to very low-income households (often below 50% of area median income). And funds are subject to availability.
VA Specially Adapted Housing (SAH) Grant – Up to $117,014 for eligible veterans with service-connected disabilities. There’s also a Special Home Adaptation (SHA) grant up to $23,444. But these are only for veterans whose disability is rated as service-connected. Many family caregivers will find their parent does not qualify.
For a complete breakdown of all available programs—including state-specific grants, nonprofit assistance, and how to apply—see our detailed funding guide for aging-in-place remodels. It lists program eligibility, application steps, and regional contacts. But frankly, most people will pay out of pocket or use a home equity line.
Choosing a Contractor Who Actually Understands Aging-in-Place
Not all contractors know how to install grab bars safely or create a curbless shower pan that meets code. Look for a Certified Aging-in-Place Specialist (CAPS) through the National Association of Home Builders. CAPS certification means the contractor has completed coursework in technical, business, and customer service skills specific to aging-in-place modifications.
When interviewing potential contractors, ask these three questions:
“How many bathroom accessibility projects have you completed in the last year?”
“Do you install blocking in walls for future grab bars even if we don't install them now?”
“What’s your process for creating a sloped, watertight shower pan for a curbless installation?”
Get at least three bids with the same scope of work. If one quote is drastically lower, ask why. The cheapest bid may skip critical steps like waterproofing or proper stud reinforcement.
Your Printable Safety Remodel Checklist
Before you call a contractor or buy materials, print this checklist and go through it room by room.
Grab bars at toilet and shower – height 33–36 in, installed into studs or blocking


Comments
Join the discussion with an anonymous comment.