Bathroom Remodel for Elderly Safety: A Room-by-Room Checklist with Costs and Funding Sources
A crisis-driven, room-by-room bathroom safety checklist for adult children after a parent's fall or near-fall. Covers what modifications to install, in what order, at what cost, and how to pay for them using VA grants, Medicaid waivers, and USDA programs.
Cost ranges are estimates. Verify eligibility directly with each program.
By Editorial Team
Why the Bathroom Is the Most Dangerous Room in the House
If your parent has had a fall or a near-fall, the bathroom is almost certainly where it happened — or where the next one will. The CDC reports that approximately 235,000 Americans over 65 visit emergency rooms every year due to bathroom-related falls and injuries. That is more than 640 people every single day, and the actual number is likely higher because many falls go unreported.
The bathroom combines every fall risk factor into one small room: wet and slippery surfaces, hard unforgiving fixtures, frequent transitions between sitting and standing, and often poor lighting. Stepping over a tub wall to shower, pivoting to sit on a low toilet, and reaching for a towel that is out of range are all high-risk movements that happen multiple times daily.
The good news is that bathroom falls are not an inevitable part of aging. A 2025 systematic review of 20 studies published in PMC found that 13 of those studies (65%) confirmed the effectiveness of home modifications in preventing falls and improving functional independence. Bathroom modifications, grab bars, and stair railings were identified as the most impactful interventions. The same review noted that only 10% of U.S. homes meet basic aging-ready definitions, which means most families are starting from a baseline that was never designed for safety.
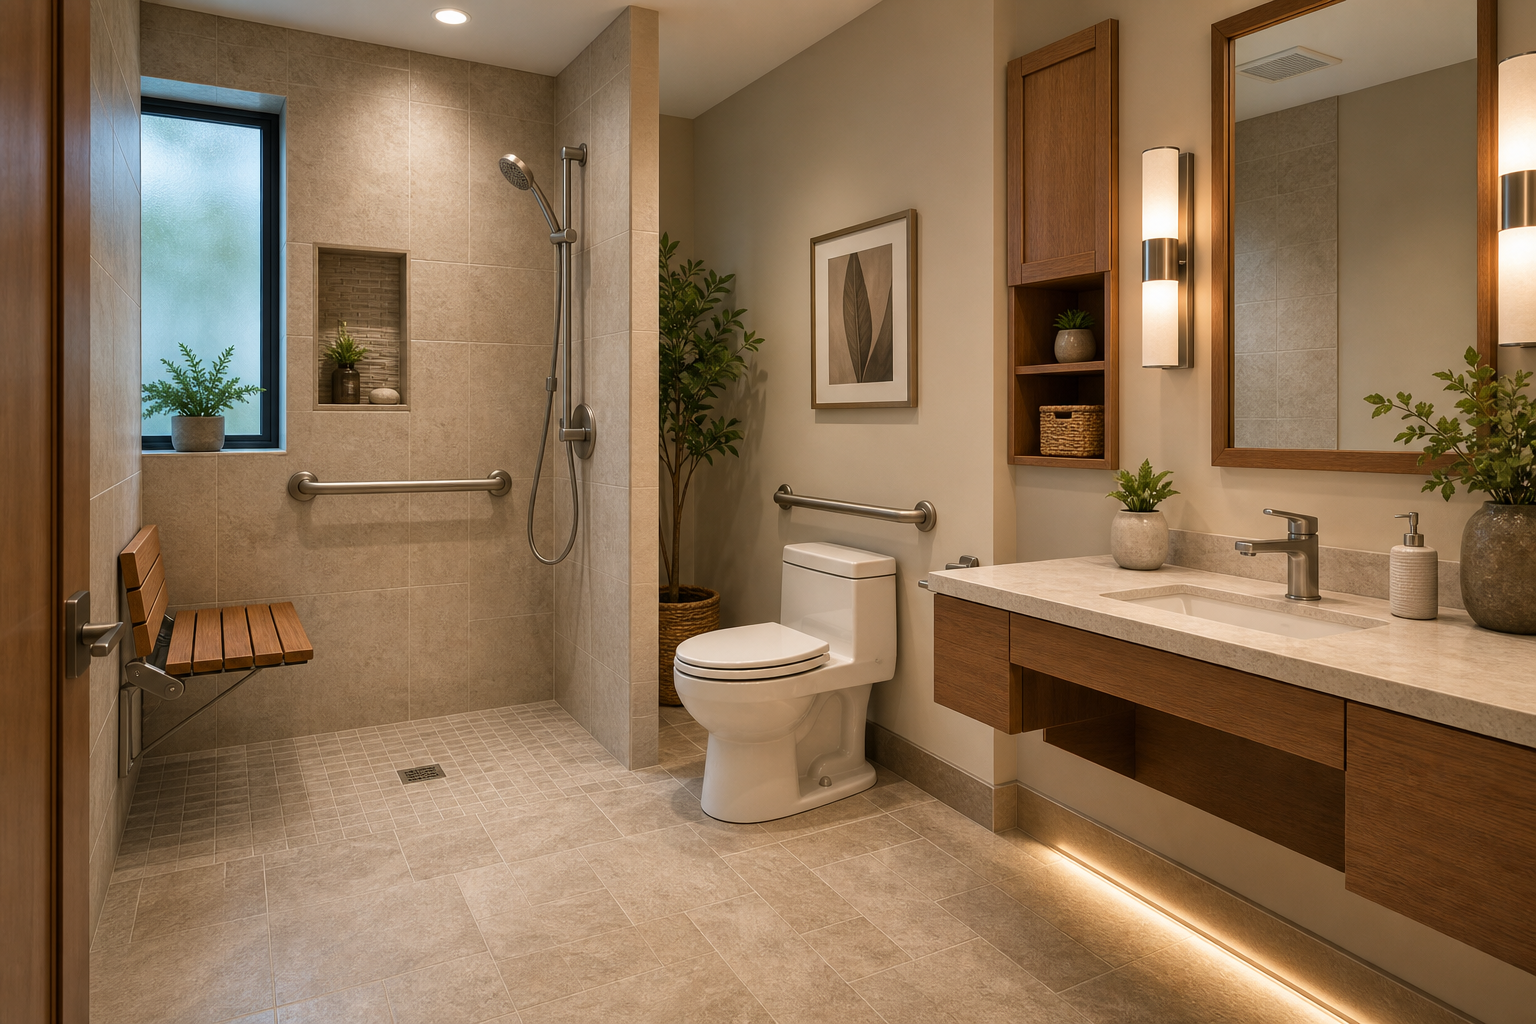
A well-designed aging-in-place bathroom combines safety features with a warm, residential aesthetic — no clinical look required.
The Hierarchy of Bathroom Safety Interventions: Impact vs. Cost
Not all bathroom modifications are created equal. Some deliver enormous risk reduction for very little money, while others require significant investment but may be necessary for long-term safety. The key is to understand the hierarchy: start with the highest-impact, lowest-cost interventions first, then progress to structural changes as needed.
The hierarchy of bathroom safety interventions: highest impact at lowest cost at the base, progressing to more expensive structural changes at the top.
Here is how the three tiers break down:
Tier 1 — Immediate, under $1,500 total: Grab bars (properly installed into studs), non-slip flooring or mats, improved lighting, and lever-style faucets. These are the highest-impact interventions and can be done in a weekend without a contractor.
Tier 2 — Within 6 months, $3,000–$15,000: Curbless (zero-threshold) shower conversion, comfort-height toilet (17–19 inch seat), handheld showerhead, and fold-down shower seat. These require professional installation but dramatically improve daily safety.
Tier 3 — Planned full remodel, $8,000–$28,000: Complete accessible bathroom with non-slip flooring throughout, widened doorways (32–36 inches), wall-hung vanity with knee space, and all ADA-compliant fixtures. This is the gold standard for long-term aging in place.
The financial argument for acting early is compelling. According to cost analysis data, a $25,000 bathroom renovation that enables a parent to stay home independently for five additional years offsets what would otherwise be $240,000 to $480,000 in assisted living facility costs. Even a modest Tier 1 investment of $1,500 can prevent a single fall that might result in a hip fracture costing $30,000–$50,000 in medical expenses.
Grab Bar Placement Guide: Where, How, and Why
Grab bars are the single most impactful bathroom safety modification. The CDC data and systematic reviews consistently confirm that properly installed grab bars reduce fall risk more effectively than any other single intervention. But they only work if they are installed correctly — and most are not.
The ADA Standards provide clear specifications for grab bar installation. Here is what you need to know:
Height: 33 to 36 inches above the finished floor. This range accommodates most adults whether standing or seated.
Load capacity: Must support at least 250 pounds. This requires mounting into wall studs or using heavy-duty toggle bolts designed for grab bar loads. Drywall anchors will fail.
Diameter: 1.25 to 1.5 inches. This is the grip range that provides the best purchase for most hand sizes. Anything thinner or thicker reduces grip effectiveness.
Clearance from wall: 1.5 inches. This allows the hand to wrap fully around the bar without the knuckles hitting the wall.
Length: At least 24 inches for horizontal bars beside the toilet, 12–18 inches for vertical bars at shower entry points.
Proper grab bar installation requires mounting into wall studs at 33–36 inches above the finished floor. The cross-section shows how the bar attaches through the tile and into the structural framing.
Recommended grab bar locations in every bathroom:
Beside the toilet: A horizontal bar 33–36 inches high, positioned so the user can reach it while seated. This assists with the sit-to-stand transfer, which is one of the highest-risk movements.
Inside the shower: A horizontal bar on the wall opposite the shower controls, and a vertical bar at the shower entry for balance when stepping in and out.
Outside the shower or tub: A vertical bar mounted at the entry point to provide a handhold during the step-over or step-in movement.
Near the sink: A horizontal bar mounted at standard height for balance when standing at the sink.
Cost for grab bar installation (3–4 bars, professionally installed) typically runs $200 to $600. If you are handy and have a stud finder, you can install them yourself for the cost of the bars only — roughly $25–$60 each for quality stainless steel or brass models.
Shower and Tub Modifications: Curbless Showers vs. Walk-In Tubs
The bathtub is often the single most dangerous fixture in the bathroom. Stepping over a 14–18 inch tub wall requires balance, flexibility, and strength — exactly the things that decline with age. There are two primary alternatives, and they serve different needs.
Comparison of curbless showers vs. walk-in tubs for elderly bathroom safety.
Feature
Curbless (Zero-Threshold) Shower
Walk-In Tub
Entry
No step-over; roll-in or walk-in at floor level
Low threshold (2–5 inches); must step over or use a transfer bench
Cost range
$3,000 – $15,000
$2,000 – $20,000
Best for
Daily showering, wheelchair or walker users, long-term aging in place
People who value soaking/bathing and have good upper-body strength
Installation complexity
Requires linear drain, sloped subfloor, waterproofing; professional only
Requires dedicated water heater, reinforced floor; professional only
Safety features
Fold-down seat, handheld showerhead, grab bars on three walls
Built-in seat, grab bars, door that seals; must wait for tub to drain before exiting
Resale value
High — appeals to broad buyer demographics
Lower — niche appeal, may need removal for future buyers
ADA compliance
Yes — meets ADA Standards for roll-in shower compartments
No — does not meet ADA Standards for accessible bathing
The curbless (zero-threshold) shower is widely considered the gold standard for aging-in-place bathroom design. It eliminates the step-over hazard entirely, allows wheelchair or walker access, and can be designed with a linear drain that creates a gentle slope rather than a raised curb. The ADA Standards require roll-in shower compartments to be at least 30 inches deep by 60 inches wide for standard type, or 60 inches wide by 36 inches deep for alternate type, with grab bars on three walls and a folding seat 17–19 inches high.
Walk-in tubs are a secondary option that makes sense when the older adult values soaking in a bath and has sufficient upper-body strength to operate the door and wait for the tub to drain before exiting. However, the requirement to sit in cold water while the tub drains is a genuine safety concern — if the person needs to exit quickly, they cannot. Walk-in tubs also require a dedicated water heater because they hold 40–60 gallons, and the installation cost can approach that of a full curbless shower.
Toilet Height and Accessibility: Comfort-Height vs. Standard
The sit-to-stand transfer at the toilet is one of the most frequent and dangerous movements in the bathroom. A standard toilet has a seat height of 14 to 15 inches. For an older adult with reduced leg strength, hip mobility, or balance, getting up from that low position requires significant effort and creates a high fall risk.
A comfort-height toilet — also called an ADA-height toilet — has a seat height of 17 to 19 inches. That extra 3–4 inches reduces the angle of knee and hip flexion, making it significantly easier to stand up. For most older adults, this is the difference between an independent transfer and a struggle that ends in a fall.
Standard toilet: 14–15 inch seat height. Common in homes built before 2000. Requires more leg strength and balance to stand.
Comfort-height toilet: 17–19 inch seat height. Meets ADA Standards. Reduces fall risk during sit-to-stand transfers.
Cost to replace: $300–$1,200 including installation. A raised toilet seat (add-on) costs $30–$80 but is less stable than a full replacement.
Clear floor space: At least 30 by 48 inches in front of the toilet for wheelchair maneuvering, if the user may eventually need a wheelchair.
Grab bar placement beside the toilet is equally important. A horizontal bar mounted 33–36 inches high on the wall beside the toilet provides a stable handhold for the sit-to-stand transfer. If space allows, a second vertical bar mounted at the front edge of the toilet gives the user something to pull on when standing.
Flooring, Lighting, and Fixtures: The Details That Matter
Beyond the major structural changes, several smaller details make the difference between a bathroom that is merely accessible and one that is truly safe. These are the elements that are easy to overlook but can cause a fall just as easily as a missing grab bar.
Flooring: The Foundation of Bathroom Safety
The floor is the surface your parent stands on during every bathroom activity. If it is slippery, nothing else matters. The industry standard for slip-resistant flooring is a Dynamic Coefficient of Friction (DCOF) rating of 0.60 or higher, as measured by the ANSI A137.1 standard. Most glossy ceramic and porcelain tiles have a DCOF below 0.50 — they are dangerously slippery when wet.
Recommended: Textured porcelain or ceramic tile with DCOF ≥ 0.60, luxury vinyl plank with slip-resistant surface, or rubber flooring. Professional installation costs $6,400 to $11,000 for a typical bathroom.
Avoid: Glossy tile, polished marble, or any smooth-surface tile. Also avoid soft bath rugs and bath mats — they create tripping hazards, shift underfoot, and trap moisture that leads to mold.
Interim solution: Non-slip adhesive strips or decals applied to the existing floor. These cost $10–$30 and can reduce slip risk while you plan for permanent flooring replacement.
Lighting: See Where You Are Going
Poor lighting is a contributing factor in many bathroom falls, especially during nighttime bathroom trips. The bathroom should have bright, even lighting that eliminates shadows and dark corners. Key recommendations:
Install a nightlight strip along the baseboard or under the vanity. This provides enough light for nighttime trips without requiring the overhead light to be turned on.
Use LED bulbs with a color temperature of 3000K–4000K (warm to neutral white). Avoid cool blue light (5000K+) which can be disorienting.
Place light switches at the bathroom entrance and near the toilet so the user does not have to cross a dark room to reach a switch.
Consider motion-sensor lights that turn on automatically when someone enters the bathroom.
Faucets and Hardware: Small Changes, Big Impact
Round doorknobs require a twisting grip that many older adults cannot manage due to arthritis or reduced hand strength. Lever-style handles and faucets are much easier to operate — they require only a downward push or pull. Touchless (motion-sensor) faucets are even better, as they eliminate the need to reach for a handle at all and reduce the risk of burns from hot water.
Replace round doorknobs with lever-style handles ($15–$40 each).
Install a single-lever or touchless faucet ($50–$200). A single-lever faucet allows the user to adjust water temperature with one hand.
Set the water heater thermostat to 120°F maximum to prevent scalding. The ADA Standards recommend this temperature limit.
Complete Cost Table: From Quick Fixes to Full Remodel
The following table provides national average cost ranges for each modification. Actual costs vary significantly by geographic region — a full remodel that costs $15,000 in the Midwest may cost $40,000 in the Northeast or on the West Coast. Always get at least three quotes from local contractors before committing to a project.
National average cost ranges for bathroom safety modifications. Prices as of 2026. Regional variation can be significant.
Modification
Cost Range (National Average)
Typical Labor
Typical Materials
Grab bar installation (3–4 bars)
$200 – $600
$150 – $400
$50 – $200
Non-slip flooring (professional install)
$6,400 – $11,000
$3,000 – $5,000
$3,400 – $6,000
Comfort-height toilet replacement
$300 – $1,200
$150 – $400
$150 – $800
Walk-in tub installation
$2,000 – $20,000
$1,000 – $5,000
$1,000 – $15,000
Curbless shower conversion
$3,000 – $15,000
$2,000 – $8,000
$1,000 – $7,000
Full accessible bathroom remodel
$8,000 – $28,000
$4,000 – $14,000
$4,000 – $14,000
Lever-style handles (per door)
$15 – $40
$0 (DIY)
$15 – $40
Touchless faucet
$50 – $200
$50 – $150
$50 – $200
Nightlight strip (professional install)
$100 – $300
$50 – $150
$50 – $150
For homeowners concerned about resale value, the 2023 Cost vs. Value survey found that converting a standard bathroom to meet universal design standards yields an average ROI of 68–70%, ranking among the top seven remodeling projects nationwide. General bathroom remodels can deliver up to 70% return, boosting home resale values by as much as 3%. An accessible bathroom appeals to a broad buyer demographic — not just older adults, but also families with young children and people with disabilities.
How to Pay for It: VA Grants, Medicaid Waivers, and USDA Programs
The biggest barrier to bathroom modifications is often cost, not awareness. But there are multiple funding pathways available — and most families do not know they exist. Here is a breakdown of the major programs that can help pay for bathroom safety modifications.
Major funding sources for bathroom safety modifications. Program details change annually — verify at source websites before applying.
Funding Source
What It Covers
Maximum Amount
Eligibility
VA SAH Grant (Specially Adapted Housing)
Major structural changes for veterans with specific service-connected disabilities
Up to ~$126,526 (2026 adjusted)
Veterans with qualifying service-connected disabilities affecting mobility
VA SHA Grant (Special Home Adaptation)
Modifications for veterans with qualifying vision or mobility impairments
Lower than SAH; varies by need
Veterans with qualifying service-connected conditions
VA HISA Grant (Home Improvements and Structural Alterations)
Medically necessary home modifications for veterans with service-connected or non-service-connected conditions
Varies by disability rating
Veterans enrolled in VA healthcare
Medicaid HCBS Waivers (Home and Community-Based Services)
Accessibility modifications including bathroom remodels, ramps, grab bars
Varies by state and waiver type
Income-eligible older adults and people with disabilities; state-specific
USDA Section 504 Home Repair Program
Repairs and accessibility modifications for very-low-income rural homeowners
Up to $10,000 grant + $40,000 loan
Age 62+, very-low-income, rural location
Los Angeles County Senior Grant Program
ADA-compliant bathroom upgrades
Up to $20,000
Age 62+, income ≤80% of Area Median Income, LA County resident
Habitat for Humanity Aging-in-Place Program
Free or low-cost bathroom renovations
Varies by affiliate
Income-qualified homeowners; local affiliate availability
Rebuilding Together Safe At Home Program
Free full bathroom retrofits and safety assessments
Varies by affiliate
Low-income seniors; local affiliate availability
Tax deduction (medical expense)
Medically prescribed home modifications
Deductible amount exceeding 7.5% of AGI
Itemized deductions; must have doctor's prescription
Where to start:
If the older adult is a veteran: Contact the Department of Veterans Affairs to inquire about SAH, SHA, or HISA grants. The Harmar guide recommends starting with the VA directly.
If the older adult has low income: Contact the state Medicaid office or HCBS waiver intake line to ask about home modification coverage. Coverage varies significantly by state.
If the home is in a rural area: Check eligibility for the USDA Section 504 Home Repair Program, which offers up to $10,000 in grants and $40,000 in low-interest loans for very-low-income homeowners aged 62 and older.
For local assistance: Contact the local Area Agency on Aging, which can provide information about state and local programs, including grants from organizations like Rebuilding Together.
For tax benefits: Keep all receipts and get a doctor's prescription for the modifications. Medically prescribed home modifications that exceed 7.5% of adjusted gross income may be deductible as medical expenses.
Common Mistakes to Avoid
Even well-intentioned bathroom modifications can create new hazards if done incorrectly. Here are the most common and dangerous mistakes families make — and what to do instead.
Installing glossy floor tile: Glossy ceramic and porcelain tiles look beautiful but become dangerously slippery when wet. Always choose tile with a DCOF rating of 0.60 or higher. If you already have glossy tile, apply non-slip adhesive strips as an interim measure.
Using soft bath rugs and mats: These create tripping hazards, shift underfoot, and trap moisture that leads to mold. Replace them with non-slip bath mats that have suction cups on the bottom, or better yet, install slip-resistant flooring throughout.
Using towel bars as grab bars: This is the most dangerous mistake. Towel bars are not designed to support body weight. A person grabbing a towel bar during a fall will pull it out of the wall, often causing a more severe fall. Install real grab bars into wall studs.
Keeping a bathtub as the only bathing option: Stepping over a tub wall is a high-risk movement. If the bathroom has a tub, consider converting it to a curbless shower. If that is not possible, install a transfer bench that allows the user to sit and swing their legs over the tub wall.
Using round doorknobs: Round knobs require a twisting grip that many older adults cannot manage. Replace them with lever-style handles that require only a push or pull.
Failing to install blocking for future grab bars during a remodel: If you are doing a full remodel, have the contractor install plywood blocking between studs in the walls where grab bars may eventually be needed. This costs very little during construction but saves hundreds of dollars later and ensures the bars can be mounted securely.
A Phased Approach: What to Do Now vs. During a Full Remodel
You do not need to do everything at once. In fact, trying to do too much too quickly can lead to poor decisions and wasted money. The most effective approach is phased: start with the highest-impact, lowest-cost interventions this week, then plan for structural changes over the next 6–12 months.
Phase 1: Immediate (This Week, Under $1,500)
These are the interventions that provide the most risk reduction for the least money. They can be done in a weekend without a contractor:
Install grab bars beside the toilet, inside the shower, and at the shower entry. Cost: $200–$600 for professional installation, or $75–$180 for DIY.
Add non-slip adhesive strips or decals to the shower floor and bathroom floor. Cost: $10–$30.
Replace round doorknobs with lever-style handles. Cost: $15–$40 per door.
Install a nightlight or motion-sensor light. Cost: $10–$50 for plug-in models.
Replace the standard toilet seat with a raised toilet seat with handles. Cost: $50–$150.
Install a handheld showerhead on a sliding bar. Cost: $30–$100.
Phase 2: Within 6 Months ($3,000–$15,000)
These modifications require professional installation but dramatically improve daily safety:
Convert the tub to a curbless (zero-threshold) shower. Cost: $3,000–$15,000.
Replace the standard toilet with a comfort-height model (17–19 inch seat). Cost: $300–$1,200.
Install a fold-down shower seat if the curbless shower does not already include one. Cost: $200–$600.
Replace the faucet with a single-lever or touchless model. Cost: $50–$200.
Phase 3: Planned Full Remodel ($8,000–$28,000)
When you are ready for a complete bathroom renovation, this is the gold standard for aging in place:
Full accessible bathroom with non-slip flooring throughout (DCOF ≥ 0.60).
Widened doorways (32–36 inches) for wheelchair accessibility.
Wall-hung vanity with knee space below for seated access.
All ADA-compliant fixtures: curbless shower, comfort-height toilet, grab bars on three walls, fold-down seat, handheld showerhead.
Bright, even lighting with nightlight strips and motion sensors.
Plywood blocking installed in walls for future grab bar placement.
For complex modifications like curbless showers and full remodels, work with a CAPS-certified aging-in-place contractor who specializes in accessible design. A CAPS (Certified Aging-in-Place Specialist) contractor has specific training in universal design and ADA Standards — they will know how to install grab bars into studs, slope the subfloor for a curbless shower, and ensure all fixtures meet accessibility requirements. This is different from a general contractor, who may not have this specialized knowledge.
The most important thing is to start. A single grab bar installed this week could prevent the fall that would otherwise land your parent in the emergency room. You do not need a full remodel to make a meaningful difference — you just need to take the first step.


Comments
Join the discussion with an anonymous comment.