Where to Place Bathroom Grab Bars for Seniors in Every Zone
For: adult child7 minutesReviewed: 2026-07-05
Where to Place Bathroom Grab Bars for Seniors in Every Zone
This guide provides precise, OT-validated placement specifications for grab bars in the toilet, shower, and tub zones, explaining why the correct height and distance from fixtures are critical for safety during a fall.
By Editorial Team
new caregiver
experienced caregiver
long-distance caregiving
spousal caregiver
working caregiver
daily routines
medication management
personal hygiene
care coordination
first steps
ADLs
IADLs
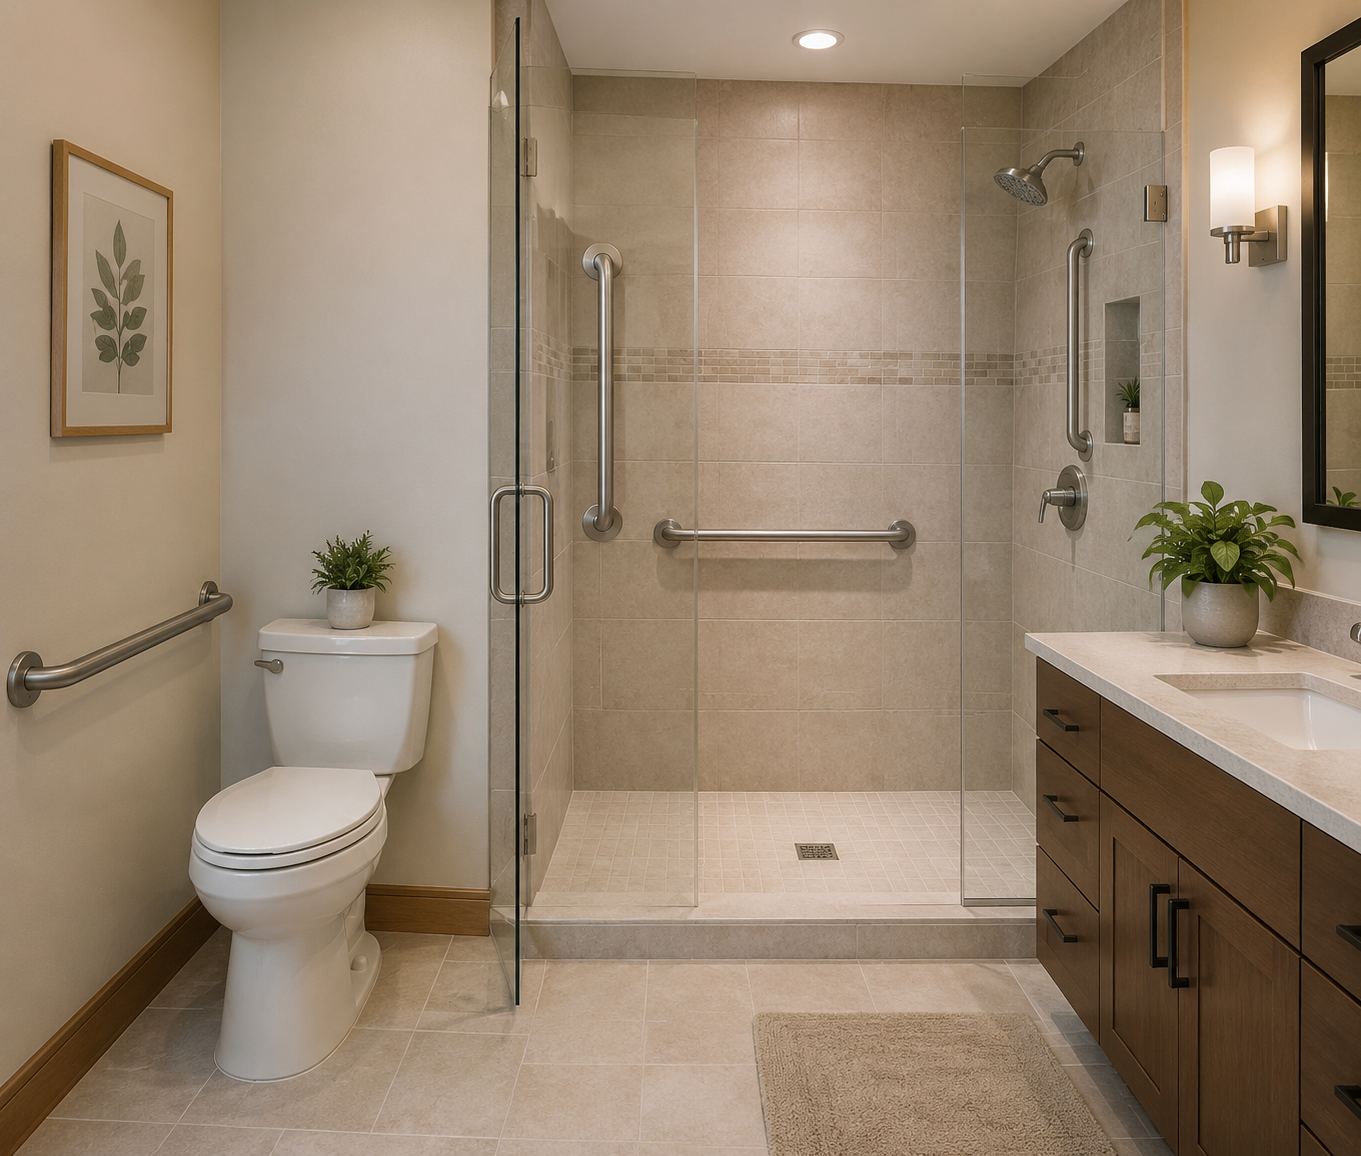
If you are standing in a parent’s bathroom with a tape measure, the question is not whether grab bars are a good idea. The question is where the hand will go when someone is lowering to the toilet, stepping over a shower threshold, turning under a shower head, or trying to recover balance before a fall finishes.
For bathroom grab bar placement for seniors, start with the common reference height for horizontal bars: 33 to 36 inches above the finished floor. That range comes from ADA bathing-room standards, and it is a useful starting specification for home work even though a private home is not required to be ADA-compliant.[1] The mistake is treating that number as the whole plan.
Bathroom zone
Primary placement
Main mistake to avoid
Toilet
Side-wall horizontal bar at 33–36 inches high; minimum 42-inch length; begin about 12 inches forward of the toilet centerline.[1][2][3]
Centering the bar on the bowl, which can put support behind the hand during sit-to-stand movement.
Shower
Three-bar layout: vertical entry bar 4–6 inches inward from the jamb; horizontal back-wall bar at 33–36 inches; vertical bar under the shower head.[1][2]
Installing only one horizontal bar and leaving no vertical support for entry or reaching.
Tub
Upper bars at 33–36 inches; lower bars 8–10 inches above the tub rim on the walls used during transfer.[1][2]
Giving support at only one hand level when tub transfers need both high and low contact points.
All zones
Fasten into studs or engineered blocking; use bars rated to support at least 250 lb; keep 1.25–1.5 inch grip diameter and 1.5 inch wall clearance.[4]
Mounting into drywall alone or using towel bars as if they were safety equipment.
Why Shape And Direction Matter
A grab bar is not trim. It has a job during a specific movement.
Horizontal bars help with push movements: pressing down and slightly forward to rise from the toilet, steadying while standing, or shifting weight during a wash task. Vertical bars help with pull and balance: stepping into a shower, reaching for a shower control, or finding a secure handhold when the body is moving forward or sideways. Diagonal bars can work as a hybrid for some users, especially when hand strength varies, but they still need to match the person’s actual movement pattern.[2]
This is why a bar can look beautifully installed and still fail the person using it. If it is behind the shoulder during a toilet transfer, too far into the shower to reach before stepping in, or mounted where wet hands cannot grip it, the wall may look safer while the transfer is not.
Toilet Grab Bar Placement
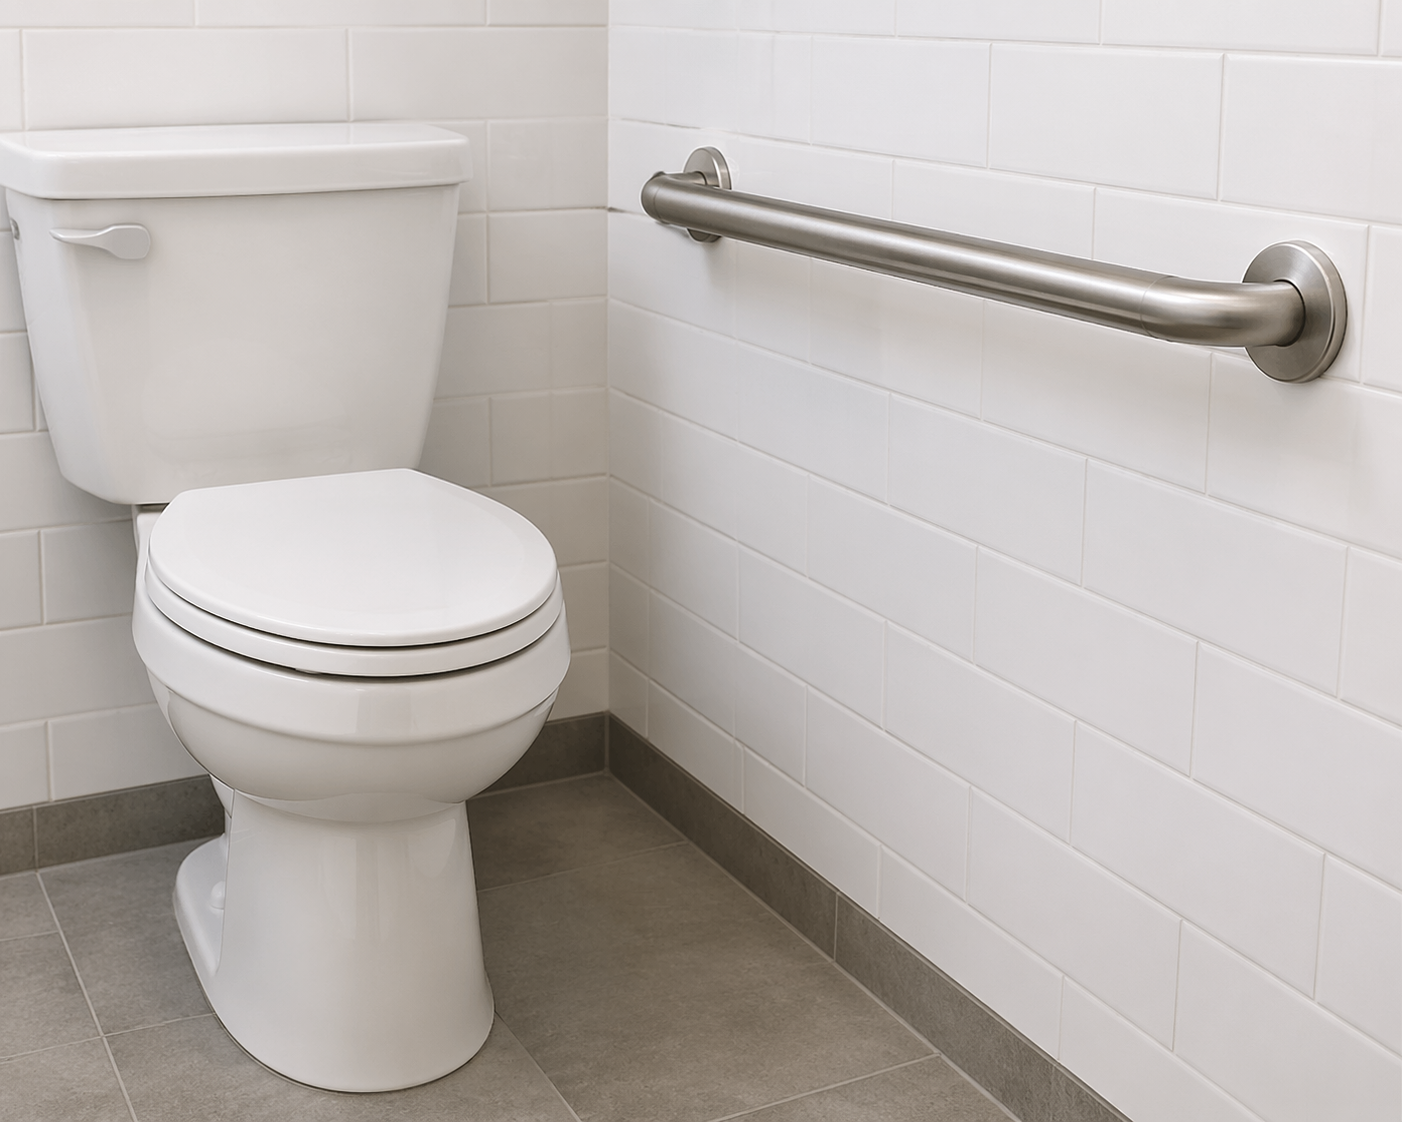
The toilet side wall is where many grab bars go wrong. The bar should not be centered on the toilet bowl for visual balance. It should begin about 12 inches forward of the toilet centerline, sit 33 to 36 inches above the finished floor, and be at least 42 inches long when following the ADA side-wall reference.[1][2][3]
That forward start matters because sit-to-stand is not a straight elevator motion. Most people lean forward before rising. Their hand searches slightly ahead of the hip, not back beside the tank. A bar centered on the bowl may be reachable while seated, but it can be poorly placed for the harder part of the movement: shifting weight forward and standing.
A 42-inch side-wall bar gives more working length through the full transfer. The user can place a hand forward while rising, then slide or re-grip as they come to standing. A short bar may technically be present but offer only one narrow contact point, which is not enough when balance changes mid-transfer.
Toilet measurement
Use this as the contractor note
Height
Mount horizontal side-wall bar 33–36 inches above finished floor.[1]
Forward start
Start the side-wall bar about 12 inches forward of the toilet centerline.[2][3]
Length
Use a minimum 42-inch bar where wall length allows.[1]
Wall side
Place on the side used for the safest transfer, not automatically on the visually open side.
Rear wall
Add a rear-wall bar when layout and user needs support it; do not let it replace the correctly placed side-wall bar.
In a narrow toilet room, the available wall may dictate some choices. In a larger bathroom, the common decision is whether to place the bar on the right or left side. Choose based on how the person transfers now: which hand has better grip, which knee or hip is painful, whether a walker approaches from one side, and whether a caregiver needs room to assist. Symmetry is not the safety standard.
If the toilet is freestanding with no usable side wall, do not solve that by installing a decorative bar too far away. Consider a floor-mounted support, toilet safety frame, or a larger bathroom modification plan. A broader guide to bathroom modifications for aging in place can help when the wall layout itself is the problem.
Shower Grab Bar Placement
A shower with one horizontal bar on the back wall is unfinished from a transfer standpoint. That bar may help once the person is already inside, facing the wall, and standing steadily. It does little for the moment of stepping in, and it may not be where the hand reaches while turning, washing, or managing the shower head.
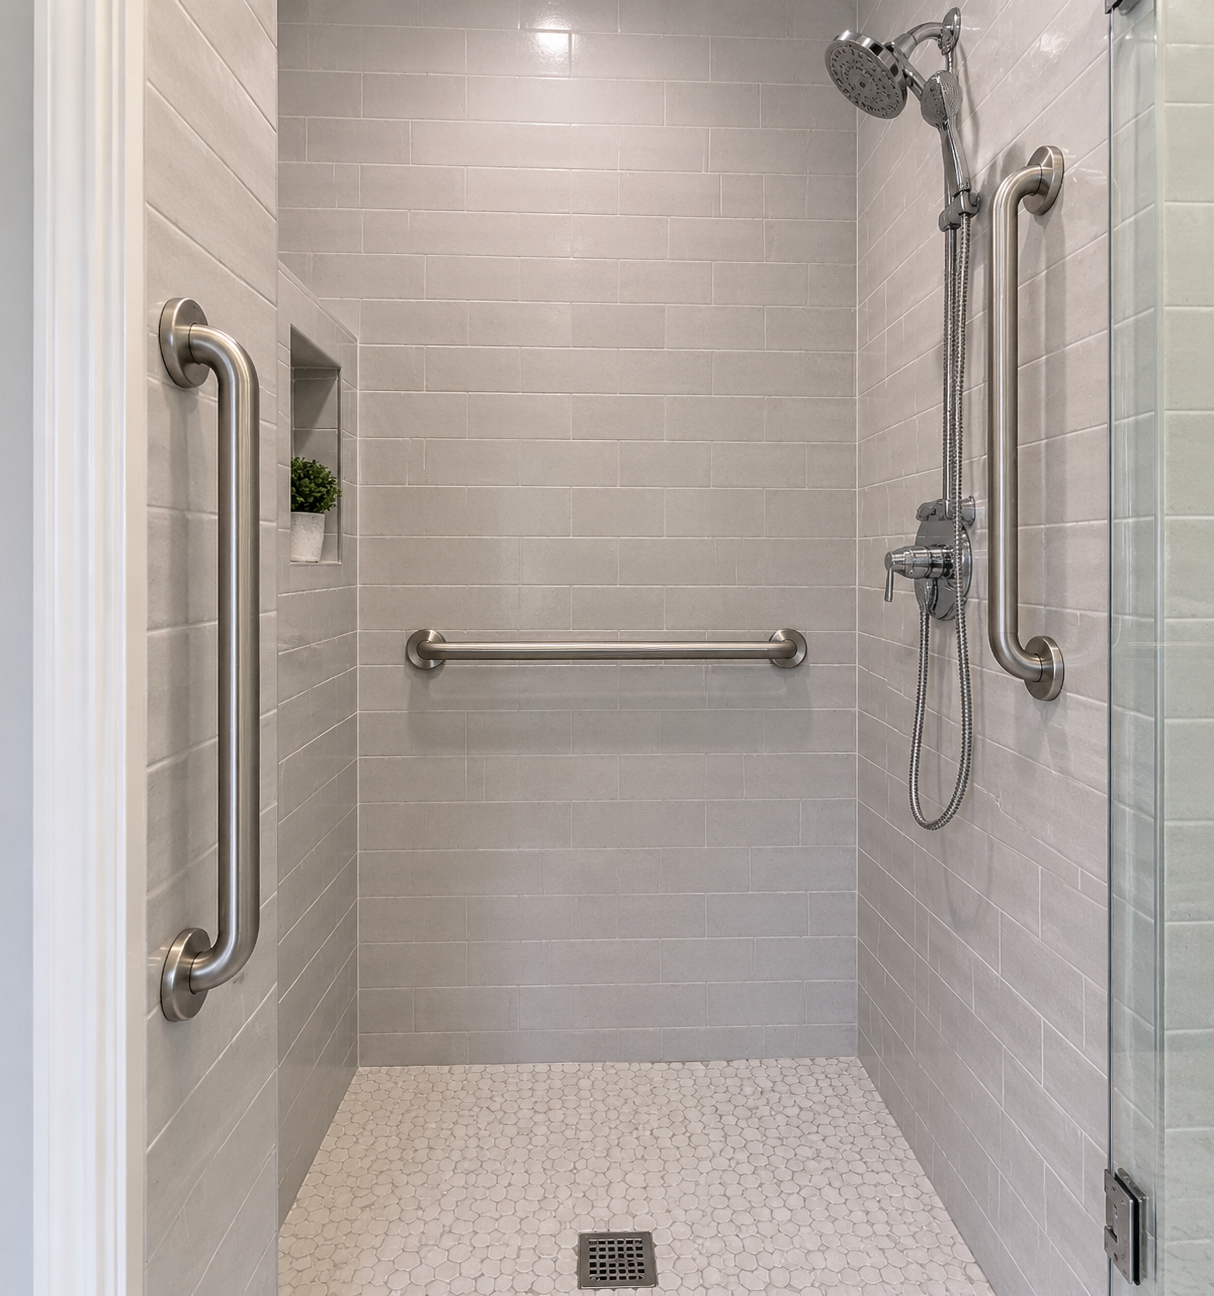
For a standard walk-in shower, use three support locations: a vertical bar near the entry, a horizontal bar on the back wall, and a second vertical bar under the shower head. OT placement guidance commonly puts the vertical entry bar 4 to 6 inches inward from the shower jamb so the hand can find it before the full step is committed.[2]
Shower bar
Placement
Why it matters
Vertical entry bar
Mount just inside the entrance, about 4–6 inches inward from the jamb.[2]
Supports the step-in and step-out moment before the person is fully inside.
Horizontal back-wall bar
Mount at 33–36 inches high and span secure framing when possible.[1][4]
Supports standing wash tasks and balance once inside the shower.
Vertical bar under shower head
Mount below or near the shower head/control area, positioned for the user’s reach.[2]
Supports reaching, turning, rinsing, and washing lower body.
The entry bar deserves more respect than it usually gets. A person stepping into a wet shower is often doing several things at once: lifting one foot, clearing a threshold, looking down, avoiding the door track, and adjusting to a slick surface. A horizontal back-wall bar may be visible from the entrance, but if the person has to lean into the shower to reach it, it is not entry support.
The back-wall horizontal bar should be placed where it can be used during standing wash tasks, generally within the 33- to 36-inch height range. Whenever possible, have it span two studs or solid blocking rather than choosing a shorter bar only because it fits neatly between tiles. The hand does not care whether the bar lines up with the grout.
The vertical bar under the shower head covers a different problem: reaching. People reach for shampoo, controls, handheld shower hoses, washcloths, and lower legs. That movement often shifts the center of gravity forward or sideways. A vertical bar gives a pull-and-steady option at the place where the task happens.
If the shower also has a bench, place the bars for both seated and standing use. A seated person may need a horizontal bar to push up from the bench and a vertical or angled option to stabilize during the first part of standing. If the bench is added after the bars, the old placement may no longer match the transfer.
Tub Grab Bar Placement
Tub transfers are demanding because the person has to clear the tub wall, shift weight onto one leg, and often turn in a small space. A single high bar is rarely enough because the hands need support at more than one level.
Use upper bars at 33 to 36 inches above the finished floor, then add lower bars 8 to 10 inches above the tub rim on the walls involved in the transfer and bathing task.[1][2] The upper bar helps with standing balance. The lower bar helps when the person is lowering toward a shower chair, sitting on a tub transfer bench, or stabilizing while moving legs over the rim.
Tub area
Placement priority
Entry wall
Provide a vertical or angled handhold where the person begins stepping over or sitting onto a transfer bench.
Long wall
Use an upper horizontal bar at 33–36 inches and a lower bar 8–10 inches above the rim when the wall is used during bathing.[1][2]
Control end
Place support where the person reaches for water controls or handheld shower equipment, without forcing a twist.
Back or end wall
Add support if the person turns, lowers, or rises in that direction.
Three-wall support is often the safer tub plan because the risky movement changes as the person enters, sits, washes, and exits. The exact bar mix depends on whether the person steps into the tub to shower, sits on a shower chair inside the tub, or uses a transfer bench from outside the tub.
Suction grab bars are not a substitute for mounted tub support. They may have limited temporary uses as balance cues on appropriate surfaces, but they should not be treated as weight-bearing equipment for a senior with fall risk.
Mounting Strength Is Part Of Placement
A correctly located bar still fails the job if it is not anchored correctly. Grab bars should be fastened into studs or engineered blocking and rated to support at least 250 lb at any point. Drywall anchors alone are not appropriate for a weight-bearing bathroom safety bar.[4]
The grip also matters. Standard specifications call for a 1.25- to 1.5-inch diameter and 1.5 inches of clearance from the wall.[4] That clearance lets fingers wrap around the bar instead of flattening against the tile. A towel bar, even a sturdy-looking one, is not built or mounted for the same load.
Ask the installer to identify the studs or blocking before drilling.
Use bars with a safety load rating, not decorative bath hardware.
Keep the required finger clearance behind the bar.
Avoid placing the bar where soap dishes, shower doors, towel hooks, or toilet paper holders interrupt the grip.
After installation, test for movement; a bar that wiggles needs correction before use.
Tile, hidden plumbing, missing blocking, and wall repair can all change the installation plan and cost. It is better to discover that before the first hole is drilled than after a bar has been placed in the right-looking spot but the wrong structural location.
When The Standard Height Needs Adjustment
The 33- to 36-inch range is a credible starting point, not a personality test. A very short adult, a tall adult, someone with shoulder arthritis, a person with one-sided weakness, or someone who pushes up from a wheelchair may need a different final position. The right test is not whether the tape measure looks official. The right test is whether the person can reach, grip, push, and steady during the actual transfer.
Arthritis and grip weakness also affect bar selection. Some people do better with textured finishes, slightly different bar shapes, or a combination of horizontal and vertical supports. Others need a transfer pole, raised toilet seat with arms, tub transfer bench, or shower chair before grab bars alone make sense.
If you are making changes after a fall, do not rely on the familiar commercial line that “most falls happen in the bathroom.” The verified CDC bathroom-injury figure is narrower and more useful: in 2008, an estimated 234,094 nonfatal bathroom injuries were treated in U.S. emergency departments among people age 15 and older, and 81.1% of those bathroom injuries were caused by falls. For adults 85 and older, the bathroom fall-injury rate was 515.3 per 100,000, more than eight times the rate for adults 65 to 74.[5]
That does not prove that every bathroom needs the same bars. It does show why the bathroom deserves careful, specific decisions instead of vague reassurance. If the fall involved dizziness, fainting, medication changes, rushing to the toilet at night, confusion, or a possible stroke symptom, grab bars are only one part of the response. A fall-prevention bathroom hazard review and an urgent aging-in-place triage checklist are better next steps than simply adding more hardware.
What To Hand The Contractor
A contractor can install what you specify. They cannot always know how your parent transfers unless you show them. Before work starts, walk through the bathroom with the older adult if it is safe to do so. Note where the hand naturally reaches during toilet rising, shower entry, turning, and reaching for controls.
Toilet: side-wall bar 33–36 inches high, at least 42 inches long, beginning about 12 inches forward of the toilet centerline.
Shower entry: vertical bar 4–6 inches inward from the jamb, reachable before stepping fully inside.
Shower back wall: horizontal bar at 33–36 inches high, mounted into studs or blocking.
Shower head area: vertical bar under or near the shower head for reaching and wash-position support.
Tub: upper bars at 33–36 inches and lower bars 8–10 inches above the rim where transfers and bathing tasks occur.
All bars: mount into studs or engineered blocking; use rated grab bars with proper grip diameter and wall clearance.
If the bathroom also has a high threshold, poor lighting, slick flooring, a swinging shower door, or a cramped toilet approach, placement alone may not solve the risk. A bathroom design mistakes guide can help separate grab-bar work from larger layout problems. If several rooms now feel unsafe, use an aging-in-place priority checklist before spending the whole budget in one bathroom.
When To Bring In An OT Or CAPS Professional
Use the measurements here as starting specifications. Bring in an occupational therapist, CAPS-informed remodeler, or qualified home-safety professional when the older adult has unusual height, one-sided weakness, shoulder or hand arthritis, poor grip strength, cognitive impairment, Parkinsonian movement, significant vision loss, wheelchair transfers, or a recent fall with an unclear cause.
Professional help is also warranted when the wall layout forces compromises: no side wall at the toilet, a fiberglass shower surround with no known backing, a tub that requires a high step-over, or tile work that hides plumbing and framing. If you are seeing several of those problems at once, the red flags for needing a CAPS specialist are worth reviewing before installation.
Safe grab bar placement is not about putting more metal in the bathroom. It is about putting the right shape of support where the hand will actually search for it during the movement that creates the risk.
Comments
Join the discussion with an anonymous comment.