Your Parent Just Fell: A 30-Minute Family Safety Walkthrough to Prevent the Next Fall
A structured, timed walkthrough for adult children to identify and fix the highest-risk fall hazards in their parent's home immediately after a fall, based on the CDC STEADI framework.
By Editorial Team
home hazard audit
bathroom safety
bedroom safety
checklist
STEADI
The first step after a fall is not fear — it is a structured plan to prevent the next one.
Why the First Fall Changes Everything
If your parent has just fallen, you are now part of a statistic that is far too common — and far too serious to ignore. Every year, more than one in four older adults reports a fall, according to the CDC STEADI initiative. That translates to roughly 3 million emergency room visits annually for fall-related injuries. More than 95% of hip fractures are caused by falls, and falls remain the leading cause of injury death among people aged 65 and older.
But the most urgent statistic is this: a prior fall is the single strongest predictor of the next fall. The window between a first fall and a second, more serious one is often measured in weeks, not months. The good news is that this window is also your best opportunity to act.
Research published in a 2025 Cochrane-adjacent review confirms that structured home safety assessments can reduce fall risk by up to 36% and decrease serious injuries such as hip fractures. When combined with medication review and exercise — a multifactorial approach — fall rates drop by approximately 24%. The evidence is clear: a systematic, immediate response to a fall is not just helpful; it is potentially life-changing.
This guide gives you a timed, zone-by-zone protocol you can complete in 30 minutes. It is designed for the moment you are in right now — the hours and days after a fall, when the urgency is real and the path forward needs to be clear.
The 30-Minute Family Safety Walkthrough
Grab a flashlight, a notepad, and a screwdriver. You are going to walk through five zones of your parent's home, spending a specific amount of time in each. The goal is not to create a perfect, renovation-ready home in one evening. The goal is to identify and fix the highest-risk hazards — the ones most likely to cause the next fall — before tomorrow morning.
Zone 1: Entrance & Exterior (0–5 Minutes)
Start outside. The entrance is the first place your parent navigates every time they come home, and it is often neglected in safety checks.
Check for uneven pavement, cracked walkways, or loose stepping stones. These are trip hazards that are easy to miss in daylight and dangerous at dusk.
Ensure outdoor lighting is working and bright enough to illuminate the full path from the car to the door. Replace any burnt-out bulbs immediately.
Look at the threshold. If the door threshold is higher than half an inch, it is a tripping risk. A simple rubber threshold ramp ($20–40) can bridge the gap.
Confirm there is a sturdy handrail on both sides of any exterior steps. If only one rail exists, or if the rail is loose, this is a fix-this-week priority.
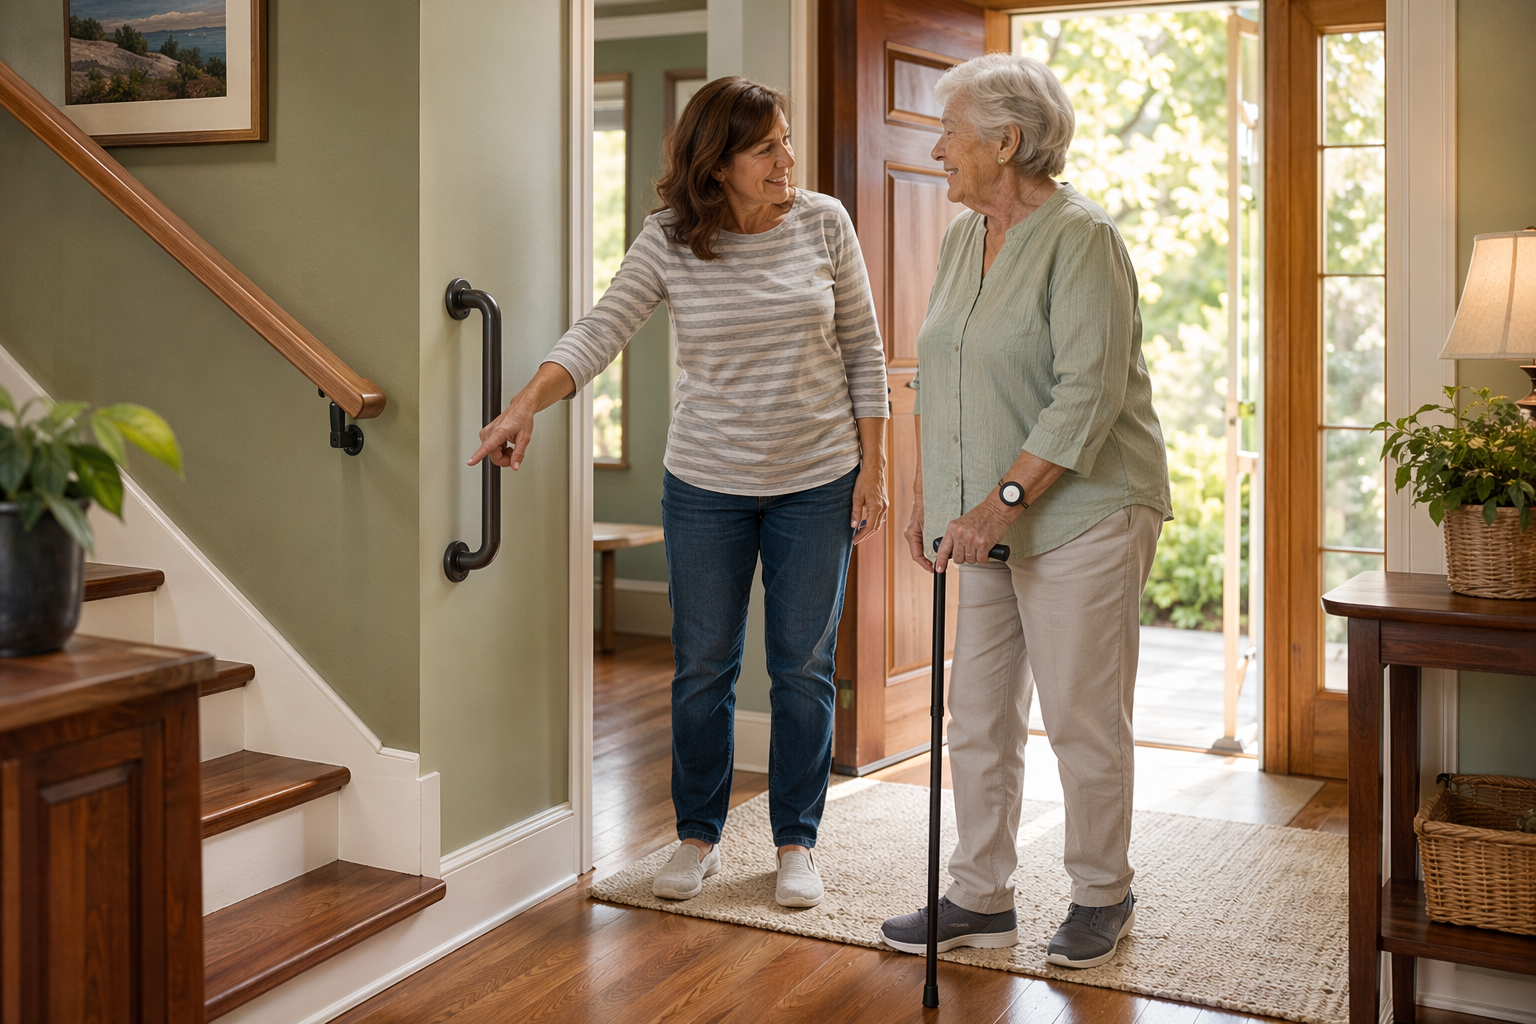
Zone 2: The Bedroom-to-Bathroom Path (5–15 Minutes)
This is the single highest-risk pathway in any home. Most falls happen at night when an older adult gets up to use the bathroom — disoriented, in dim light, and possibly on medication that affects balance.
The bedroom-to-bathroom path at night is the most dangerous route in the home. A nightlight and a clear floor can change that.
Clear the path. Remove any throw rugs, loose cords, shoes, or clutter from the bedroom floor, hallway, and bathroom entrance. Throw rugs are a leading cause of trips — roll them up and store them.
Install nightlights. Place at least two: one in the bedroom near the bed, and one in the hallway leading to the bathroom. Motion-activated nightlights that plug directly into an outlet cost $10–20 and require no wiring.
Check the path for furniture that protrudes into the walking space. A corner of a dresser or a chair that sticks out can catch a hip or a foot. Rearrange furniture to create a straight, unobstructed line from the bed to the bathroom door.
If the hallway is longer than a few feet, consider installing a wall-mounted handrail. A simple 3-foot rail costs $30–60 and can be anchored into wall studs.
Zone 3: The Bathroom — The Highest-Injury Room (15–22 Minutes)
The bathroom combines hard surfaces, water, and the need to sit, stand, and transfer — a perfect storm for falls. This zone deserves the most time because it is where the most serious injuries occur.
Anchored grab bars are safe; suction-only bars are not. The difference is visible in the mounting hardware.
Install anchored grab bars. This is the single most effective modification you can make. Anchored grab bars cost $25–75 per bar plus installation (or a DIY afternoon if you have a stud finder and a drill). Suction-cup grab bars are not safe — they can detach without warning, especially in humid conditions. Install one bar next to the toilet and one inside the shower or tub.
Place a non-slip bath mat or adhesive treads inside the shower or tub. A shower seat ($40–100) allows your parent to sit while bathing, eliminating the need to stand on a wet surface.
Check the toilet height. If the toilet is lower than 17 inches, a raised toilet seat with handles ($30–60) makes sitting and standing significantly safer.
Ensure the bathroom door opens outward or is a pocket door. If your parent falls inside the bathroom, an inward-swinging door can block access for help.
Zone 4: Kitchen & Living Areas (22–26 Minutes)
These are the rooms where your parent spends most of their waking hours. The hazards here are less about wet surfaces and more about reach, clutter, and furniture stability.
Move frequently used items — plates, cups, food staples — to cabinets between waist and shoulder height. Reaching above the shoulders or bending below the knees for everyday items is a common fall trigger.
Secure all area rugs with double-sided carpet tape or remove them entirely. The edges of rugs are a classic trip hazard, especially in doorways.
Check that all chairs and sofas are sturdy and have armrests. A chair without armrests offers no support when standing up. If a favorite chair is too low, add firm seat cushions to raise the sitting height.
Ensure there is a clear, wide pathway through each room — at least 36 inches wide for walker or wheelchair access. Move side tables, magazine racks, and pet bowls out of the main walking path.
Zone 5: Lighting, Footwear & Medication Check (26–30 Minutes)
The final four minutes are about the three factors that silently increase fall risk every single day.
Lighting: Walk through every room and hallway at night. If any area is dim, add a nightlight or replace the bulb with a brighter LED (60-watt equivalent or higher). Light switches should be accessible at room entrances — if they are not, consider plug-in motion-activated lights.
Footwear: Look at what your parent wears around the house. Slippers without backs, socks on hardwood floors, or bare feet are dangerous. Non-slip, closed-toe shoes with rubber soles — even indoor-only walking shoes — reduce slip risk dramatically.
Medication: Gather all prescription bottles and over-the-counter medications. The American Geriatrics Society Beers Criteria identifies several classes of drugs that significantly increase fall risk, including benzodiazepines, sleep medications, and opioids. Do not stop any medication — but make a list to discuss with the doctor in the next step.
What to Fix This Week vs. What Can Wait
Not every hazard needs to be addressed tonight. The table below helps you triage: fix the high-urgency items this week, and plan the lower-urgency items for the next month. This prevents the overwhelm that often derails safety efforts.
Immediate triage priorities for post-fall home safety. Fix high-urgency items this week; plan lower-urgency items for the next month.
Hazard / Issue
Fix This Week
Can Wait (Plan for Next Month)
Estimated Cost / Effort
Throw rugs on bedroom-to-bathroom path
Remove and store immediately
Replace with non-slip mats if needed
$0 (free removal)
Missing or loose grab bars in bathroom
Install anchored grab bars next to toilet and in shower
Add a second bar near the tub if needed
$25–75 per bar + 1 hour DIY or $150–250 for professional install
No nightlight on bedroom-to-bathroom path
Install 2 motion-activated nightlights
Add nightlights to kitchen and hallway
$10–20 per nightlight
Dim or burnt-out exterior lighting
Replace bulbs with bright LEDs
Consider motion-activated floodlight
$5–15 per bulb
Low toilet height
Install raised toilet seat with handles
Consider comfort-height toilet replacement
$30–60 for raised seat; $200–500 for new toilet + install
Frequently used items stored above shoulder or below knee
Move to waist-height cabinets
Reorganize kitchen for long-term accessibility
$0 (reorganization time)
No shower seat or non-slip mat
Place non-slip mat and add shower seat
Consider walk-in tub or curbless shower remodel
$10–20 for mat; $40–100 for shower seat; $2,000–8,000 for remodel
Uneven walkway or high door threshold
Mark hazard with bright tape; install threshold ramp
Repair or repave walkway
$20–40 for threshold ramp; $500–2,000 for walkway repair
Stair handrail missing or loose
Tighten existing rail; install second rail if only one exists
Replace with continuous handrail if needed
$30–60 for rail; $100–300 for professional install
Your 30-minute walkthrough will catch the most obvious hazards, but some risks require a trained eye. Two types of professionals can help.
Occupational Therapist (OT) — Home Safety Evaluation
An OT can perform a comprehensive home safety assessment that goes far beyond what a family walkthrough can achieve. They evaluate how your parent moves through the home, how they transfer from bed to chair to toilet, and how their specific physical limitations interact with the environment. Medicare Part B often covers OT home evaluations as part of home health care if your parent qualifies. For a detailed breakdown of coverage and eligibility, see our Medicare Home Health Care guide.
For modifications that require structural work — installing grab bars into studs, building a ramp, widening doorways, or replacing a tub with a curbless shower — a Certified Aging-in-Place Specialist (CAPS) contractor is the right choice. These professionals are trained in universal design and aging-in-place principles. To decide whether an OT or a CAPS contractor is right for your situation, compare the two roles here.
After the Walkthrough: Your Next Steps
Completing the walkthrough is a major step, but it is not the end. Three follow-up actions will significantly reduce the likelihood of a second fall.
1. Consider a Personal Emergency Response System (PERS)
A PERS device — worn as a pendant or wristband — allows your parent to call for help with the push of a button, even if they cannot reach a phone. This is especially important in the weeks after a fall, when confidence is low and the risk of another fall is highest. Modern systems include automatic fall detection, which can place a call even if your parent is unable to press the button.
2. Schedule a Medication Review with the Doctor
Bring the list of medications you gathered during the walkthrough to your parent's primary care provider. Ask specifically about drugs identified as high-risk by the Beers Criteria — benzodiazepines, sedative-hypnotics, anticholinergics, and opioids. A medication review is one of the three pillars of the multifactorial approach that reduces fall rates by approximately 24%. Do not stop or change any medication without a doctor's guidance.
3. Discuss a Physical Therapy Referral
Balance and strength training are the strongest single-intervention strategies for fall prevention. The Otago Exercise Programme and Tai Chi have the strongest evidence base among exercise interventions. A physical therapist can design a program tailored to your parent's current mobility level and medical history. Medicare Part B covers physical therapy when prescribed by a doctor.
Printable Checklist: Your 30-Minute Walkthrough Guide
Use the checklist below as your quick-reference guide during the walkthrough. Print it out, grab a pen, and check off each item as you go. A downloadable PDF version is available for easy printing and sharing with other family members.
Zone 1 — Entrance & Exterior (0–5 min): Check walkway for cracks; test outdoor lighting; inspect threshold height; confirm handrails on both sides of steps.
Zone 2 — Bedroom-to-Bathroom Path (5–15 min): Remove throw rugs; install nightlights; clear furniture from path; consider wall-mounted handrail.
Zone 3 — Bathroom (15–22 min): Install anchored grab bars; add non-slip mat and shower seat; check toilet height; verify door swings outward.
Zone 4 — Kitchen & Living Areas (22–26 min): Move items to waist-height storage; secure area rugs; check chair stability and armrests; ensure 36-inch clear pathways.
Zone 5 — Lighting, Footwear & Medication (26–30 min): Test all lights at night; assess indoor footwear; gather medications for doctor review.
📄
A printable checklist version of this resource is available. Use your browser's print function (Ctrl+P / ⌘P) to save or print.


Comments
Join the discussion with an anonymous comment.